摘要:针对疫情期间存在的排查实时性差、排查效率低、无法追踪密接者等问题,可以使用基于YOLOv4的行人检测、行人距离估计、多目标跟踪的方案进行解决。
本文分享自华为云社区《基于ModelArts进行流感患者密接排查》,作者:HWCloudAI。
目前流感病毒患者密接难以排查,尤其是在人流量大的区域,进行排查需要消耗大量人力且需要等待。针对疫情期间存在的排查实时性差、排查效率低、无法追踪密接者等问题,可以使用基于YOLOv4的行人检测、行人距离估计、多目标跟踪的方案进行解决。
1)利用行人重识别技术实现流感病毒患者及密接者识别功能;
2)结合Stereo-vision以及YOLO算法实现患者的真实密切接触鉴别;
3)利用SORT多目标跟踪算法绘制出患者及密接者的行动轨迹;
该系统可以有效提高防疫效率,减轻经济与防疫压力,提高安全性。
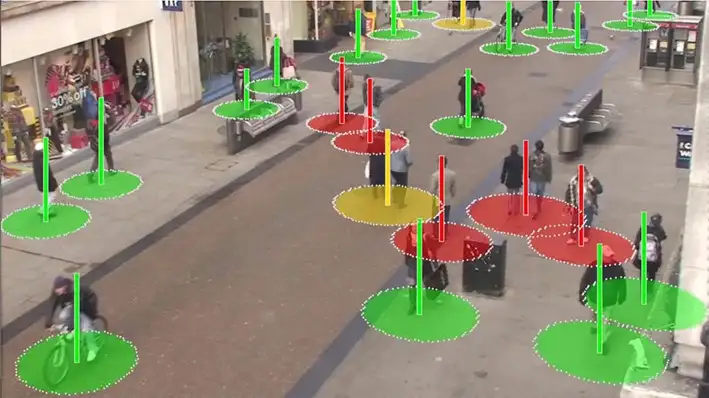
今天将带大家了解 通过华为云ModelArts的 DeepSocial-COVID-19社会距离监测案例实现AI排查新冠密接。
? 点击链接进入到AI Gallery的“DeepSocial-COVID-19社会距离监测”案例页面,点击Run in ModelArts,即可进入ModelArts Jupyter运行环境,此处需要选用GPU的规格。
注:以下步骤所涉及的代码都已经写好,直接点击代码前面的箭头,让其自动运行即可。
# 下载代码和数据
import moxing as mox
mox.file.copy_parallel('obs://obs-aigallery-zc/clf/code/DeepSocial','DeepSocial')
# 引入依赖
from IPython.display import display, Javascript, Image
from base64 import b64decode, b64encode
import os
import cv2
import numpy as np
import PIL
import io
import html
import time
import matplotlib.pyplot as plt
%matplotlib inline需要根据运行环境修改Makefile 如是否有GPU等
如果编译报错:/bin/sh:nvcc not found
解决方式(参考):
1)查看nvcc可执行文件的路径
which nvcc
2)修改Makefile文件中的NVCC=nvcc,把nvcc替换为上面查询到的nvcc可执行文件的路径,如:/usr/local/cuda/bin/nvcc
NVCC=/usr/local/cuda/bin/nvcc
%cd DeepSocial
!make# import darknet functions to perform object detections
from darknet2 import *
# load in our YOLOv4 architecture network
network, class_names, class_colors = load_network("cfg/yolov4.cfg", "cfg/coco.data", "DeepSocial.weights")
width = network_width(network)
height = network_height(network)
# darknet helper function to run detection on image
def darknet_helper(img, width, height):
darknet_image = make_image(width, height, 3)
img_rgb = cv2.cvtColor(img, cv2.COLOR_BGR2RGB)
img_resized = cv2.resize(img_rgb, (width, height),
interpolation=cv2.INTER_LINEAR)
# get image ratios to convert bounding boxes to proper size
img_height, img_width, _ = img.shape
width_ratio = img_width/width
height_ratio = img_height/height
# run model on darknet style image to get detections
copy_image_from_bytes(darknet_image, img_resized.tobytes())
detections = detect_image(network, class_names, darknet_image)
free_image(darknet_image)
return detections, width_ratio, height_ratio!pip install filterpy
from sort import *
mot_tracker = Sort(max_age=25, min_hits=4, iou_threshold=0.3)Input = "OxfordTownCentreDataset.avi" # 需要检测的适配
ReductionFactor = 2 # 采样因子
calibration = [[180,162],[618,0],[552,540],[682,464]] # 相机标定的参数from deepsocial import *
######################## Frame number
StartFrom = 0
EndAt = 500 #-1 for the end of the video
######################## (0:OFF/ 1:ON) Outputs
CouplesDetection = 1 # Enable Couple Detection
DTC = 1 # Detection, Tracking and Couples
SocialDistance = 1
CrowdMap = 1
# MoveMap = 0
# ViolationMap = 0
# RiskMap = 0
######################## Units are Pixel
ViolationDistForIndivisuals = 28
ViolationDistForCouples = 31
####
CircleradiusForIndivsual = 14
CircleradiusForCouples = 17
########################
MembershipDistForCouples = (16 , 10) # (Forward, Behind) per Pixel
MembershipTimeForCouples = 35 # Time for considering as a couple (per Frame)
######################## (0:OFF/ 1:ON)
CorrectionShift = 1 # Ignore people in the margins of the video
HumanHeightLimit = 200 # Ignore people with unusual heights
########################
Transparency = 0.7
######################## Output Video's path
Path_For_DTC = os.getcwd() + "/DeepSOCIAL DTC.mp4"
Path_For_SocialDistance = os.getcwd() + "/DeepSOCIAL Social Distancing.mp4"
Path_For_CrowdMap = os.getcwd() + "/DeepSOCIAL Crowd Map.mp4"
def extract_humans(detections):
detetcted = []
if len(detections) > 0: # At least 1 detection in the image and check detection presence in a frame
idList = []
id = 0
for label, confidence, bbox in detections:
if label == 'person':
xmin, ymin, xmax, ymax = bbox2points(bbox)
id +=1
if id not in idList: idList.append(id)
detetcted.append([int(xmin), int(ymin), int(xmax), int(ymax), idList[-1]])
return np.array(detetcted)
def centroid(detections, image, calibration, _centroid_dict, CorrectionShift, HumanHeightLimit):
e = birds_eye(image.copy(), calibration)
centroid_dict = dict()
now_present = list()
if len(detections) > 0:
for d in detections:
p = int(d[4])
now_present.append(p)
xmin, ymin, xmax, ymax = d[0], d[1], d[2], d[3]
w = xmax - xmin
h = ymax - ymin
x = xmin + w/2
y = ymax - h/2
if h < HumanHeightLimit:
overley = e.image
bird_x, bird_y = e.projection_on_bird((x, ymax))
if CorrectionShift:
if checkupArea(overley, 1, 0.25, (x, ymin)):
continue
e.setImage(overley)
center_bird_x, center_bird_y = e.projection_on_bird((x, ymin))
centroid_dict[p] = (
int(bird_x), int(bird_y),
int(x), int(ymax),
int(xmin), int(ymin), int(xmax), int(ymax),
int(center_bird_x), int(center_bird_y))
_centroid_dict[p] = centroid_dict[p]
return _centroid_dict, centroid_dict, e.image
def ColorGenerator(seed=1, size=10):
np.random.seed = seed
color=dict()
for i in range(size):
h = int(np.random.uniform() *255)
color[i]= h
return color
def VisualiseResult(_Map, e):
Map = np.uint8(_Map)
histMap = e.convrt2Image(Map)
visualBird = cv2.applyColorMap(np.uint8(_Map), cv2.COLORMAP_JET)
visualMap = e.convrt2Image(visualBird)
visualShow = cv2.addWeighted(e.original, 0.7, visualMap, 1 - 0.7, 0)
return visualShow, visualBird, histMapcap = cv2.VideoCapture(Input)
frame_width = int(cap.get(3))
frame_height = int(cap.get(4))
height, width = frame_height // ReductionFactor, frame_width // ReductionFactor
print("Video Reolution: ",(width, height))
if DTC: DTCVid = cv2.VideoWriter(Path_For_DTC, cv2.VideoWriter_fourcc(*'X264'), 30.0, (width, height))
if SocialDistance: SDimageVid = cv2.VideoWriter(Path_For_SocialDistance, cv2.VideoWriter_fourcc(*'X264'), 30.0, (width, height))
if CrowdMap: CrowdVid = cv2.VideoWriter(Path_For_CrowdMap, cv2.VideoWriter_fourcc(*'X264'), 30.0, (width, height))
colorPool = ColorGenerator(size = 3000)
_centroid_dict = dict()
_numberOFpeople = list()
_greenZone = list()
_redZone = list()
_yellowZone = list()
_final_redZone = list()
_relation = dict()
_couples = dict()
_trackMap = np.zeros((height, width, 3), dtype=np.uint8)
_crowdMap = np.zeros((height, width), dtype=np.int)
_allPeople = 0
_counter = 1
frame = 0
while True:
print('-- Frame : {}'.format(frame))
prev_time = time.time()
ret, frame_read = cap.read()
if not ret: break
frame += 1
if frame <= StartFrom: continue
if frame != -1:
if frame > EndAt: break
frame_resized = cv2.resize(frame_read,(width, height), interpolation=cv2.INTER_LINEAR)
image = frame_resized
e = birds_eye(image, calibration)
detections, width_ratio, height_ratio = darknet_helper(image, width, height)
humans = extract_humans(detections)
track_bbs_ids = mot_tracker.update(humans) if len(humans) != 0 else humans
_centroid_dict, centroid_dict, partImage = centroid(track_bbs_ids, image, calibration, _centroid_dict, CorrectionShift, HumanHeightLimit)
redZone, greenZone = find_zone(centroid_dict, _greenZone, _redZone, criteria=ViolationDistForIndivisuals)
if CouplesDetection:
_relation, relation = find_relation(e, centroid_dict, MembershipDistForCouples, redZone, _couples, _relation)
_couples, couples, coupleZone = find_couples(image, _centroid_dict, relation, MembershipTimeForCouples, _couples)
yellowZone, final_redZone, redGroups = find_redGroups(image, centroid_dict, calibration, ViolationDistForCouples, redZone, coupleZone, couples , _yellowZone, _final_redZone)
else:
couples = []
coupleZone = []
yellowZone = []
redGroups = redZone
final_redZone = redZone
if DTC:
DTC_image = image.copy()
_trackMap = Apply_trackmap(centroid_dict, _trackMap, colorPool, 3)
DTC_image = cv2.add(e.convrt2Image(_trackMap), image)
DTCShow = DTC_image
for id, box in centroid_dict.items():
center_bird = box[0], box[1]
if not id in coupleZone:
cv2.rectangle(DTCShow,(box[4], box[5]),(box[6], box[7]),(0,255,0),2)
cv2.rectangle(DTCShow,(box[4], box[5]-13),(box[4]+len(str(id))*10, box[5]),(0,200,255),-1)
cv2.putText(DTCShow,str(id),(box[4]+2, box[5]-2),cv2.FONT_HERSHEY_SIMPLEX,.4,(0,0,0),1,cv2.LINE_AA)
for coupled in couples:
p1 , p2 = coupled
couplesID = couples[coupled]['id']
couplesBox = couples[coupled]['box']
cv2.rectangle(DTCShow, couplesBox[2:4], couplesBox[4:], (0,150,255), 4)
loc = couplesBox[0] , couplesBox[3]
offset = len(str(couplesID)*5)
captionBox = (loc[0] - offset, loc[1]-13), (loc[0] + offset, loc[1])
cv2.rectangle(DTCShow,captionBox[0],captionBox[1],(0,200,255),-1)
wc = captionBox[1][0] - captionBox[0][0]
hc = captionBox[1][1] - captionBox[0][1]
cx = captionBox[0][0] + wc // 2
cy = captionBox[0][1] + hc // 2
textLoc = (cx - offset, cy + 4)
cv2.putText(DTCShow, str(couplesID) ,(textLoc),cv2.FONT_HERSHEY_SIMPLEX,.4,(0,0,0),1,cv2.LINE_AA)
DTCVid.write(DTCShow)
if SocialDistance:
SDimage, birdSDimage = Apply_ellipticBound(centroid_dict, image, calibration, redZone, greenZone, yellowZone, final_redZone, coupleZone, couples, CircleradiusForIndivsual, CircleradiusForCouples)
SDimageVid.write(SDimage)
if CrowdMap:
_crowdMap, crowdMap = Apply_crowdMap(centroid_dict, image, _crowdMap)
crowd = (crowdMap - crowdMap.min()) / (crowdMap.max() - crowdMap.min())*255
crowd_visualShow, crowd_visualBird, crowd_histMap = VisualiseResult(crowd, e)
CrowdVid.write(crowd_visualShow)
cv2.waitKey(3)
print('::: Analysis Completed')
cap.release()
if DTC: DTCVid.release(); print("::: Video Write Completed : ", Path_For_DTC)
if SocialDistance: SDimageVid.release() ; print("::: Video Write Completed : ", Path_For_SocialDistance)
if CrowdMap: CrowdVid.release() ; print("::: Video Write Completed : ", Path_For_CrowdMap)from IPython.display import HTML
outpath = "DeepSOCIAL DTC.mp4"
mp4 = open(outpath,'rb').read()
data_url = "data:video/mp4;base64," + b64encode(mp4).decode()
HTML("""
<video width=400 controls>
<source src="%s" type="video/mp4">
</video>
""" % data_url)<iframe src="https://obs-aigallery-zc.obs.cn-north-4.myhuaweicloud.com/clf/code/DeepSocial/DeepSOCIAL%20DTC.mp4" scrolling="no" border="0" frameborder="no" framespacing="0" allowfullscreen="true" height=450 width=800> </iframe> <iframe src="https://obs-aigallery-zc.obs.cn-north-4.myhuaweicloud.com/clf/code/DeepSocial/DeepSOCIAL%20Social%20Distancing.mp4" scrolling="no" border="0" frameborder="no" framespacing="0" allowfullscreen="true" height=450 width=800> </iframe>
1.使用精确度更高的检测算法YOLOv7,使用追踪效果更好的Deep SORT;
2.使用更多数据进行训练
本次介绍就到这里啦,大家快去Gallery实操一下吧!
很好奇,就使用rubyonrails自动化单元测试而言,你们正在做什么?您是否创建了一个脚本来在cron中运行rake作业并将结果邮寄给您?git中的预提交Hook?只是手动调用?我完全理解测试,但想知道在错误发生之前捕获错误的最佳实践是什么。让我们理所当然地认为测试本身是完美无缺的,并且可以正常工作。下一步是什么以确保他们在正确的时间将可能有害的结果传达给您? 最佳答案 不确定您到底想听什么,但是有几个级别的自动代码库控制:在处理某项功能时,您可以使用类似autotest的内容获得关于哪些有效,哪些无效的即时反馈。要确保您的提
在控制台中反复尝试之后,我想到了这种方法,可以按发生日期对类似activerecord的(Mongoid)对象进行分组。我不确定这是完成此任务的最佳方法,但它确实有效。有没有人有更好的建议,或者这是一个很好的方法?#eventsisanarrayofactiverecord-likeobjectsthatincludeatimeattributeevents.map{|event|#converteventsarrayintoanarrayofhasheswiththedayofthemonthandtheevent{:number=>event.time.day,:event=>ev
我正在编写一个包含C扩展的gem。通常当我写一个gem时,我会遵循TDD的过程,我会写一个失败的规范,然后处理代码直到它通过,等等......在“ext/mygem/mygem.c”中我的C扩展和在gemspec的“扩展”中配置的有效extconf.rb,如何运行我的规范并仍然加载我的C扩展?当我更改C代码时,我需要采取哪些步骤来重新编译代码?这可能是个愚蠢的问题,但是从我的gem的开发源代码树中输入“bundleinstall”不会构建任何native扩展。当我手动运行rubyext/mygem/extconf.rb时,我确实得到了一个Makefile(在整个项目的根目录中),然后当
这是一道面试题,我没有答对,但还是很好奇怎么解。你有N个人的大家庭,分别是1,2,3,...,N岁。你想给你的大家庭拍张照片。所有的家庭成员都排成一排。“我是家里的friend,建议家庭成员安排如下:”1岁的家庭成员坐在这一排的最左边。每两个坐在一起的家庭成员的年龄相差不得超过2岁。输入:整数N,1≤N≤55。输出:摄影师可以拍摄的照片数量。示例->输入:4,输出:4符合条件的数组:[1,2,3,4][1,2,4,3][1,3,2,4][1,3,4,2]另一个例子:输入:5输出:6符合条件的数组:[1,2,3,4,5][1,2,3,5,4][1,2,4,3,5][1,2,4,5,3][
我已经构建了一些serverspec代码来在多个主机上运行一组测试。问题是当任何测试失败时,测试会在当前主机停止。即使测试失败,我也希望它继续在所有主机上运行。Rakefile:namespace:specdotask:all=>hosts.map{|h|'spec:'+h.split('.')[0]}hosts.eachdo|host|begindesc"Runserverspecto#{host}"RSpec::Core::RakeTask.new(host)do|t|ENV['TARGET_HOST']=hostt.pattern="spec/cfengine3/*_spec.r
我们的git存储库中目前有一个Gemfile。但是,有一个gem我只在我的环境中本地使用(我的团队不使用它)。为了使用它,我必须将它添加到我们的Gemfile中,但每次我checkout到我们的master/dev主分支时,由于与跟踪的gemfile冲突,我必须删除它。我想要的是类似Gemfile.local的东西,它将继承从Gemfile导入的gems,但也允许在那里导入新的gems以供使用只有我的机器。此文件将在.gitignore中被忽略。这可能吗? 最佳答案 设置BUNDLE_GEMFILE环境变量:BUNDLE_GEMFI
这似乎非常适得其反,因为太多的gem会在window上破裂。我一直在处理很多mysql和ruby-mysqlgem问题(gem本身发生段错误,一个名为UnixSocket的类显然在Windows机器上不能正常工作,等等)。我只是在浪费时间吗?我应该转向不同的脚本语言吗? 最佳答案 我在Windows上使用Ruby的经验很少,但是当我开始使用Ruby时,我是在Windows上,我的总体印象是它不是Windows原生系统。因此,在主要使用Windows多年之后,开始使用Ruby促使我切换回原来的系统Unix,这次是Linux。Rub
导读:随着叮咚买菜业务的发展,不同的业务场景对数据分析提出了不同的需求,他们希望引入一款实时OLAP数据库,构建一个灵活的多维实时查询和分析的平台,统一数据的接入和查询方案,解决各业务线对数据高效实时查询和精细化运营的需求。经过调研选型,最终引入ApacheDoris作为最终的OLAP分析引擎,Doris作为核心的OLAP引擎支持复杂地分析操作、提供多维的数据视图,在叮咚买菜数十个业务场景中广泛应用。作者|叮咚买菜资深数据工程师韩青叮咚买菜创立于2017年5月,是一家专注美好食物的创业公司。叮咚买菜专注吃的事业,为满足更多人“想吃什么”而努力,通过美好食材的供应、美好滋味的开发以及美食品牌的孵
C#实现简易绘图工具一.引言实验目的:通过制作窗体应用程序(C#画图软件),熟悉基本的窗体设计过程以及控件设计,事件处理等,熟悉使用C#的winform窗体进行绘图的基本步骤,对于面向对象编程有更加深刻的体会.Tutorial任务设计一个具有基本功能的画图软件**·包括简单的新建文件,保存,重新绘图等功能**·实现一些基本图形的绘制,包括铅笔和基本形状等,学习橡皮工具的创建**·设计一个合理舒适的UI界面**注明:你可能需要先了解一些关于winform窗体应用程序绘图的基本知识,以及关于GDI+类和结构的知识二.实验环境Windows系统下的visualstudio2017C#窗体应用程序三.
需求:要创建虚拟机,就需要给他提供一个虚拟的磁盘,我们就在/opt目录下创建一个10G大小的raw格式的虚拟磁盘CentOS-7-x86_64.raw命令格式:qemu-imgcreate-f磁盘格式磁盘名称磁盘大小qemu-imgcreate-f磁盘格式-o?1.创建磁盘qemu-imgcreate-fraw/opt/CentOS-7-x86_64.raw10G执行效果#ls/opt/CentOS-7-x86_64.raw2.安装虚拟机使用virt-install命令,基于我们提供的系统镜像和虚拟磁盘来创建一个虚拟机,另外在创建虚拟机之前,提前打开vnc客户端,在创建虚拟机的时候,通过vnc