文章目录
选取经典的早期Pytorch官方实现代码进行分析
https://github.com/pytorch/vision/blob/9a481d0bec2700763a799ff148fe2e083b575441/torchvision/models/resnet.py
各种ResNet网络是由BasicBlock或者bottleneck构成的,它们是构成深度残差网络的基本模块
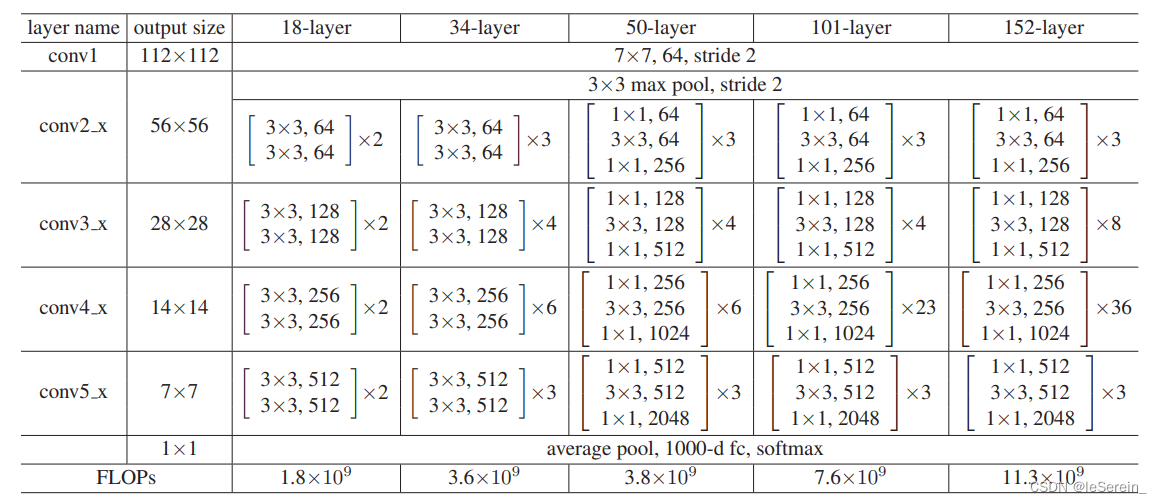
ResNet的大部分各种结构是1层conv+4个block+1层fc
class ResNet(nn.Module):

    def __init__(self, block, layers, zero_init_residual=False):
        super(ResNet, self).__init__()
        self.inplanes = 64
        self.conv1 = nn.Conv2d(3, 64, kernel_size=7, stride=2, padding=3,
                               bias=False)
        self.bn1 = nn.BatchNorm2d(64)
        self.relu = nn.ReLU(inplace=True)
        self.maxpool = nn.MaxPool2d(kernel_size=3, stride=2, padding=1)
        self.layer1 = self._make_layer(block, 64, layers[0])
        self.layer2 = self._make_layer(block, 128, layers[1], stride=2)
        self.layer3 = self._make_layer(block, 256, layers[2], stride=2)
        self.layer4 = self._make_layer(block, 512, layers[3], stride=2)
		self.avgpool = nn.AdaptiveAvgPool2d((1, 1))
        self.fc = nn.Linear(512 * block.expansion, num_classes)
        for m in self.modules():
            if isinstance(m, nn.Conv2d):
                nn.init.kaiming_normal_(m.weight, mode='fan_out', nonlinearity='relu')
            elif isinstance(m, nn.BatchNorm2d):
                nn.init.constant_(m.weight, 1)
                nn.init.constant_(m.bias, 0)

        # Zero-initialize the last BN in each residual branch,
        # so that the residual branch starts with zeros, and each residual block behaves like an identity.
        # This improves the model by 0.2~0.3% according to https://arxiv.org/abs/1706.02677
        if zero_init_residual:
            for m in self.modules():
                if isinstance(m, Bottleneck):
                    nn.init.constant_(m.bn3.weight, 0)
                elif isinstance(m, BasicBlock):
                    nn.init.constant_(m.bn2.weight, 0)

    def _make_layer(self, block, planes, blocks, stride=1):
        downsample = None
        if stride != 1 or self.inplanes != planes * block.expansion:
         # normly happened when stride = 2
            downsample = nn.Sequential(
                conv1x1(self.inplanes, planes * block.expansion, stride),
                nn.BatchNorm2d(planes * block.expansion),
            )

        layers = []
        layers.append(block(self.inplanes, planes, stride, downsample))
        self.inplanes = planes * block.expansion
        for _ in range(1, blocks):
        # only the first block need downsample thus there is no downsample and stride = 2
            layers.append(block(self.inplanes, planes))

        return nn.Sequential(*layers)

    def forward(self, x):
        x = self.conv1(x)
        x = self.bn1(x)
        x = self.relu(x)
        x = self.maxpool(x)

        c2 = self.layer1(x)
        c3 = self.layer2(c2)
        c4 = self.layer3(c3)
        c5 = self.layer4(c4)
        x = self.avgpool(x)
        x = x.view(x.size(0), -1)
        x = self.fc(x)
        return c5
需要注意的是最后的avgpool是全局的平均池化
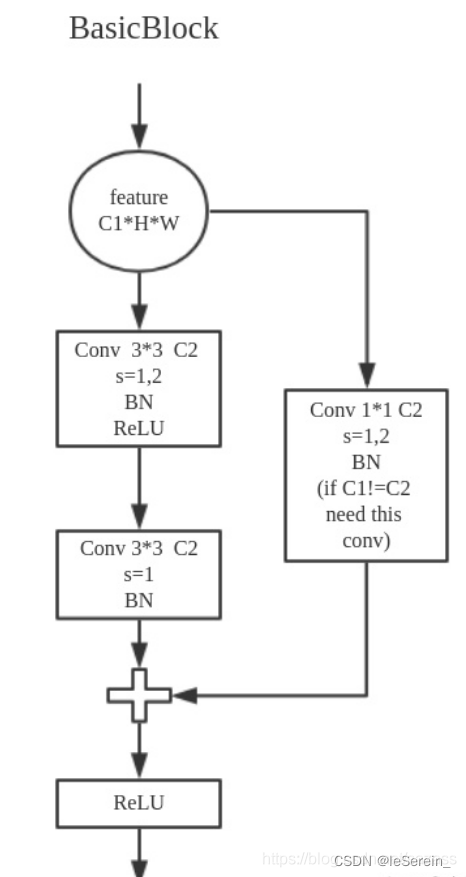
class BasicBlock(nn.Module):
    expansion = 1

    def __init__(self, inplanes, planes, stride=1, downsample=None):
    	# here planes names channel number
        super(BasicBlock, self).__init__()
        self.conv1 = conv3x3(inplanes, planes, stride)
        self.bn1 = nn.BatchNorm2d(planes)
        self.relu = nn.ReLU(inplace=True)
        self.conv2 = conv3x3(planes, planes)
        self.bn2 = nn.BatchNorm2d(planes)
        self.downsample = downsample
        self.stride = stride

    def forward(self, x):
        identity = x

        out = self.conv1(x)
        out = self.bn1(out)
        out = self.relu(out)

        out = self.conv2(out)
        out = self.bn2(out)

        if self.downsample is not None:
            identity = self.downsample(x)

        out += identity
        out = self.relu(out)

        return out
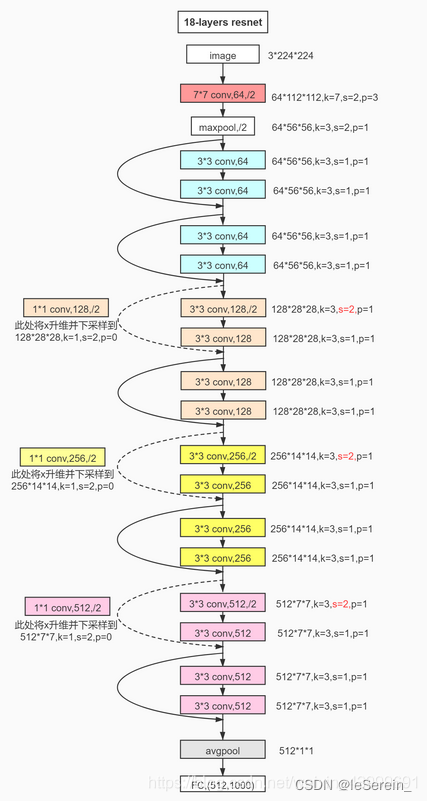
对应的就是[2,2,2,2]
def resnet18(pretrained=False, **kwargs):
    """Constructs a ResNet-18 model.

    Args:
        pretrained (bool): If True, returns a model pre-trained on ImageNet
    """
    model = ResNet(BasicBlock, [2, 2, 2, 2], **kwargs)
    if pretrained:
        print('Loading the pretrained model ...')
        # strict = False as we don't need fc layer params.
        model.load_state_dict(model_zoo.load_url(model_urls['resnet18']), strict=False)
    return model
def resnet34(pretrained=False, **kwargs):
    """Constructs a ResNet-34 model.

    Args:
        pretrained (bool): If True, returns a model pre-trained on ImageNet
    """
    model = ResNet(BasicBlock, [3, 4, 6, 3], **kwargs)
    if pretrained:
        print('Loading the pretrained model ...')
        model.load_state_dict(model_zoo.load_url(model_urls['resnet34']), strict=False)
    return model
这个需要强调一下,正常的ResNet20应该是文章中提出,针对cifar数据集设计的n=3时候, 1+6*3+1=20
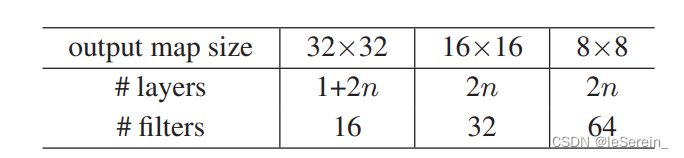
class ResNet4Cifar(nn.Module):
    def __init__(self, block, num_block, num_classes=10):
        super().__init__()
        self.in_channels = 16
        self.conv1 = nn.Sequential(
            nn.Conv2d(3, 16, kernel_size=3, padding=1, bias=False),
            nn.BatchNorm2d(16),
            nn.ReLU(inplace=True))
        # we use a different inputsize than the original paper
        # so conv2_x's stride is 1
        self.conv2_x = self._make_layer(block, 16, num_block[0], 1)
        self.conv3_x = self._make_layer(block, 32, num_block[1], 2)
        self.conv4_x = self._make_layer(block, 64, num_block[2], 2)
        self.avg_pool = nn.AdaptiveAvgPool2d((1, 1))
        self.fc = nn.Linear(64 * block.expansion, num_classes)

    def _make_layer(self, block, out_channels, num_blocks, stride):
        strides = [stride] + [1] * (num_blocks - 1)
        layers = []
        for stride in strides:
            layers.append(block(self.in_channels, out_channels, stride))
            self.in_channels = out_channels * block.expansion
        return nn.Sequential(*layers)

    def forward(self, x):
        output = self.conv1(x)
        output = self.conv2_x(output)
        output = self.conv3_x(output)
        output = self.conv4_x(output)
        output = self.avg_pool(output)
        output = output.view(output.size(0), -1)
        output = self.fc(output)
        return output

def resnet20(num_classes=10, **kargs):
    """ return a ResNet 20 object
    """
    return ResNet4Cifar(BasicBlock, [3, 3, 3], num_classes=num_classes)
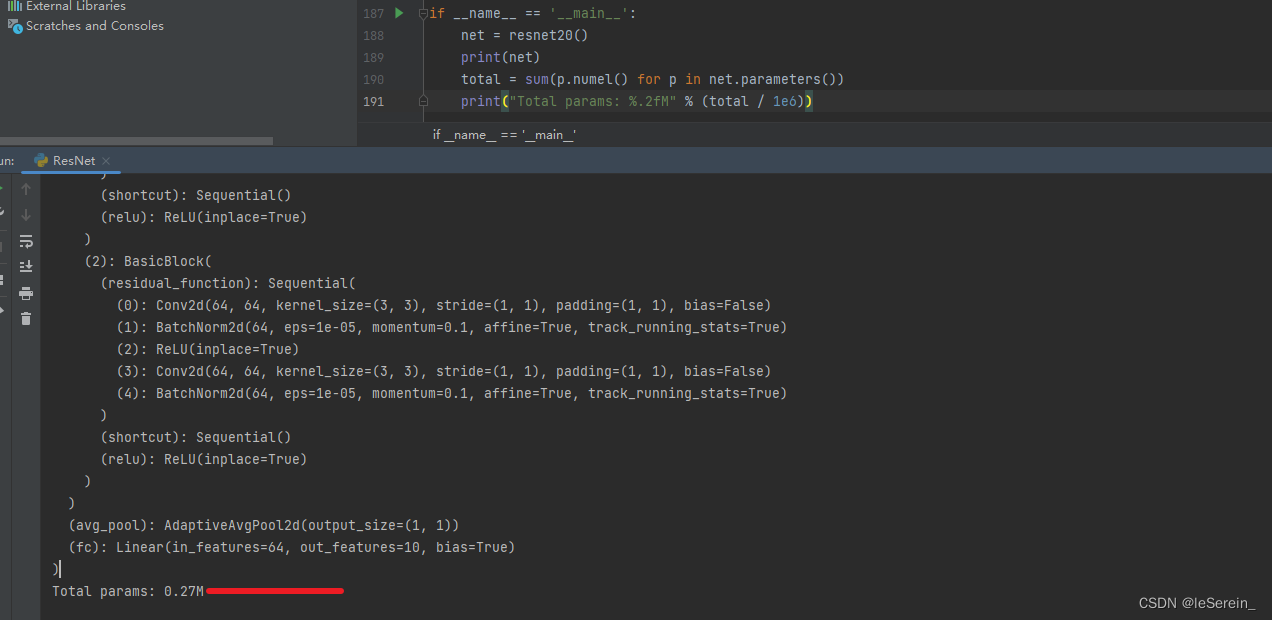
我们通过参数量的计算也为0.27M,和论文中的一致,对[1,3,32,32]的输入,输出维度为[1,64,8,8]
但是也有一些文章只换了开头三层的3x3卷积层,通道数并没有采用16、32、64,仍是4层的64、128、256、512
,这样下来参数量是11.25M。针对的任务不同,但是如果不关注原始网络结构,这一点可以忽略。
Bottleneck Block中使用了1×1卷积层。如输入通道数为256,1×1卷积层会将通道数先降为64,经过3×3卷积层后,再将通道数升为256。1×1卷积层的优势是在更深的网络中,用较小的参数量处理通道数很大的输入。
这种结构用在ResNet50、ResNet101中。

class Bottleneck(nn.Module):
    expansion = 4

    def __init__(self, inplanes, planes, stride=1, downsample=None):
        super(Bottleneck, self).__init__()
        self.conv1 = conv1x1(inplanes, planes)
        self.bn1 = nn.BatchNorm2d(planes)
        self.conv2 = conv3x3(planes, planes, stride)
        self.bn2 = nn.BatchNorm2d(planes)
        self.conv3 = conv1x1(planes, planes * self.expansion)
        self.bn3 = nn.BatchNorm2d(planes * self.expansion)
        self.relu = nn.ReLU(inplace=True)
        self.downsample = downsample
        self.stride = stride

    def forward(self, x):
        identity = x

        out = self.conv1(x)
        out = self.bn1(out)
        out = self.relu(out)

        out = self.conv2(out)
        out = self.bn2(out)
        out = self.relu(out)

        out = self.conv3(out)
        out = self.bn3(out)

        if self.downsample is not None:
            identity = self.downsample(x)

        out += identity
        out = self.relu(out)

        return out
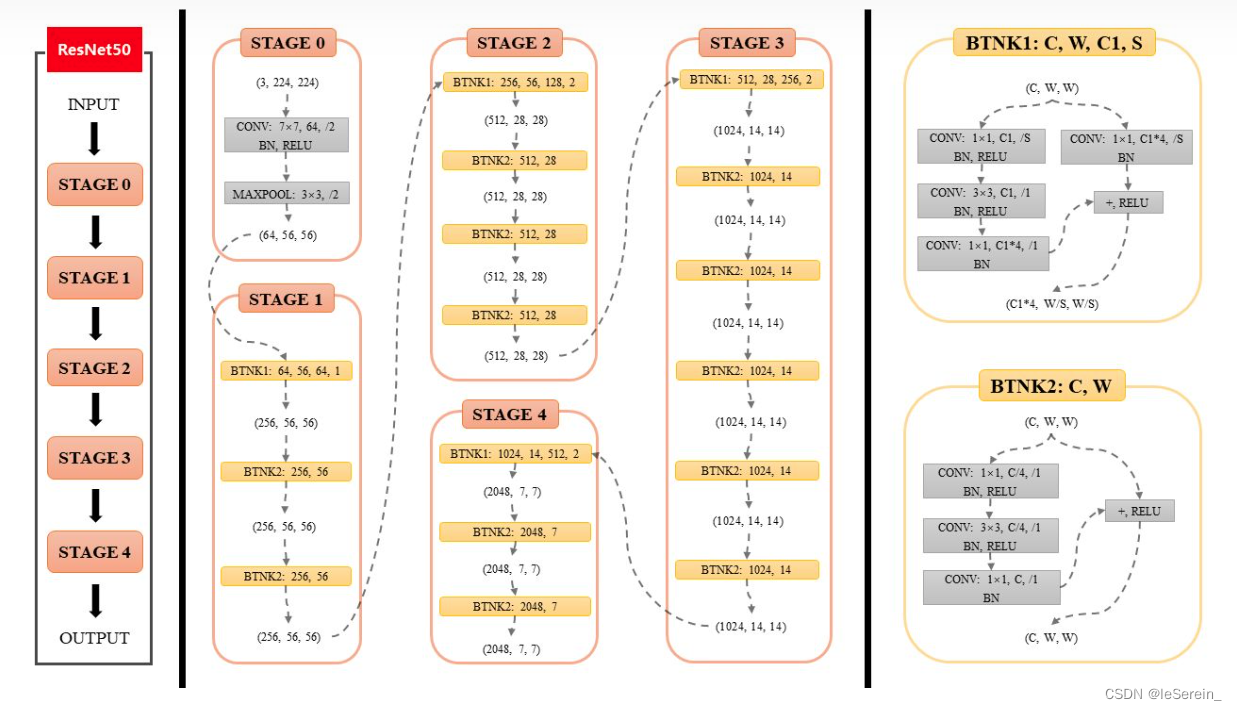
和以上的网络结构一样,把Bottleneck按层数堆起来就可以了
def resnet50(pretrained=False, **kwargs):
    """Constructs a ResNet-50 model.

    Args:
        pretrained (bool): If True, returns a model pre-trained on ImageNet
    """
    model = ResNet(Bottleneck, [3, 4, 6, 3], **kwargs)
    if pretrained:
        print('Loading the pretrained model ...')
        model.load_state_dict(model_zoo.load_url(model_urls['resnet50']), strict=False)
    return model
推荐看知乎问题Resnet到底在解决一个什么问题呢?
贴一些我比较喜欢的回答:
A. 对于 L L L层的网络来说,没有残差表示的Plain Net梯度相关性的衰减在 1 2 L \frac{1}{2^L} 2L1 ,而ResNet的衰减却只有 1 L \frac{1}{\sqrt{L}} L1 。即使BN过后梯度的模稳定在了正常范围内,但梯度的相关性实际上是随着层数增加持续衰减的。而经过证明,ResNet可以有效减少这种相关性的衰减。
B. 对于“梯度弥散”观点来说,在输出引入一个输入x的恒等映射,则梯度也会对应地引入一个常数1,这样的网络的确不容易出现梯度值异常,在某种意义上,起到了稳定梯度的作用。
C. 跳连接相加可以实现不同分辨率特征的组合,因为浅层容易有高分辨率但是低级语义的特征,而深层的特征有高级语义,但分辨率就很低了。引入跳接实际上让模型自身有了更加“灵活”的结构,即在训练过程本身,模型可以选择在每一个部分是“更多进行卷积与非线性变换”还是“更多倾向于什么都不做”,抑或是将两者结合。模型在训练便可以自适应本身的结构。3
D. 当使用了残差网络时,就是加入了skip connection 结构,这时候由一个building block 的任务由: F(x) := H(x),变成了F(x) := H(x)-x对比这两个待拟合的函数, 拟合残差图更容易优化,也就是说:F(x) := H(x)-x比F(x) := H(x)更容易优化4. 举了一个差分放大器的例子:F是求和前网络映射,H是从输入到求和后的网络映射。比如把5映射到5.1,那么引入残差前是F’(5)=5.1,引入残差后是H(5)=5.1, H(5)=F(5)+5, F(5)=0.1。这里的F’和F都表示网络参数映射,引入残差后的映射对输出的变化更敏感。比如s输出从5.1变到5.2,映射F’的输出增加了1/51=2%,而对于残差结构输出从5.1到5.2,映射F是从0.1到0.2,增加了100%。明显后者输出变化对权重的调整作用更大,所以效果更好。残差的思想都是去掉相同的主体部分,从而突出微小的变化。
说法众多,好用就完事儿了嗷~
我正在使用i18n从头开始构建一个多语言网络应用程序,虽然我自己可以处理一大堆yml文件,但我说的语言(非常)有限,最终我想寻求外部帮助帮助。我想知道这里是否有人在使用UI插件/gem(与django上的django-rosetta不同)来处理多个翻译器,其中一些翻译器不愿意或无法处理存储库中的100多个文件,处理语言数据。谢谢&问候,安德拉斯(如果您已经在rubyonrails-talk上遇到了这个问题,我们深表歉意) 最佳答案 有一个rails3branchofthetolkgem在github上。您可以通过在Gemfi
我正在尝试测试是否存在表单。我是Rails新手。我的new.html.erb_spec.rb文件的内容是:require'spec_helper'describe"messages/new.html.erb"doit"shouldrendertheform"dorender'/messages/new.html.erb'reponse.shouldhave_form_putting_to(@message)with_submit_buttonendendView本身,new.html.erb,有代码:当我运行rspec时,它失败了:1)messages/new.html.erbshou
我在从html页面生成PDF时遇到问题。我正在使用PDFkit。在安装它的过程中,我注意到我需要wkhtmltopdf。所以我也安装了它。我做了PDFkit的文档所说的一切......现在我在尝试加载PDF时遇到了这个错误。这里是错误:commandfailed:"/usr/local/bin/wkhtmltopdf""--margin-right""0.75in""--page-size""Letter""--margin-top""0.75in""--margin-bottom""0.75in""--encoding""UTF-8""--margin-left""0.75in""-
我看到这个错误:translationmissing:da.datetime.distance_in_words.about_x_hours我的语言环境文件:http://pastie.org/2944890我的看法:我已将其添加到我的application.rb中:config.i18n.load_path+=Dir[Rails.root.join('my','locales','*.{rb,yml}').to_s]config.i18n.default_locale=:da如果我删除I18配置,帮助程序会处理英语。更新:我在config/enviorments/devolpment
为了将Cucumber用于命令行脚本,我按照提供的说明安装了arubagem。它在我的Gemfile中,我可以验证是否安装了正确的版本并且我已经包含了require'aruba/cucumber'在'features/env.rb'中为了确保它能正常工作,我写了以下场景:@announceScenario:Testingcucumber/arubaGivenablankslateThentheoutputfrom"ls-la"shouldcontain"drw"假设事情应该失败。它确实失败了,但失败的原因是错误的:@announceScenario:Testingcucumber/ar
我遵循MichaelHartl的“RubyonRails教程:学习Web开发”,并创建了检查用户名和电子邮件长度有效性的测试(名称最多50个字符,电子邮件最多255个字符)。test/helpers/application_helper_test.rb的内容是:require'test_helper'classApplicationHelperTest在运行bundleexecraketest时,所有测试都通过了,但我看到以下消息在最后被标记为错误:ERROR["test_full_title_helper",ApplicationHelperTest,1.820016791]test
我正在尝试从Postgresql表(table1)中获取数据,该表由另一个相关表(property)的字段(table2)过滤。在纯SQL中,我会这样编写查询:SELECT*FROMtable1JOINtable2USING(table2_id)WHEREtable2.propertyLIKE'query%'这工作正常:scope:my_scope,->(query){includes(:table2).where("table2.property":query)}但我真正需要的是使用LIKE运算符进行过滤,而不是严格相等。然而,这是行不通的:scope:my_scope,->(que
我正在尝试编写一个将文件上传到AWS并公开该文件的Ruby脚本。我做了以下事情:s3=Aws::S3::Resource.new(credentials:Aws::Credentials.new(KEY,SECRET),region:'us-west-2')obj=s3.bucket('stg-db').object('key')obj.upload_file(filename)这似乎工作正常,除了该文件不是公开可用的,而且我无法获得它的公共(public)URL。但是当我登录到S3时,我可以正常查看我的文件。为了使其公开可用,我将最后一行更改为obj.upload_file(file
当我尝试安装Ruby时遇到此错误。我试过查看this和this但无济于事➜~brewinstallrubyWarning:YouareusingOSX10.12.Wedonotprovidesupportforthispre-releaseversion.Youmayencounterbuildfailuresorotherbreakages.Pleasecreatepull-requestsinsteadoffilingissues.==>Installingdependenciesforruby:readline,libyaml,makedepend==>Installingrub
如果我使用ruby版本2.5.1和Rails版本2.3.18会怎样?我有基于rails2.3.18和ruby1.9.2p320构建的rails应用程序,我只想升级ruby的版本,而不是rails,这可能吗?我必须面对哪些挑战? 最佳答案 GitHub维护apublicfork它有针对旧Rails版本的分支,有各种变化,它们一直在运行。有一段时间,他们在较新的Ruby版本上运行较旧的Rails版本,而不是最初支持的版本,因此您可能会发现一些关于需要向后移植的有用提示。不过,他们现在已经有几年没有使用2.3了,所以充其量只能让更