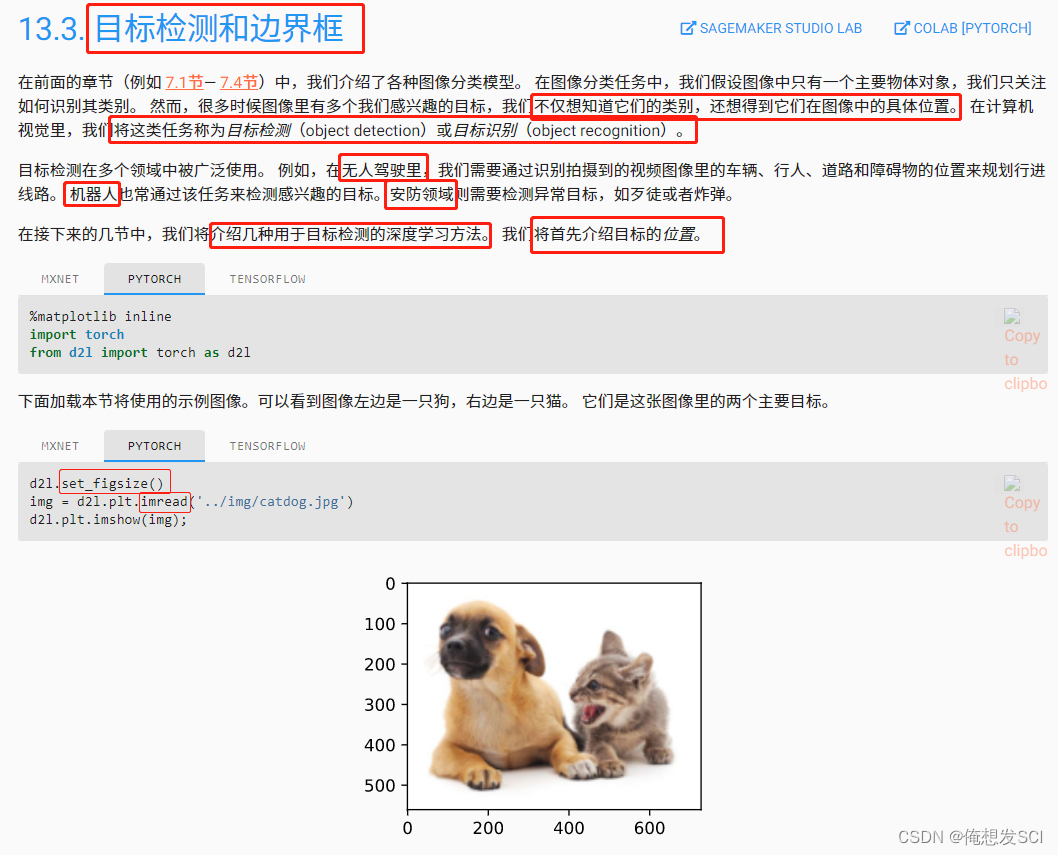
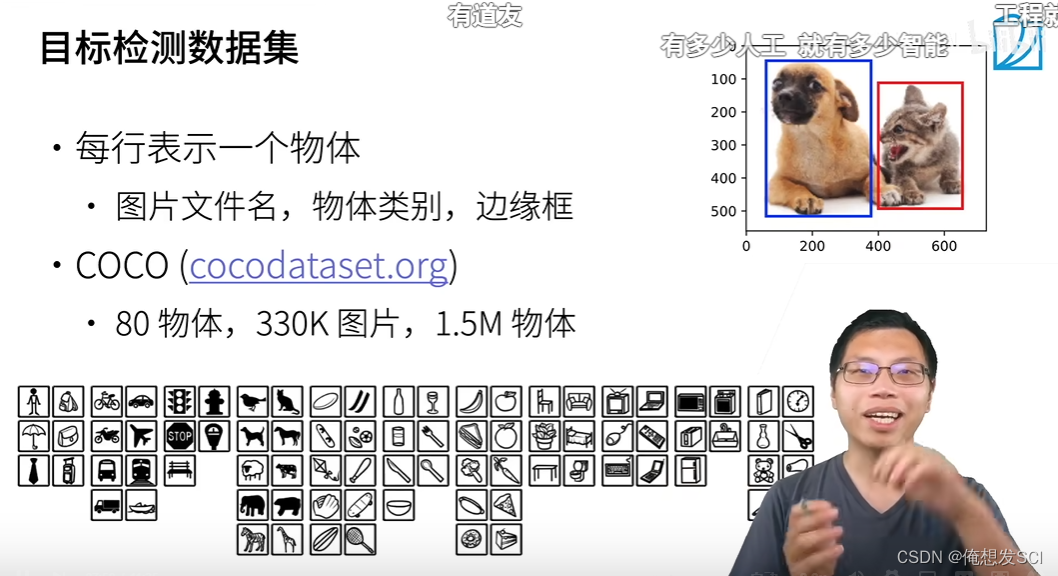
d2l.set_figsize()
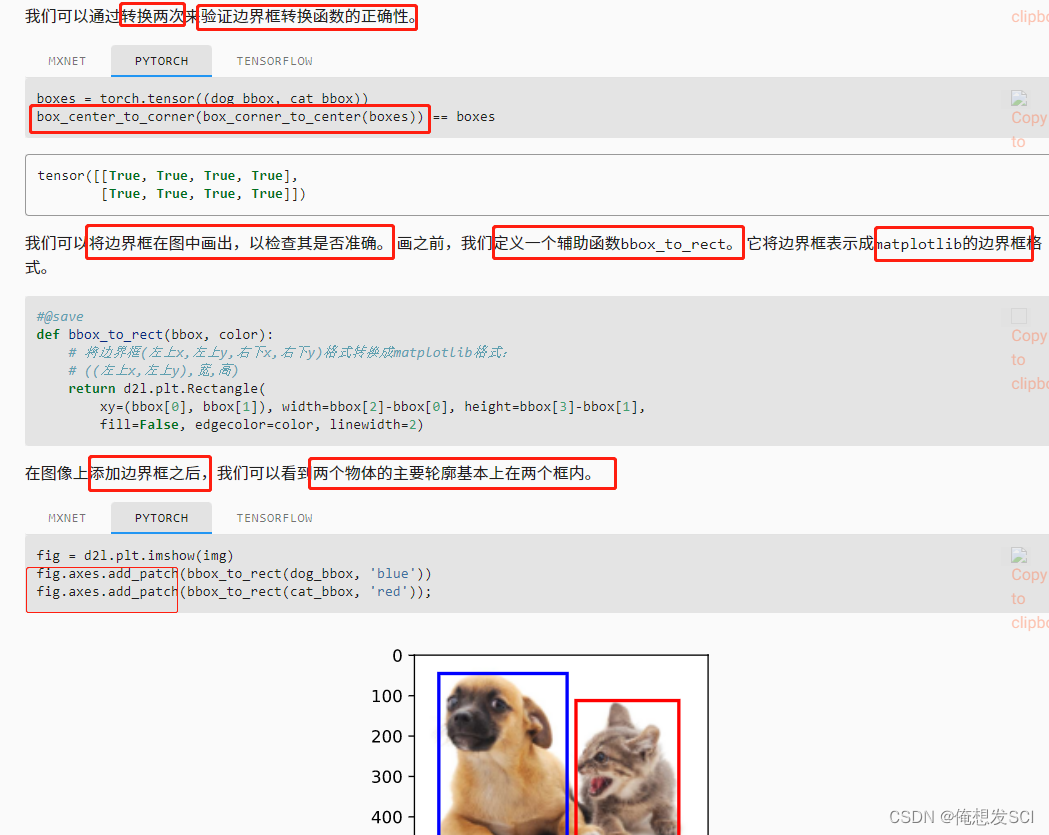
return d2l.plt.Rectangle(
        xy=(bbox[0], bbox[1]), width=bbox[2]-bbox[0], height=bbox[3]-bbox[1],
        fill=False, edgecolor=color, linewidth=2)
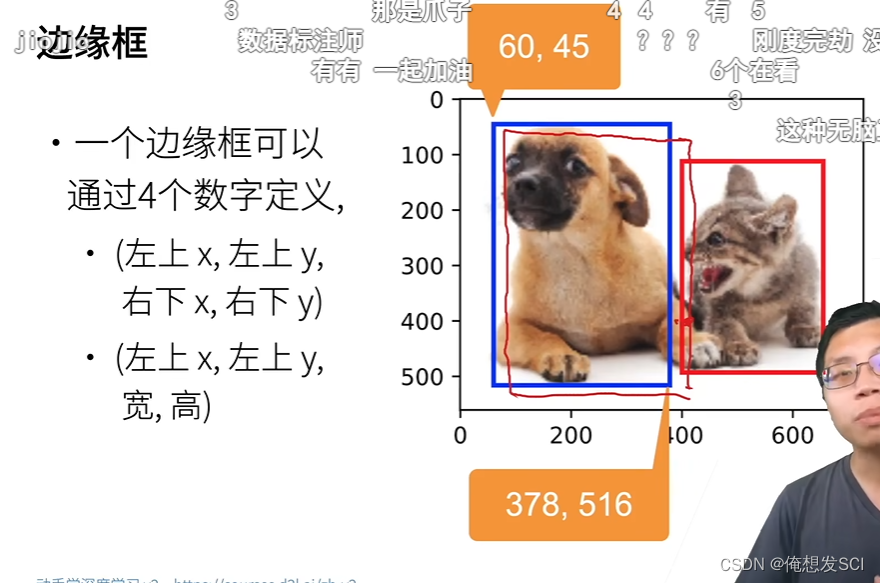
坐上的xy 高宽
fig = d2l.plt.imshow(img)
fig.axes.add_patch(bbox_to_rect(dog_bbox, 'blue'))
fig.axes.add_patch(bbox_to_rect(cat_bbox, 'red'));


Q:有哪些标注软件/平台推荐?
A:弹幕上说的:Labeling,Makesense,Vott 等。也可以自己标注,使用半监督学习,迁移学习等。
更多QA


图片错啦 不是Python

np.set_printoptions(2)  # 精简输出精度
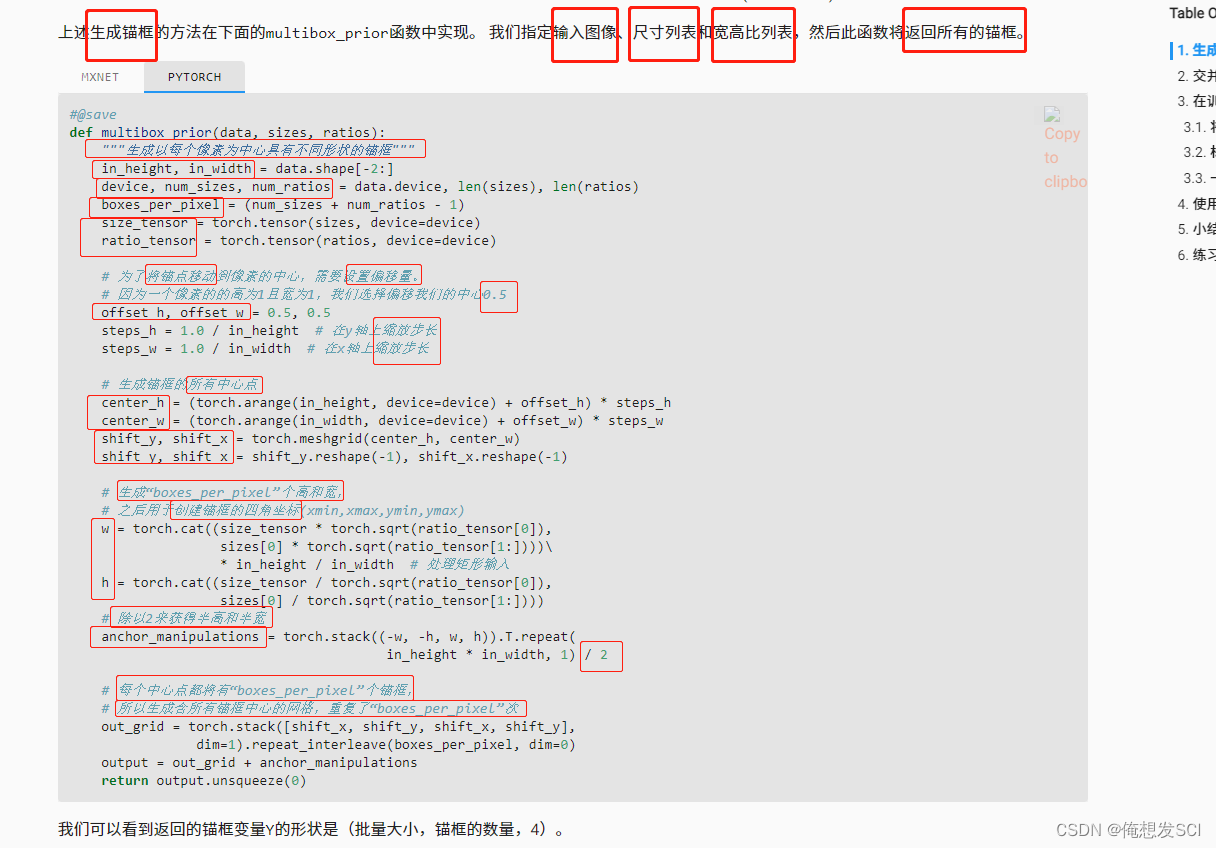
def multibox_prior(data, sizes, ratios):
    """生成以每个像素为中心具有不同形状的锚框"""
    in_height, in_width = data.shape[-2:]
    device, num_sizes, num_ratios = data.device, len(sizes), len(ratios)
    boxes_per_pixel = (num_sizes + num_ratios - 1)
    size_tensor = torch.tensor(sizes, device=device)
    ratio_tensor = torch.tensor(ratios, device=device)

    # 为了将锚点移动到像素的中心,需要设置偏移量。
    # 因为一个像素的的高为1且宽为1,我们选择偏移我们的中心0.5
    offset_h, offset_w = 0.5, 0.5
    steps_h = 1.0 / in_height  # 在y轴上缩放步长
    steps_w = 1.0 / in_width  # 在x轴上缩放步长

    # 生成锚框的所有中心点
    center_h = (torch.arange(in_height, device=device) + offset_h) * steps_h
    center_w = (torch.arange(in_width, device=device) + offset_w) * steps_w
    shift_y, shift_x = torch.meshgrid(center_h, center_w)
    shift_y, shift_x = shift_y.reshape(-1), shift_x.reshape(-1)

    # 生成“boxes_per_pixel”个高和宽,
    # 之后用于创建锚框的四角坐标(xmin,xmax,ymin,ymax)
    w = torch.cat((size_tensor * torch.sqrt(ratio_tensor[0]),
                   sizes[0] * torch.sqrt(ratio_tensor[1:])))\
                   * in_height / in_width  # 处理矩形输入
    h = torch.cat((size_tensor / torch.sqrt(ratio_tensor[0]),
                   sizes[0] / torch.sqrt(ratio_tensor[1:])))
    # 除以2来获得半高和半宽
    anchor_manipulations = torch.stack((-w, -h, w, h)).T.repeat(
                                        in_height * in_width, 1) / 2

    # 每个中心点都将有“boxes_per_pixel”个锚框,
    # 所以生成含所有锚框中心的网格,重复了“boxes_per_pixel”次
    out_grid = torch.stack([shift_x, shift_y, shift_x, shift_y],
                dim=1).repeat_interleave(boxes_per_pixel, dim=0)
    output = out_grid + anchor_manipulations
    return output.unsqueeze(0)
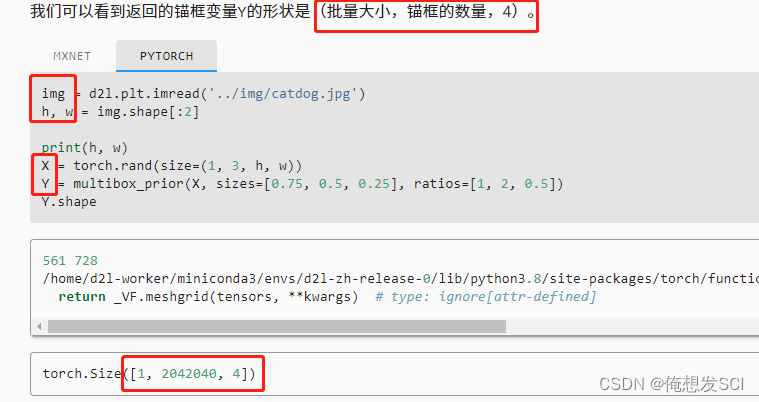
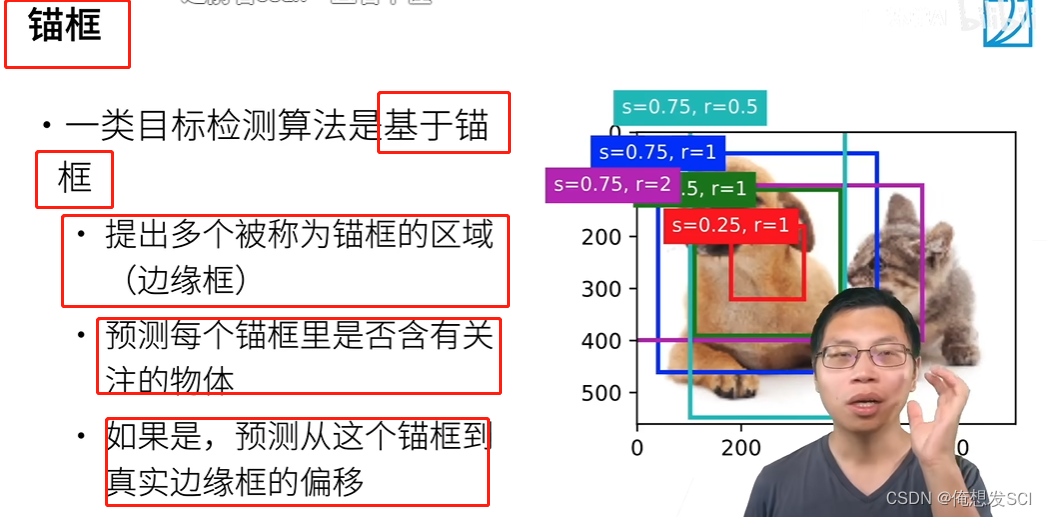
img = d2l.plt.imread('../img/catdog.jpg')
h, w = img.shape[:2]

print(h, w)
X = torch.rand(size=(1, 3, h, w))   批量大小1  rgb无所谓
Y = multibox_prior(X, sizes=[0.75, 0.5, 0.25], ratios=[1, 2, 0.5])
                          磨框是百分之75 50 25        1:1 2:1 1:2
Y.shape
561 728图片 十几万像素
批量1 204两百万个磨框 4是每个磨框的位置
boxes = Y.reshape(h, w, 5, 4) 生产五个这样子的磨框 3+3-1
boxes[250, 250, 0, :]   :是坐标
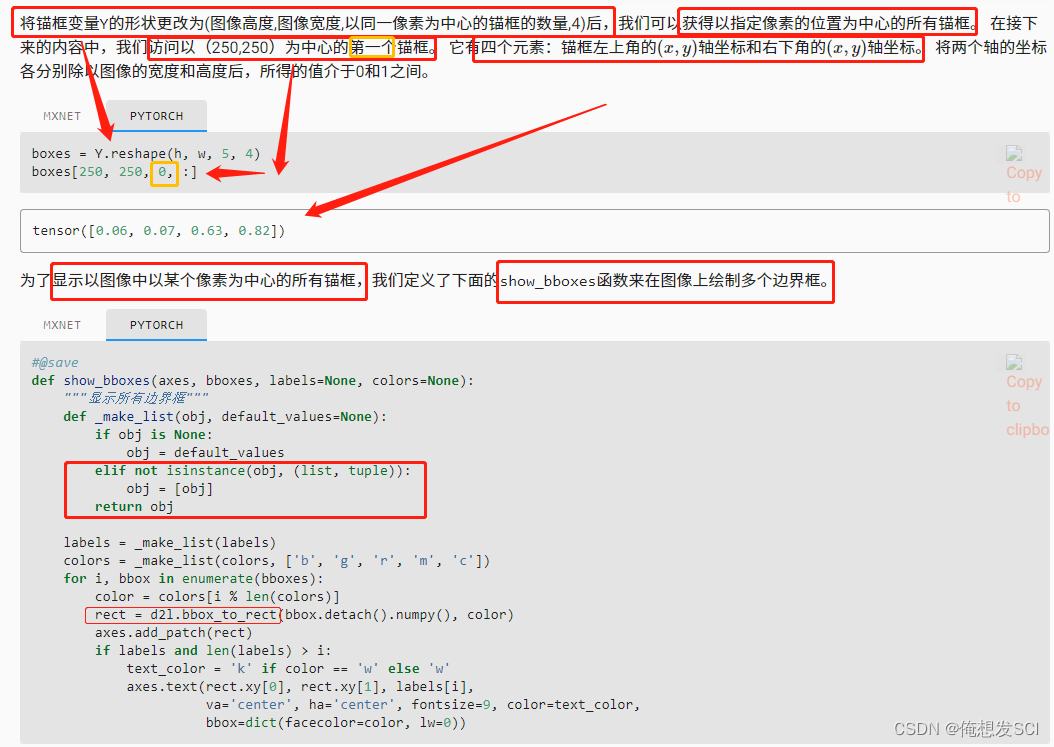
def show_bboxes(axes, bboxes, labels=None, colors=None):
    """显示所有边界框"""
    def _make_list(obj, default_values=None):
        if obj is None:
            obj = default_values
        elif not isinstance(obj, (list, tuple)):
            obj = [obj]
        return obj

    labels = _make_list(labels)
    colors = _make_list(colors, ['b', 'g', 'r', 'm', 'c'])
    for i, bbox in enumerate(bboxes):
        color = colors[i % len(colors)]
        rect = d2l.bbox_to_rect(bbox.detach().numpy(), color)
        axes.add_patch(rect)
        if labels and len(labels) > i:
            text_color = 'k' if color == 'w' else 'w'
            axes.text(rect.xy[0], rect.xy[1], labels[i],
                      va='center', ha='center', fontsize=9, color=text_color,
                      bbox=dict(facecolor=color, lw=0))
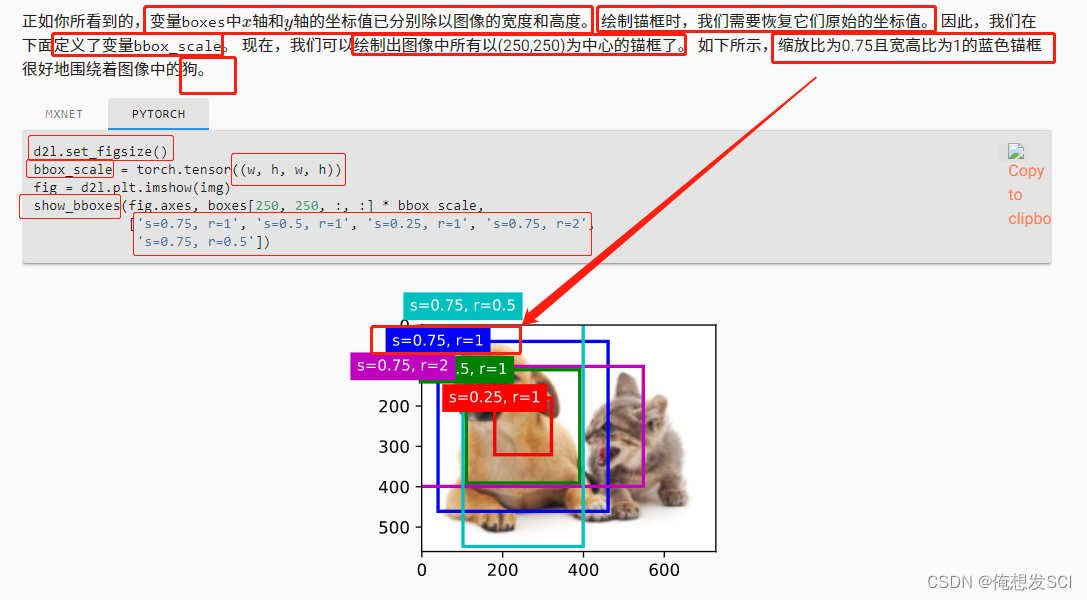
250250像素为中心的所有磨框画出来
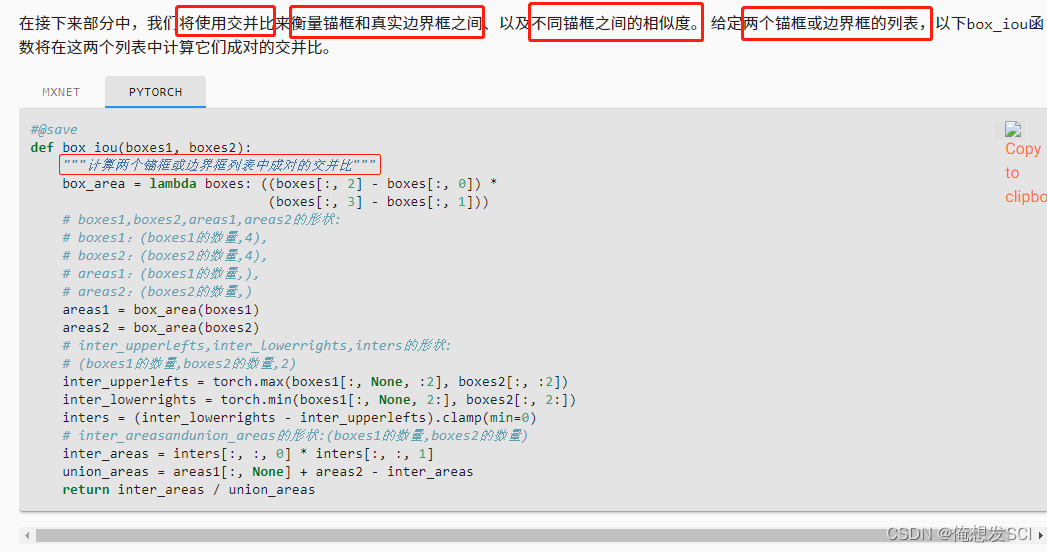
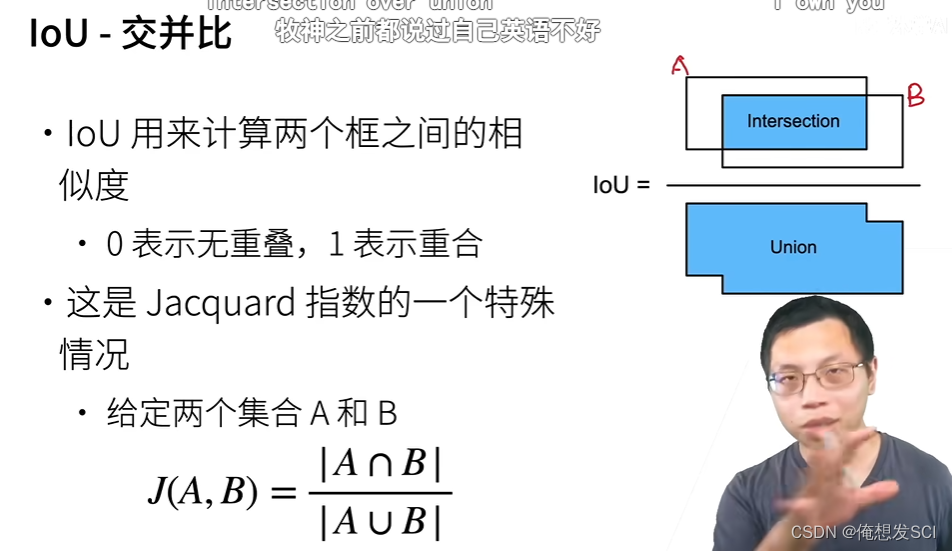
def box_iou(boxes1, boxes2):
    """计算两个锚框或边界框列表中成对的交并比"""
    box_area = lambda boxes: ((boxes[:, 2] - boxes[:, 0]) *
                              (boxes[:, 3] - boxes[:, 1]))
    # boxes1,boxes2,areas1,areas2的形状:
    # boxes1:(boxes1的数量,4),
    # boxes2:(boxes2的数量,4),
    # areas1:(boxes1的数量,),
    # areas2:(boxes2的数量,)
    areas1 = box_area(boxes1)
    areas2 = box_area(boxes2)
    # inter_upperlefts,inter_lowerrights,inters的形状:
    # (boxes1的数量,boxes2的数量,2)
    inter_upperlefts = torch.max(boxes1[:, None, :2], boxes2[:, :2])
    inter_lowerrights = torch.min(boxes1[:, None, 2:], boxes2[:, 2:])
    inters = (inter_lowerrights - inter_upperlefts).clamp(min=0)
    # inter_areasandunion_areas的形状:(boxes1的数量,boxes2的数量)
    inter_areas = inters[:, :, 0] * inters[:, :, 1]
    union_areas = areas1[:, None] + areas2 - inter_areas
    return inter_areas / union_areas

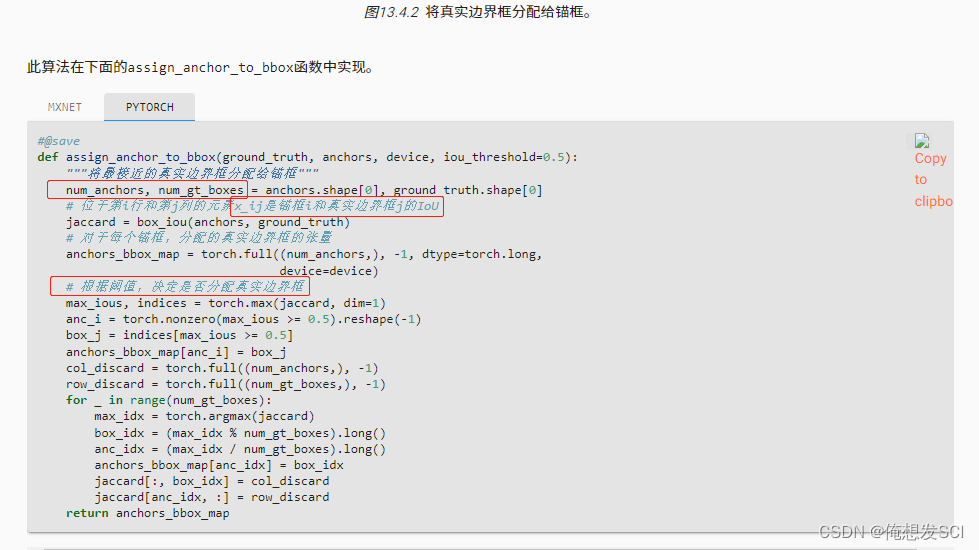
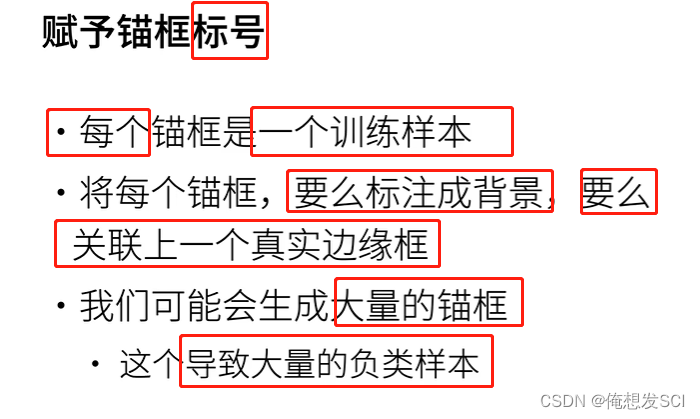
def assign_anchor_to_bbox(ground_truth, anchors, device, iou_threshold=0.5):
    """将最接近的真实边界框分配给锚框"""
    num_anchors, num_gt_boxes = anchors.shape[0], ground_truth.shape[0]
    # 位于第i行和第j列的元素x_ij是锚框i和真实边界框j的IoU
    jaccard = box_iou(anchors, ground_truth)
    # 对于每个锚框,分配的真实边界框的张量
    anchors_bbox_map = torch.full((num_anchors,), -1, dtype=torch.long,
                                  device=device)
    # 根据阈值,决定是否分配真实边界框
    max_ious, indices = torch.max(jaccard, dim=1)
    anc_i = torch.nonzero(max_ious >= 0.5).reshape(-1)
    box_j = indices[max_ious >= 0.5]
    anchors_bbox_map[anc_i] = box_j
    col_discard = torch.full((num_anchors,), -1)
    row_discard = torch.full((num_gt_boxes,), -1)
    for _ in range(num_gt_boxes):
        max_idx = torch.argmax(jaccard)
        box_idx = (max_idx % num_gt_boxes).long()
        anc_idx = (max_idx / num_gt_boxes).long()
        anchors_bbox_map[anc_idx] = box_idx
        jaccard[:, box_idx] = col_discard
        jaccard[anc_idx, :] = row_discard
    return anchors_bbox_map

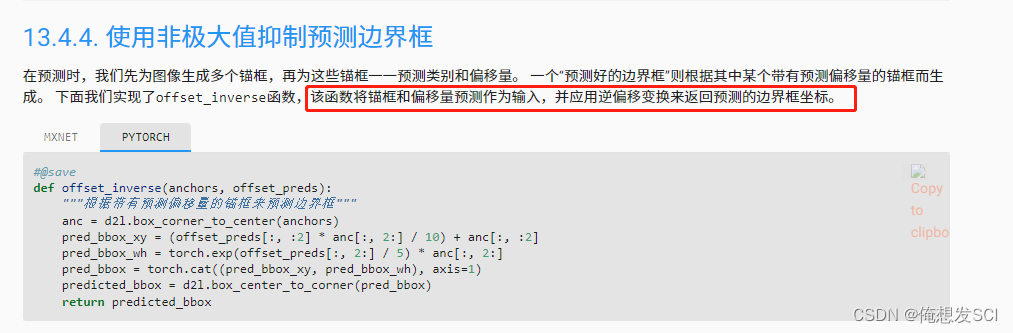
#@save
def offset_boxes(anchors, assigned_bb, eps=1e-6):
    """对锚框偏移量的转换"""
    c_anc = d2l.box_corner_to_center(anchors)
    c_assigned_bb = d2l.box_corner_to_center(assigned_bb)
    offset_xy = 10 * (c_assigned_bb[:, :2] - c_anc[:, :2]) / c_anc[:, 2:]
    offset_wh = 5 * torch.log(eps + c_assigned_bb[:, 2:] / c_anc[:, 2:])
    offset = torch.cat([offset_xy, offset_wh], axis=1)
    return offset
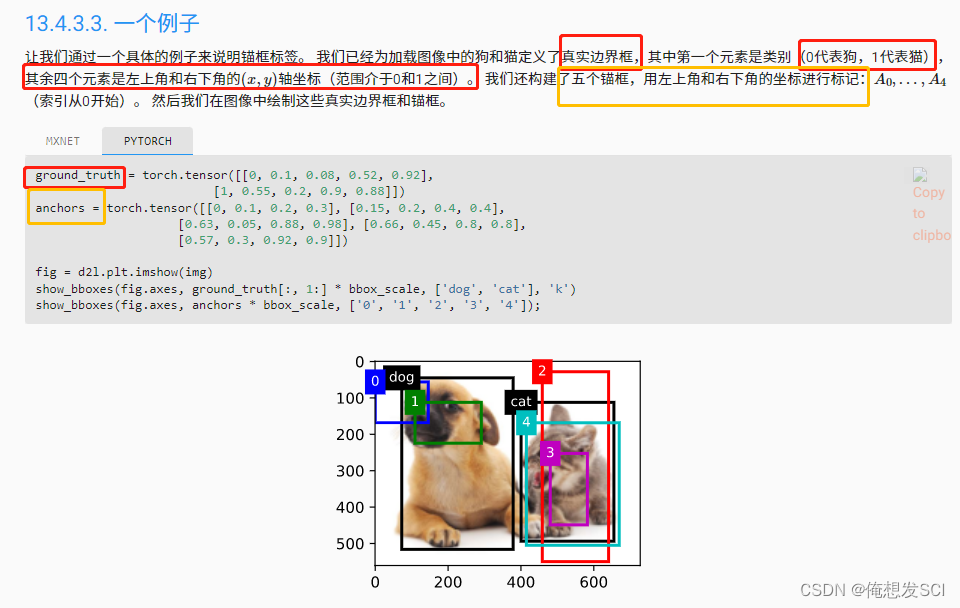
ground_truth = torch.tensor([[0, 0.1, 0.08, 0.52, 0.92],
                         [1, 0.55, 0.2, 0.9, 0.88]])
anchors = torch.tensor([[0, 0.1, 0.2, 0.3], [0.15, 0.2, 0.4, 0.4],
                    [0.63, 0.05, 0.88, 0.98], [0.66, 0.45, 0.8, 0.8],
                    [0.57, 0.3, 0.92, 0.9]])

fig = d2l.plt.imshow(img)
show_bboxes(fig.axes, ground_truth[:, 1:] * bbox_scale, ['dog', 'cat'], 'k')
show_bboxes(fig.axes, anchors * bbox_scale, ['0', '1', '2', '3', '4']);
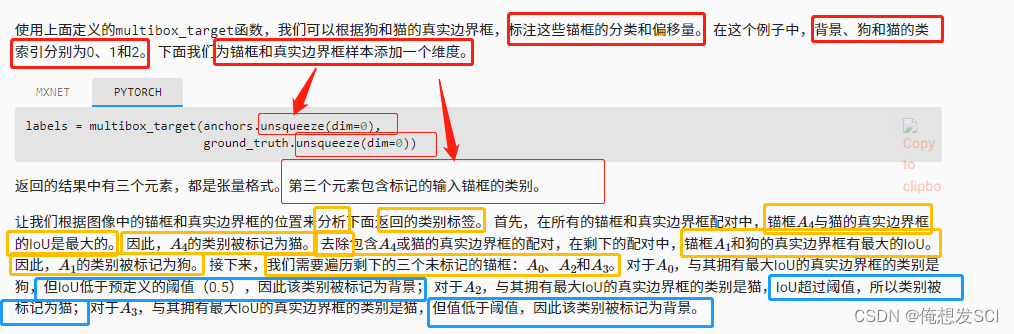
multibox_target(anchors, labels):


labels[2] 表示labels
tensor([[0, 1, 2, 0, 2]])每个磨框的类别
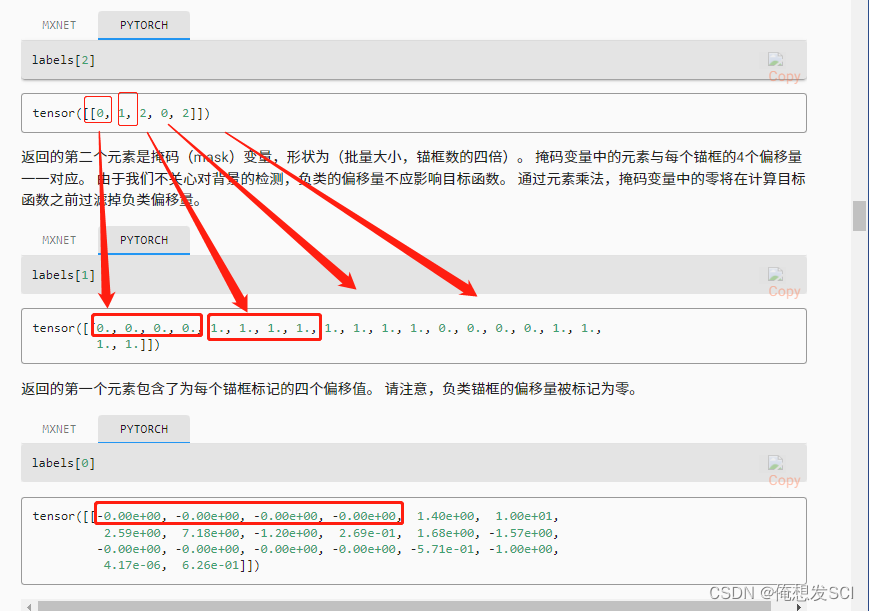
labels[1] 表示mask
tensor([[0., 0., 0., 0., 1., 1., 1., 1., 1., 1., 1., 1., 0., 0., 0., 0., 1., 1.,
         1., 1.]])
磨框个数撑4
labels[0] 表示偏移
tensor([[-0.00e+00, -0.00e+00, -0.00e+00, -0.00e+00,  1.40e+00,  1.00e+01,
          2.59e+00,  7.18e+00, -1.20e+00,  2.69e-01,  1.68e+00, -1.57e+00,
         -0.00e+00, -0.00e+00, -0.00e+00, -0.00e+00, -5.71e-01, -1.00e+00,
          4.17e-06,  6.26e-01]])
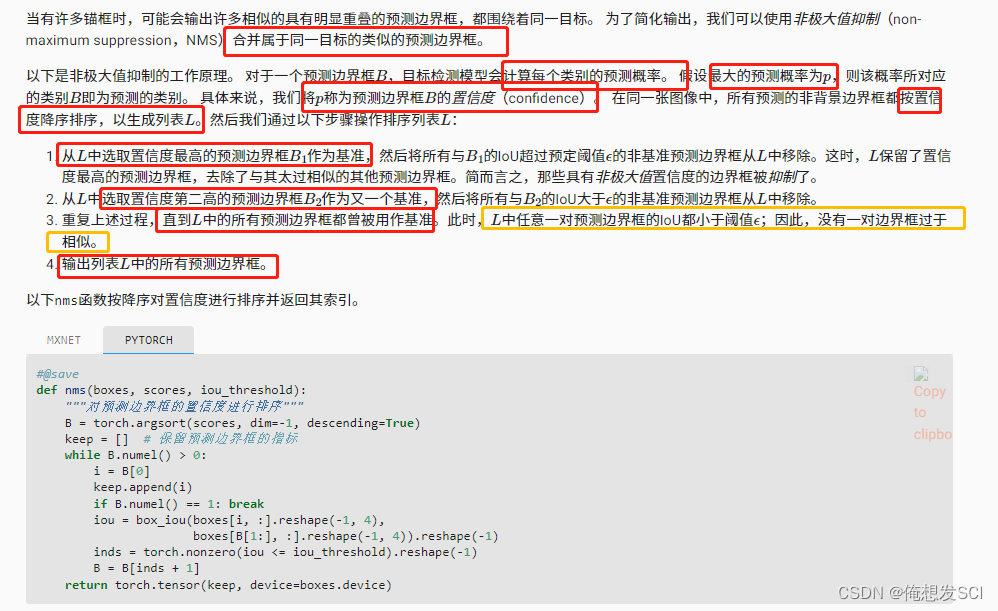
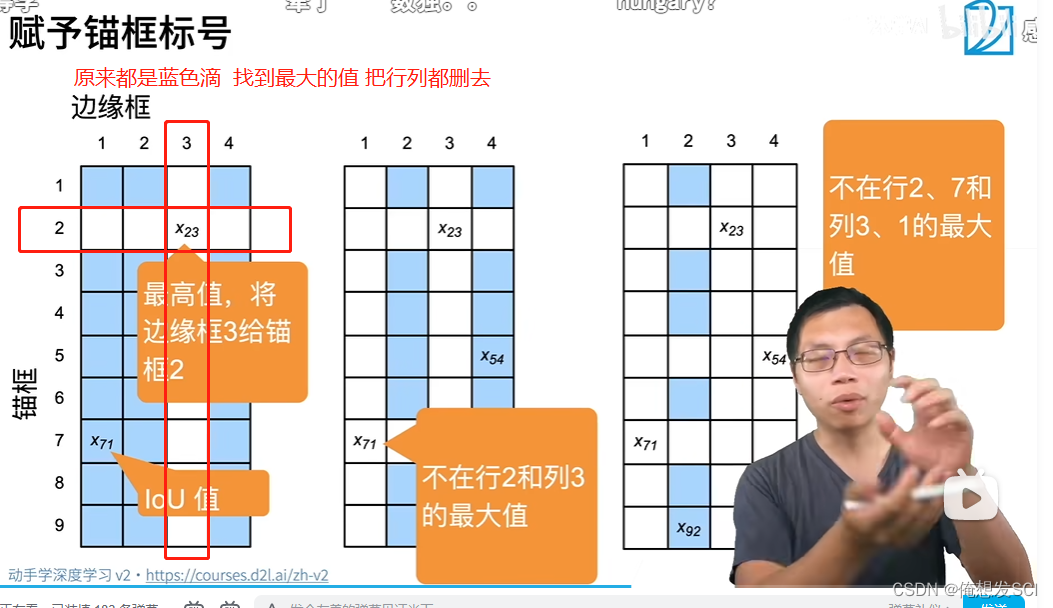
def nms(boxes, scores, iou_threshold):
    """对预测边界框的置信度进行排序"""
    B = torch.argsort(scores, dim=-1, descending=True)
    keep = []  # 保留预测边界框的指标
    while B.numel() > 0:
        i = B[0]
        keep.append(i)
        if B.numel() == 1: break
        iou = box_iou(boxes[i, :].reshape(-1, 4),
                      boxes[B[1:], :].reshape(-1, 4)).reshape(-1)
        inds = torch.nonzero(iou <= iou_threshold).reshape(-1)
        B = B[inds + 1]
    return torch.tensor(keep, device=boxes.device)
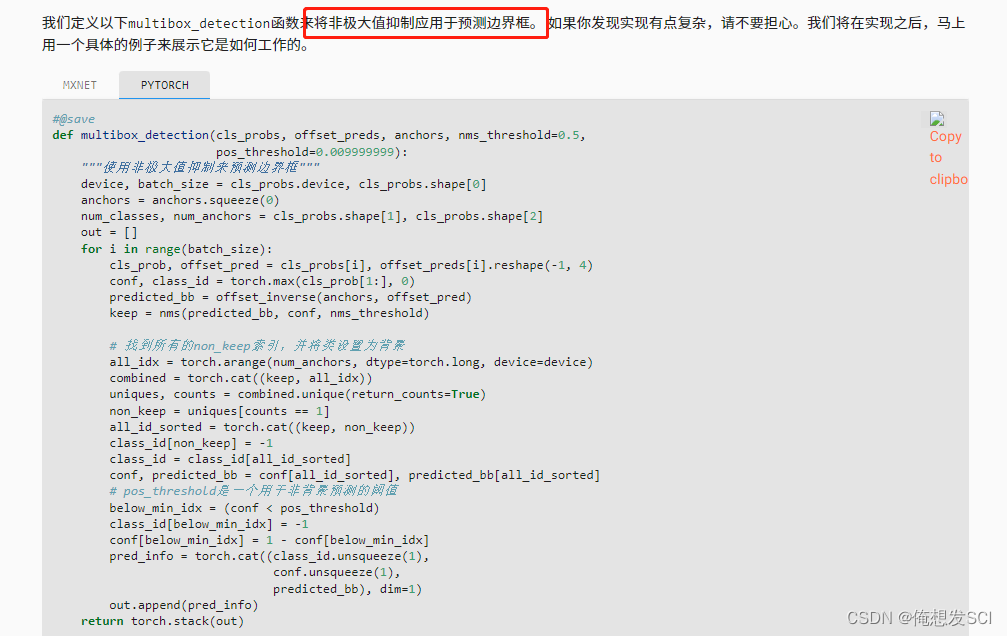
def multibox_detection(cls_probs, offset_preds, anchors, nms_threshold=0.5,
                       pos_threshold=0.009999999):
    """使用非极大值抑制来预测边界框"""
    device, batch_size = cls_probs.device, cls_probs.shape[0]
    anchors = anchors.squeeze(0)
    num_classes, num_anchors = cls_probs.shape[1], cls_probs.shape[2]
    out = []
    for i in range(batch_size):
        cls_prob, offset_pred = cls_probs[i], offset_preds[i].reshape(-1, 4)
        conf, class_id = torch.max(cls_prob[1:], 0)
        predicted_bb = offset_inverse(anchors, offset_pred)
        keep = nms(predicted_bb, conf, nms_threshold)

        # 找到所有的non_keep索引,并将类设置为背景
        all_idx = torch.arange(num_anchors, dtype=torch.long, device=device)
        combined = torch.cat((keep, all_idx))
        uniques, counts = combined.unique(return_counts=True)
        non_keep = uniques[counts == 1]
        all_id_sorted = torch.cat((keep, non_keep))
        class_id[non_keep] = -1
        class_id = class_id[all_id_sorted]
        conf, predicted_bb = conf[all_id_sorted], predicted_bb[all_id_sorted]
        # pos_threshold是一个用于非背景预测的阈值
        below_min_idx = (conf < pos_threshold)
        class_id[below_min_idx] = -1
        conf[below_min_idx] = 1 - conf[below_min_idx]
        pred_info = torch.cat((class_id.unsqueeze(1),
                               conf.unsqueeze(1),
                               predicted_bb), dim=1)
        out.append(pred_info)
    return torch.stack(out)
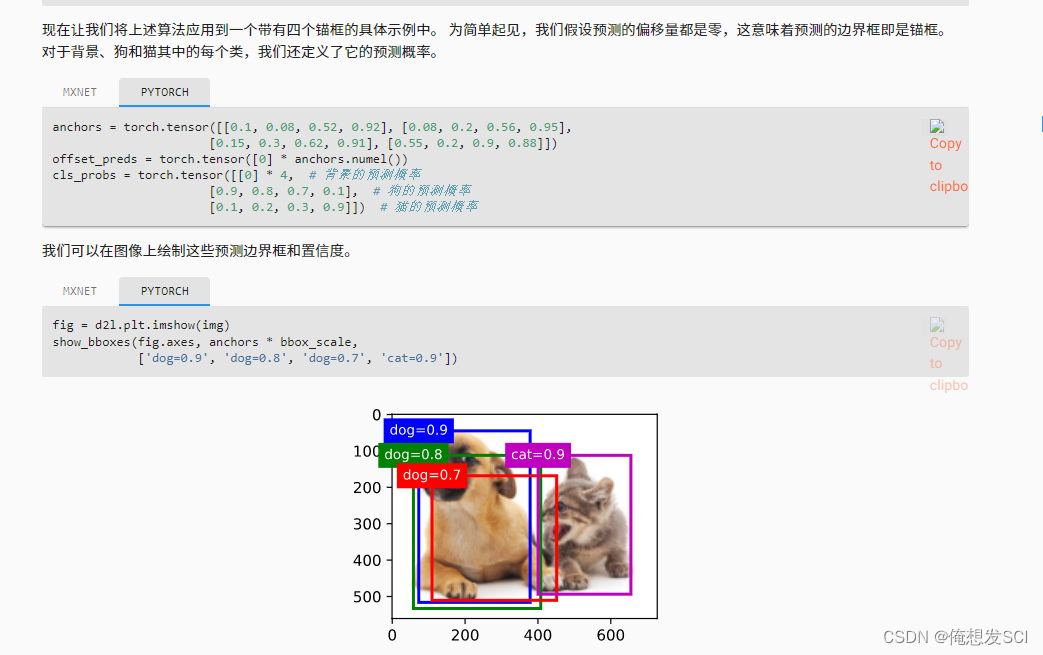
anchors = torch.tensor([[0.1, 0.08, 0.52, 0.92], [0.08, 0.2, 0.56, 0.95],
                      [0.15, 0.3, 0.62, 0.91], [0.55, 0.2, 0.9, 0.88]])
offset_preds = torch.tensor([0] * anchors.numel())
cls_probs = torch.tensor([[0] * 4,  # 背景的预测概率
                      [0.9, 0.8, 0.7, 0.1],  # 狗的预测概率
                      [0.1, 0.2, 0.3, 0.9]])  # 猫的预测概率
fig = d2l.plt.imshow(img) show_bboxes(fig.axes, anchors * bbox_scale, ['dog=0.9', 'dog=0.8', 'dog=0.7', 'cat=0.9'])
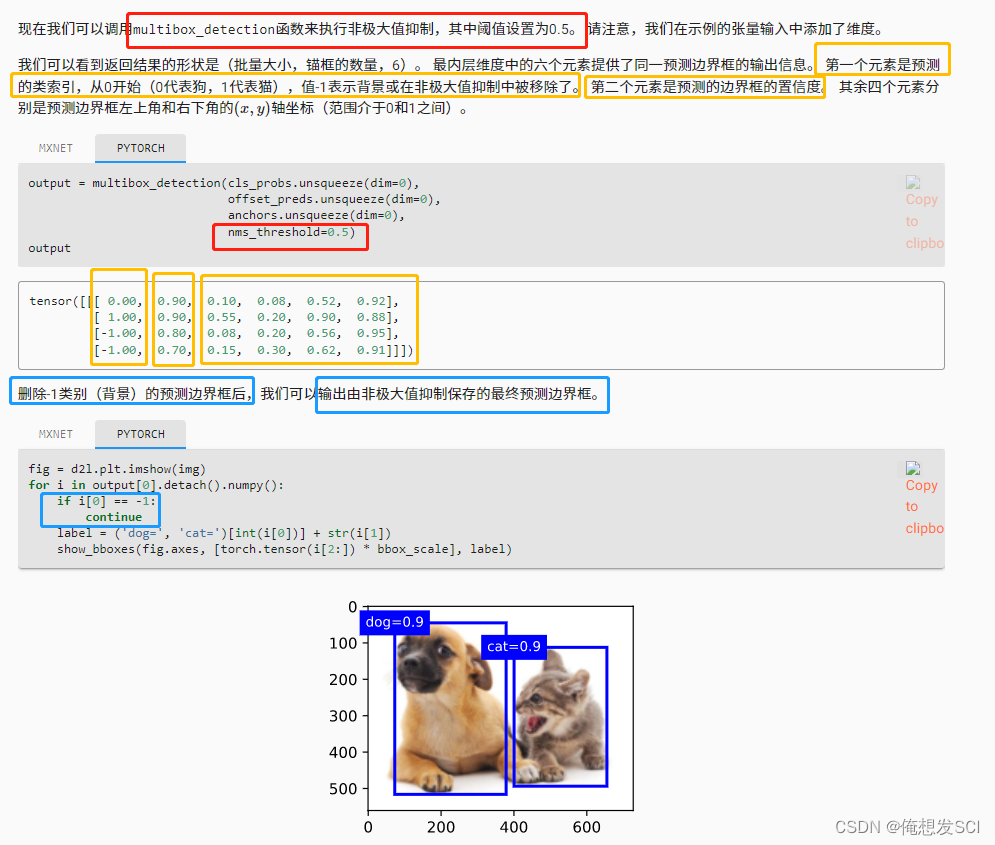
fig = d2l.plt.imshow(img)
for i in output[0].detach().numpy():
    if i[0] == -1:
        continue
    label = ('dog=', 'cat=')[int(i[0])] + str(i[1])
    show_bboxes(fig.axes, [torch.tensor(i[2:]) * bbox_scale], label)
我收到这个错误:RuntimeError(自动加载常量Apps时检测到循环依赖当我使用多线程时。下面是我的代码。为什么会这样?我尝试多线程的原因是因为我正在编写一个HTML抓取应用程序。对Nokogiri::HTML(open())的调用是一个同步阻塞调用,需要1秒才能返回,我有100,000多个页面要访问,所以我试图运行多个线程来解决这个问题。有更好的方法吗?classToolsController0)app.website=array.join(',')putsapp.websiteelseapp.website="NONE"endapp.saveapps=Apps.order("
运行bundleinstall后出现此错误:Gem::Package::FormatError:nometadatafoundin/Users/jeanosorio/.rvm/gems/ruby-1.9.3-p286/cache/libv8-3.11.8.13-x86_64-darwin-12.gemAnerroroccurredwhileinstallinglibv8(3.11.8.13),andBundlercannotcontinue.Makesurethat`geminstalllibv8-v'3.11.8.13'`succeedsbeforebundling.我试试gemin
动漫制作技巧是很多新人想了解的问题,今天小编就来解答与大家分享一下动漫制作流程,为了帮助有兴趣的同学理解,大多数人会选择动漫培训机构,那么今天小编就带大家来看看动漫制作要掌握哪些技巧?一、动漫作品首先完成草图设计和原型制作。设计草图要有目的、有对象、有步骤、要形象、要简单、符合实际。设计图要一致性,以保证制作的顺利进行。二、原型制作是根据设计图纸和制作材料,可以是手绘也可以是3d软件创建。在此步骤中,要注意的问题是色彩和平面布局。三、动漫制作制作完成后,加工成型。完成不同的表现形式后,就要对设计稿进行加工处理,使加工的难易度降低,并得到一些基本准确的概念,以便于后续的大样、准确的尺寸制定。四、
2022/8/4更新支持加入水印水印必须包含透明图像,并且水印图像大小要等于原图像的大小pythonconvert_image_to_video.py-f30-mwatermark.pngim_dirout.mkv2022/6/21更新让命令行参数更加易用新的命令行使用方法pythonconvert_image_to_video.py-f30im_dirout.mkvFFMPEG命令行转换一组JPG图像到视频时,是将这组图像视为MJPG流。我需要转换一组PNG图像到视频,FFMPEG就不认了。pyav内置了ffmpeg库,不需要系统带有ffmpeg工具因此我使用ffmpeg的python包装p
Transformers开始在视频识别领域的“猪突猛进”,各种改进和魔改层出不穷。由此作者将开启VideoTransformer系列的讲解,本篇主要介绍了FBAI团队的TimeSformer,这也是第一篇使用纯Transformer结构在视频识别上的文章。如果觉得有用,就请点赞、收藏、关注!paper:https://arxiv.org/abs/2102.05095code(offical):https://github.com/facebookresearch/TimeSformeraccept:ICML2021author:FacebookAI一、前言Transformers(VIT)在图
我已经通过提供MagickWand.h的路径尝试了一切,我安装了命令工具。谁能帮帮我?$geminstallrmagick-v2.13.1Buildingnativeextensions.Thiscouldtakeawhile...ERROR:Errorinstallingrmagick:ERROR:Failedtobuildgemnativeextension./Users/ghazanfarali/.rvm/rubies/ruby-1.8.7-p357/bin/rubyextconf.rbcheckingforRubyversion>=1.8.5...yescheckingfor/
我想知道我的代码是否在rspec下运行。这可能吗?原因是我正在加载一些错误记录器,这些记录器在测试期间会被故意错误(expect{x}.toraise_error)弄得乱七八糟。我查看了我的ENV变量,没有(明显的)测试环境变量的迹象。 最佳答案 在spec_helper.rb的开头添加:ENV['RACK_ENV']='test'现在您可以在代码中检查RACK_ENV是否经过测试。 关于ruby-检测由RSpec、Ruby运行的代码,我们在StackOverflow上找到一个类似的问题
我正在使用rubydaemongem。想知道如何向停止操作添加一些额外的步骤?希望我能检测到停止被调用,并向其添加一些额外的代码。任何人都知道我如何才能做到这一点? 最佳答案 查看守护程序gem代码,它似乎没有用于此目的的明显扩展点。但是,我想知道(在守护进程中)您是否可以捕获守护进程在发生“停止”时发送的KILL/TERM信号...?trap("TERM")do#executeyourextracodehereend或者你可以安装一个at_exit钩子(Hook):-at_exitdo#executeyourextracodehe
我正在学习Ruby,遇到了inject。我正处于理解它的风口浪尖,但当我是那种需要真实世界的例子来学习一些东西的人时。我遇到的最常见的例子是人们使用inject来添加一个(1..10)范围的总和,我不太关心这个。这是一个任意的例子。在实际程序中我会用它做什么?我正在学习,所以我可以继续使用Rails,但我不必有一个以Web为中心的示例。我只需要一些我可以全神贯注的目标。谢谢大家。 最佳答案 inject有时可以通过它的“其他”名称reduce更好地理解。它是一个对Enumerable进行操作(迭代一次)并返回单个值的函数。它有许多有
我在en:语言环境中有一个字符串display_device:toplay:getplayer冒号给我的错误是cannotloadtranslationsfromC:/DocumentsandSettings/rajg/discoveryaws/branches/internationalization/config/locales/en.yml,expectedittoreturnahash,butdoesnot我怎样才能让它工作? 最佳答案 如果你用这样的引号将它括起来,你可以在你的字符串中转义冒号(和其他“重要”字符):dis
 https://www.bilibili.com/video/BV1aB4y1K7za?p=2&vd_source=eba877d881f216d635d2dfec9dc10379