UVM前置基础:
2.UVM基础-组件(driver、monitor、agent...)
...还在更新
从零搭建一个UVM验证平台:
...还在更新
目录
在上篇博客里,我们封装了monitor来监测输入及输出的信号,还将monitor和driver封装成了一个可配置是否实例化driver的功能性agent,再将输入输出的两个agent封装到一个更大的env环境中。整个架构可以如下描述:
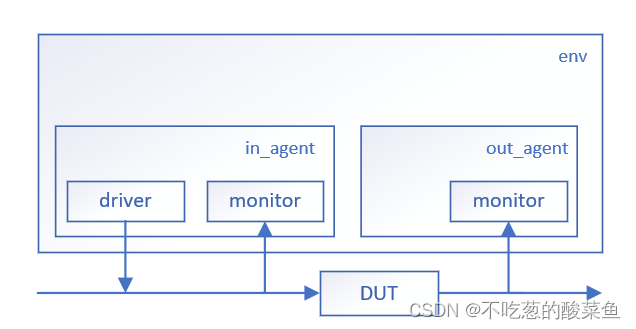
这篇文章我们将着重讲解如何给我们的验证模块添加reference model以及scoreboard。
在验证平台当中,reference model的作用是完成和DUT相同的功能,在我们不确定RTL代码结果是否正确的时候,我们要保证reference model的结果必须正确,然后再将RTL代码的结果和reference model的结果作对比,两者实现的功能是完全一致的。
`ifndef MY_REFERENCE_DEFINES
`define MY_REFERENCE_DEFINES

`include "uvm_macros.svh"
`include "my_transaction.sv"

import uvm_pkg::*;

class my_reference_model extends uvm_component;

  //TLM 机制
  uvm_blocking_get_port #(my_transaction) port;
  uvm_analysis_port #(my_transaction) ap;

  extern function new(string name, uvm_component parent);
  extern function void build_phase(uvm_phase phase);
  extern virtual task main_phase(uvm_phase phase);

  `uvm_component_utils(my_reference_model)
endclass

function my_reference_model::new(string name, uvm_component parent);
  super.new(name, parent);
endfunction

function void my_reference_model::build_phase(uvm_phase phase);
  super.build_phase(phase);
  port = new("port", this);
  ap = new("ap", this);
endfunction

task my_reference_model::main_phase(uvm_phase phase);

  my_transaction tr;
  my_transaction new_tr;

  super.main_phase(phase);

  while(1)begin
    port.get(tr);
    new_tr = new("new_tr");
    new_tr.my_copy(tr);
    `uvm_info("my_reference_model", "get one transaction, copy and print it:", UVM_LOW)
    new_tr.my_print();
    ap.write(new_tr);
  end
endtask

`endif
reference model的代码,在一开始使用了TLM机制:
uvm_blocking_get_port #(my_transaction) port;
uvm_analysis_port #(my_transaction) ap;
TLM通信需要两个通信的对象,这两个对象分别称为 initiator 和 target 。区分它们的方法在于,谁先发起通信请求,谁就属于initiator;谁作为发起通信的响应方,谁就属于target ,但这个分类并不代表transaction一定是initiator发起的,transaction也可能是从target流向initiator。
端口按照类型可以划分为三种:
※ port:经常作为initiator的发起端,initiator凭借port才可以访问target的TLM通信方法。
※ export:作为initiator和target中间层次的端口。
※ imp:只能作为target接收request的末端,它无法作为中间层次的端口,所以imp的连接无法再次延伸。
使用TLM机制来进行transaction的传输, 如果数据是从同一个源的TLM端口发出到达不同组件,这就要求该种端口可以满足从一端到多端的需求,analysis_port 就可以实现这个需求。按照传输方法和端口方向组合,可以将 analysis port 分为:uvm_analysis_port 、uvm_analysis_export 以及uvm_analysis_imp。
reference model 编写流程:
在reference model中,我们先定义了两个port;然后在build_phase里将两个port进行实例化;接着运行完build_phase进入main_phase后,实例化new_tr,把in_agent中得到的tr复制一份给scoreboard。my_copy是定义在transaction中的函数:
Transaction
`ifndef MY_TRANS_DEFINES
`define MY_TRANS_DEFINES

`include "uvm_macros.svh"

import uvm_pkg::*;

class my_transaction extends uvm_sequence_item;

  rand bit [63:0] password; //assume there is a 64bits password

  `uvm_object_utils(my_transaction);

  function new(string name = "my_transaction");
    super.new(name);
  endfunction

  function void my_print();
    $display("password = %0h", password);
  endfunction
  extern function void my_copy(my_transaction tr);

endclass

function void my_transaction::my_copy(my_transaction tr);
  if(tr == null)
    `uvm_fatal("my_transaction", "tr is null!!!")
  password = tr.password;
endfunction

`endif
这里实现了两个transaction的复制。不仅如此,因为添加了reference model,这个组件是搭载在env环境下的, 所以我们还需要在my_env中对其进行实例化(在env的build_phase中使用type_id::create创建实例)。
在上面,component之间transaction级别的数据通信是使用TLM机制进行的。我们现在要实现的目的其实就是在reference model中,将in_agent中的monitor发出的transaction复制到reference model中,在reference model里面我们声明了TLM机制中的uvm_blocking_get_port(),并在reference model的main_phase中对其进行了实例化,然后利用port.get()任务来得到从in_agent中的monitor发出的transaction。
但截止目前,我们只在reference model中创建了uvm_blocking_get_port,它的目的是接收monitor发出的transaction,所以我们还需要在monitor中添加发送transaction的port:
在工厂注册之前,声明:uvm_analysis_port #(my_transacion) ap;
在monitor的build_phase中将port实例化:ap = new("new", this);
在main_phase中,添加ap.write(tr);//将收集的transaction数据写入tr
这里用到的write是uvm_analysis_port的一个内建函数。
以上,在my_monitor和reference model中定义并实例化了各自的端口后,端口和端口之间并没有连接在一起,因此我们需要在env环境中,使用fifo将两个端口联系在一起,即①在my_env中定义一个fifo,②并在build_phase中将其实例化,③并在connect_phase中将fifo分别与my_monitor中的analysis_port和reference model中的blocking_get_port相连:
`include "uvm_macros.svh"
import uvm_pkg::*;

`include "my_agent.sv"
`include "my_transaction.sv"

class my_env extends uvm_env;
  my_agent i_agt;
  my_agent o_agt;

  my_reference_model mrm;

  uvm_tlm_analysis_fifo #(my_transaction) agt_mrm_fifo;

  function new(string name = "my_env", uvm_component parent);
    super.new(name, parent);
  endfunction

  virtual function void build_phase(uvm_phase phase);
    super.build_phase(phase);

    i_agt = my_agent::type_id::create("i_agt", this);
    o_agt = my_agent::type_id::create("o_agt", this);
    i_agt.is_active = UVM_ACTIVE;
    i_agt.is_active = UVM_PASSIVE;

    mrm = my_reference_model::type_id::create("mrm", this);
    agt_mrm_fifo = new("agt_mon_fifo", this);

  endfunction

  extern virtual function void connect_phase(uvm_phase phase);

  `uvm_component_utils(my_env);

endclass

function void my_env::connect_phase(uvm_phase phase);
   super.connect_phase(phase);
   in_agt.ap.connect(agt_mrm_fifo.analysis_export);
   mrm.port.connect(agt_mrm_fifo.blocking_get_export);
endfunction
connect_phase和build_phase以及main_phase类似,都是UVM内建的phase,它在build_phase执行完成之后马上执行。但是与build_phase不同的是,它执行的顺序不是从树根到树叶,而是从树叶到树根---先执行driver和monitor的connect_phase,再执行agent的connect_phase,最后执行env的connect_phase。
为了让思路更加清晰,我们来整理一下上边my_env的代码思路:目前在我们的env环境中,有一个reference model,in_agent和out_agent,所以要将三个组件例化;然后我们在reference model中设置了一个port,在monitor中也设置了一个port,利用TLM机制来传输monitor监测到的transaction给reference model。
考虑到analysis_port是非阻塞性质的,我们实例化了一个一transaction为变量类型的fifo来存储可能会被blocking_get_port堵塞的transaction;在build_phase中创建agent实例,并设置in_agent有driver,out_agent没有driver(is_active = UVM_PASSIVE);
reference model的port连接到monitor的port时要进入到agent组件,这就需要agent组件也得有一个port供transaction传输,所以我们另外还需要在my_agent.sv中声明一个port,让reference model的port连接到in_agent上,再让in_agent的port连接到monitor上,在connect_phase中连接完所有port后,connect_phase的顺序是从树叶到树根,所以会先执行my_agent的connect_phase,接着才是执行my_env的connect_phase。

验证平台中已经有了reference model和agent,最后一步就是给我们的平台添加scoreboard。scoreboard要比较的数据,一个是来自reference model,一个是来自out_agent的monitor。
`include "uvm_macros.svh"

import uvm_pkg::*;

`include "my_transaction.sv"

class my_scoreboard extends uvm_scoreboard;
  my_transaction expect_queue [$];
  uvm_blocking_get_port #(my_transaction) exp_port;
  uvm_blocking_get_port #(my_transaction) act_port;
  `uvm_component_utils(my_scoreboard)

  extern function new(string name, uvm_component parent = null);
  extern virtual function void build_phase(uvm_phase phase);
  extern virtual task main_phase(uvm_phase phase);
endclass

function my_scoreboard::new(string name, uvm_component parent = null);
  super.new(name, parent);
endfunction

function void my_scoreboard::build_phase(uvm_phase phase);
  super.build_phase(phase);
  exp_port = new("exp_port", this);
  act_port = new("act_port", this);
endfunction

task my_scoreboard::main_phase(uvm_phase phase);
  my_transaction get_expect, get_actual, temp_tran;
  bit result;

  super.main_phase(phase);
  fork
    while(1)begin
      exp_port.get(get_expect);
      expect_queue.push_back(get_expect);
    end
    while(1)begin
      act_port.get(get_actual);
      if(expect_queue.size()>0)begin
        temp_tran = expect_queue.pop_front();
        result = get_actual.my_compare(temp_tran);//比较
        if(result)begin
          `uvm_info("my_scoreboard", "Compare SUCCESSFULLY", UVM_LOW)
        end
        else begin
          `uvm_error("my_scoreboard", "Compare FALLED")
          $display("the expect password is");
          temp_tran.my_print();
          $display("the actual password is");
          get_actual.my_print();
        end
      end
      else begin
        `uvm_error("my_scoreboard", "Received from DUT, while Expect queue is empty")
        $display("the unexpected password is");
        get_actual.my_print();
      end
    end
  join
endtask
在上面这段代码中通过fork建立了两个进程,一个进程处理exp_port的数据,当收到数据后,把数据放到expect_queue中;另外一个进程处理act_port数据,这是DUT的输出数据,当收集到这些数据后,从expect_queue中弹出之前从exp_port收到的数据,并调用my_transaction中的my_compare函数。这样处理的前提是exp_port要比act_port先收到数据,由于DUT处理数据需要延时,而reference model是基于高级语言的处理,一般不需要延时,因此可以保证exp_port的数据在act_port的数据之前到来。
另外别忘了,写了scoreboard之后,我们还需要在env环境中创建并实例化该组件,然后在connect_phase中,将组件与组件之间的port连接好。
`ifndef MY_ENV_SV
`define MY_ENV_SV

`include "uvm_macros.svh"
import uvm_pkg::*;

`include "my_agent.sv"
`include "my_transaction.sv"
`include "my_reference_model.sv"
`include "my_scoreboard.sv"

class my_env extends uvm_env;
  my_agent in_agt;
  my_agent out_agt;

  my_reference_model mrm;
  my_scoreboard scb;

  uvm_tlm_analysis_fifo #(my_transaction) agt_mrm_fifo;
  uvm_tlm_analysis_fifo #(my_transaction) agt_scb_fifo;
  uvm_tlm_analysis_fifo #(my_transaction) mrm_scb_fifo;

  function new(string name = "my_env", uvm_component parent);
    super.new(name, parent);
  endfunction

  virtual function void build_phase(uvm_phase phase);
    super.build_phase(phase);

    in_agt = my_agent::type_id::create("in_agt", this);
    out_agt = my_agent::type_id::create("out_agt", this);
    in_agt.is_active = UVM_ACTIVE;
    out_agt.is_active = UVM_PASSIVE;

    mrm = my_reference_model::type_id::create("mrm", this);
    scb = my_scoreboard::type_id::create("scb", this);

    agt_mrm_fifo = new("agt_mon_fifo", this);
    agt_scb_fifo = new("agt_scb_fifo", this);
    mrm_scb_fifo = new("mrm_scb_fifo", this);
  endfunction

  extern virtual function void connect_phase(uvm_phase phase);

  `uvm_component_utils(my_env);

endclass

function void my_env::connect_phase(uvm_phase phase);
   super.connect_phase(phase);

   //connect input agent with reference model
   in_agt.ap.connect(agt_mrm_fifo.analysis_export);
   mrm.port.connect(agt_mrm_fifo.blocking_get_export);

   //connect reference model with scoreboard
   mrm.ap.connect(mrm_scb_fifo.analysis_export);
   scb.exp_port.connect(mrm_scb_fifo.blocking_get_export);

   //connect output agent with scoreboard
   out_agt.ap.connect(agt_scb_fifo.analysis_export);
   scb.act_port.connect(agt_scb_fifo.blocking_get_export);

endfunction

`endif
在transaction中定义一个compare函数,很简单,比较发送的transaction中的password是否一致即可,但这一步compare函数可以通过field_automation机制省略自定义的过程,但为了体现field_automation机制的优越性,我们还是先使用自定义的compare方法:
`ifndef MY_TRANS_DEFINES
`define MY_TRANS_DEFINES

`include "uvm_macros.svh"

import uvm_pkg::*;

class my_transaction extends uvm_sequence_item;

  rand bit [63:0] password; //assume there is a 64bits password

  `uvm_object_utils(my_transaction);

  function new(string name = "my_transaction");
    super.new(name);
  endfunction

  function void my_print();
    $display("password = %0h", password);
  endfunction
  extern function void my_copy(my_transaction tr);
  extern function bit my_compare(my_transaction);

endclass

function void my_transaction::my_copy(my_transaction tr);
  if(tr == null)
    `uvm_fatal("my_transaction", "tr is null!!!")
  password = tr.password;
endfunction

function bit my_transaction::my_compare(my_transaction tr);
  bit result;
  if(tr == null)
    `uvm_fatal("my_transaction", "tr is null!");
  result = (password == tr.password);
  return result;
endfunction

`endif在transaction.sv中我们在transaction里定义了很多的function,譬如my_print、my_compare 函数,它们都有一个特点就是需要逐字段地对transaction进行某些操作。但其实这些函数我们可以不用自己定义,而是使用UVM中的field_automation机制,使用uvm_field来自动预定义好这些常用的函数,而不需要自己额外定义了。
由宏定义`uvm_object_utils_begin和`uvm_object_utils_end包起来的部分,为域自动化部分。UVM_ALL_ON是一个用于数据操作的内容
`ifndef MY_TRANS_DEFINES
`define MY_TRANS_DEFINES

`include "uvm_macros.svh"

import uvm_pkg::*;

class my_transaction extends uvm_sequence_item;

  rand bit [63:0] password; //assume there is a 64bits password

  `uvm_object_utils_begin(my_transaction);
    `uvm_field_int(password, UVM_ALL_ON)
  `uvm_object_utils_end

  function new(string name = "my_transaction");
    super.new(name);
  endfunction

endclass

`endif
使用了域的自动化后,我们的transaction的代码量就大大减小了。当上述宏注册之后,可以直接调用copy、compare、print等函数,极大的简化了验证平台的搭建,提高了效率。
加入scoreboard 以及 reference model之后,我们现在的整个验证框架如图所示:
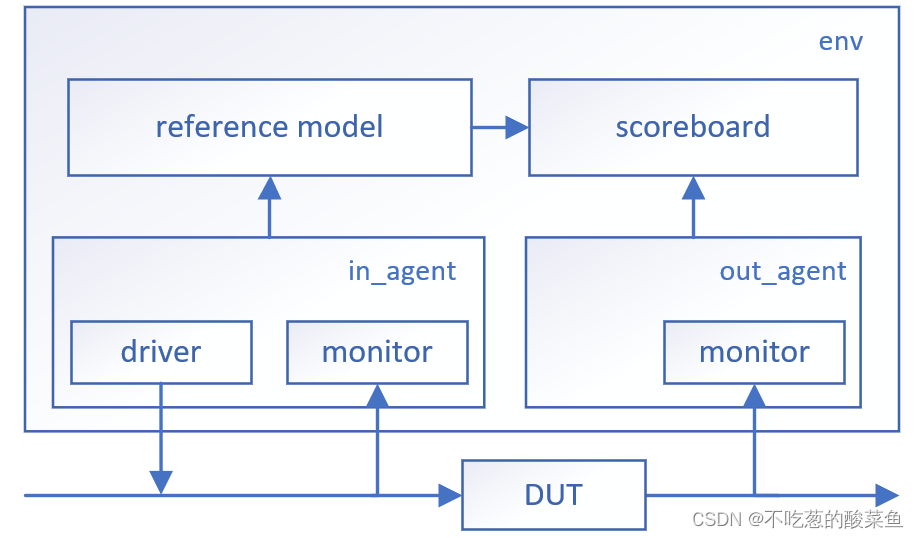
在这篇文章里,我们在env环境中添加了reference model 以及 scoreboard并在各个组件的connect_phase中,将组件与组件之间的port连接在了一起,并且利用UVM的field_automation机制,可以调用自定义的函数print、copy、compare等,极大的简化了我们transaction的代码。下篇博客我们将着重讲解如何给我们的验证环境添加sequencer。
给定这段代码defcreate@upgrades=User.update_all(["role=?","upgraded"],:id=>params[:upgrade])redirect_toadmin_upgrades_path,:notice=>"Successfullyupgradeduser."end我如何在该操作中实际验证它们是否已保存或未重定向到适当的页面和消息? 最佳答案 在Rails3中,update_all不返回任何有意义的信息,除了已更新的记录数(这可能取决于您的DBMS是否返回该信息)。http://ar.ru
我想安装一个带有一些身份验证的私有(private)Rubygem服务器。我希望能够使用公共(public)Ubuntu服务器托管内部gem。我读到了http://docs.rubygems.org/read/chapter/18.但是那个没有身份验证-如我所见。然后我读到了https://github.com/cwninja/geminabox.但是当我使用基本身份验证(他们在他们的Wiki中有)时,它会提示从我的服务器获取源。所以。如何制作带有身份验证的私有(private)Rubygem服务器?这是不可能的吗?谢谢。编辑:Geminabox问题。我尝试“捆绑”以安装新的gem..
使用带有Rails插件的vim,您可以创建一个迁移文件,然后一次性打开该文件吗?textmate也可以这样吗? 最佳答案 你可以使用rails.vim然后做类似的事情::Rgeneratemigratonadd_foo_to_bar插件将打开迁移生成的文件,这正是您想要的。我不能代表textmate。 关于ruby-使用VimRails,您可以创建一个新的迁移文件并一次性打开它吗?,我们在StackOverflow上找到一个类似的问题: https://sta
我需要从一个View访问多个模型。以前,我的links_controller仅用于提供以不同方式排序的链接资源。现在我想包括一个部分(我假设)显示按分数排序的顶级用户(@users=User.all.sort_by(&:score))我知道我可以将此代码插入每个链接操作并从View访问它,但这似乎不是“ruby方式”,我将需要在不久的将来访问更多模型。这可能会变得很脏,是否有针对这种情况的任何技术?注意事项:我认为我的应用程序正朝着单一格式和动态页面内容的方向发展,本质上是一个典型的网络应用程序。我知道before_filter但考虑到我希望应用程序进入的方向,这似乎很麻烦。最终从任何
我想要做的是有2个不同的Controller,client和test_client。客户端Controller已经构建,我想创建一个test_clientController,我可以使用它来玩弄客户端的UI并根据需要进行调整。我主要是想绕过我在客户端中内置的验证及其对加载数据的管理Controller的依赖。所以我希望test_clientController加载示例数据集,然后呈现客户端Controller的索引View,以便我可以调整客户端UI。就是这样。我在test_clients索引方法中试过这个:classTestClientdefindexrender:template=>
我希望我的UserPrice模型的属性在它们为空或不验证数值时默认为0。这些属性是tax_rate、shipping_cost和price。classCreateUserPrices8,:scale=>2t.decimal:tax_rate,:precision=>8,:scale=>2t.decimal:shipping_cost,:precision=>8,:scale=>2endendend起初,我将所有3列的:default=>0放在表格中,但我不想要这样,因为它已经填充了字段,我想使用占位符。这是我的UserPrice模型:classUserPrice回答before_val
我有一个表单,其中有很多字段取自数组(而不是模型或对象)。我如何验证这些字段的存在?solve_problem_pathdo|f|%>... 最佳答案 创建一个简单的类来包装请求参数并使用ActiveModel::Validations。#definedsomewhere,atthesimplest:require'ostruct'classSolvetrue#youcouldevencheckthesolutionwithavalidatorvalidatedoerrors.add(:base,"WRONG!!!")unlesss
如果您尝试在Ruby中的nil对象上调用方法,则会出现NoMethodError异常并显示消息:"undefinedmethod‘...’fornil:NilClass"然而,有一个tryRails中的方法,如果它被发送到一个nil对象,它只返回nil:require'rubygems'require'active_support/all'nil.try(:nonexisting_method)#noNoMethodErrorexceptionanymore那么try如何在内部工作以防止该异常? 最佳答案 像Ruby中的所有其他对象
关闭。这个问题需要detailsorclarity.它目前不接受答案。想改进这个问题吗?通过editingthispost添加细节并澄清问题.关闭8年前。Improvethisquestion为什么SecureRandom.uuid创建一个唯一的字符串?SecureRandom.uuid#=>"35cb4e30-54e1-49f9-b5ce-4134799eb2c0"SecureRandom.uuid方法创建的字符串从不重复?
我有一些非常大的模型,我必须将它们迁移到最新版本的Rails。这些模型有相当多的验证(User有大约50个验证)。是否可以将所有这些验证移动到另一个文件中?说app/models/validations/user_validations.rb。如果可以,有人可以提供示例吗? 最佳答案 您可以为此使用关注点:#app/models/validations/user_validations.rbrequire'active_support/concern'moduleUserValidationsextendActiveSupport: