文章目录
以Mysql5.7.31版本为例
这里为了方便演示,使用
yum进行下载(其他系统的请使用自己对应的安装命令,在Windows或者MacOS上安装,请去官网下载二进制安装包),不进行源码编译安装
cat > /etc/yum.repos.d/mysql57.repo <<EOF
[mysql-5.7-community]
name=MySQL 5.7 Community Server
baseurl=https://mirrors.tuna.tsinghua.edu.cn/mysql/yum/mysql-5.7-community-el7-x86_64/
enabled=1
gpgcheck=1
gpgkey=https://repo.mysql.com/RPM-GPG-KEY-mysql
EOF


rpm --import https://repo.mysql.com/RPM-GPG-KEY-mysql-2022
yum -y install mysql-server

# 启动mysql
systemctl start mysqld
# 查看默认密码
cat /var/log/mysqld.log | grep password

# 登录Mysql
mysql -uroot -pwIu8_wS_nXpf

# 修改密码
mysql> set password=password('Syz123!@#');

# 如果日志内容报错[ERROR]
/usr/bin/mysql_upgrade -u root -p --force
Enter password:             ### 设定密码
修改Mysql的数据存储目录datadir
[mysqld]
datadir=/usr/local/mysql/data
socket=/var/lib/mysql/mysql.sock

# Disabling symbolic-links is recommended to prevent assorted security risks
symbolic-links=0

log-error=/var/log/mysqld.log
pid-file=/var/run/mysqld/mysqld.pid
创建目录并重启Mysql服务
mkdir -p /usr/local/mysql/data
systemctl restart mysql

[root@hecs-33592 ~]# ll /usr/local/mysql/data
total 122940
-rw-r----- 1 mysql mysql       56 Dec  9 13:45 auto.cnf
-rw------- 1 mysql mysql     1676 Dec  9 13:45 ca-key.pem
-rw-r--r-- 1 mysql mysql     1112 Dec  9 13:45 ca.pem
-rw-r--r-- 1 mysql mysql     1112 Dec  9 13:45 client-cert.pem
-rw------- 1 mysql mysql     1680 Dec  9 13:45 client-key.pem
-rw-r----- 1 mysql mysql      436 Dec  9 13:45 ib_buffer_pool
-rw-r----- 1 mysql mysql 12582912 Dec  9 13:46 ibdata1
-rw-r----- 1 mysql mysql 50331648 Dec  9 13:46 ib_logfile0
-rw-r----- 1 mysql mysql 50331648 Dec  9 13:45 ib_logfile1
-rw-r----- 1 mysql mysql 12582912 Dec  9 13:46 ibtmp1
drwxr-x--- 2 mysql mysql     4096 Dec  9 13:45 mysql
drwxr-x--- 2 mysql mysql     4096 Dec  9 13:45 performance_schema
-rw------- 1 mysql mysql     1680 Dec  9 13:45 private_key.pem
-rw-r--r-- 1 mysql mysql      452 Dec  9 13:45 public_key.pem
-rw-r--r-- 1 mysql mysql     1112 Dec  9 13:45 server-cert.pem
-rw------- 1 mysql mysql     1680 Dec  9 13:45 server-key.pem
drwxr-x--- 2 mysql mysql    12288 Dec  9 13:45 sys
[root@hecs-33592 ~]# vim /etc/my.cnf
skip-grant-tables	# 最下面加入这一行

[root@hecs-33592 ~]# systemctl restart mysqld

[root@hecs-33592 ~]# mysql -uroot -p
Enter password:		# 直接回车

mysql> use mysql;
Reading table information for completion of table and column names
You can turn off this feature to get a quicker startup with -A

Database changed
mysql> update user set authentication_string=password('Syz123!@#') where user='root';
Query OK, 1 row affected, 1 warning (0.00 sec)
Rows matched: 1  Changed: 1  Warnings: 1

mysql> flush privileges;
Query OK, 0 rows affected (0.00 sec)
然后注释掉/etc/my.cnf中的skip-grant-tables
重启mysql
mysql> create database d1 DEFAULT CHARSET utf8 COLLATE utf8_general_ci;
ERROR 1820 (HY000): You must reset your password using ALTER USER statement before executing this statement.

# 需要重新修改密码
mysql> set password=password('Syz123!@#');
Query OK, 0 rows affected, 1 warning (0.00 sec)
如果要配置Mysql为远程可登录,可作如下操作:
host改为自己的网段
mysql> use mysql
mysql> update user set host='192.168.10.%' where user='root';
mysql> flush privileges;
create database 数据库名字 DEFAULT CHARSET utf8 COLLATE utf8_general_ci;
Example
create database d1 DEFAULT CHARSET utf8 COLLATE utf8_general_ci;
drop database 数据库名字;
use 数据库名称;
show tables;
create table 表名称(
	列名称 类型,
	列名称 类型,
	列名称 类型
) default charset=utf8;
Example:
create table tb1(
	id int,
	name varchar(16) not null,	--不允许为空
	age int	null				--允许为空
) default charset=utf8;
create table tb1(
	id int,
	name varchar(16),
	age int default 3			--插入数据时,age列的默认值为3
) default charset=utf8;
create table tb1(
	id int primary key,			--主键(不允许为空,不允许重复)
	name varchar(16),
	age int
) default charset=utf8;
create table tb1(
	id int auto_increment primary key,		--内部维护,自增
	name varchar(16),
	age int
) default charset=utf8;
一般情况下,我们都会这样写:
create table tb1(
	id int not null auto_increment primary key,
	name varchar(16),
	age int
) default charset=utf8;
drop table 表名称;
查看表结构
mysql> desc tb1;
+-------+-------------+------+-----+---------+----------------+
| Field | Type        | Null | Key | Default | Extra          |
+-------+-------------+------+-----+---------+----------------+
| id    | int(11)     | NO   | PRI | NULL    | auto_increment |
| name  | varchar(16) | YES  |     | NULL    |                |
| age   | int(11)     | YES  |     | NULL    |                |
+-------+-------------+------+-----+---------+----------------+
有符号, 取值范围: -128 ~ 127(有正有负)
无符号, 取值范围: 0 ~ 255(只有正)
create table tb1(
	id int not null auto_increment primary key,
	age tinyint				--有符号, 取值范围: -128 ~ 127
) default charset=utf8;
create table tb1(
	id int not null auto_increment primary key,
	age tinyint unsigned	--无符号, 取值范围: 0 ~ 255
) default charset=utf8;
有符号, 取值范围: -2147483648 ~ 2147483647(有正有负)
无符号, 取值范围: 0 ~ 4294967295(只有正)
有符号, 取值范围: -9223372036854775808 ~ 9223372036854775807(有正有负)
无符号, 取值范围: 0 ~ 18446744073709551615(只有正)
create table tb1(
	id int auto_increment primary key,		--内部维护,自增
	name varchar(16),
	salary decimal(8,2)						--一共8位(整数位数+小数点位数), 保留小数点后2位
) default charset=utf8;
定长字符串, 默认固定用 11 个字符串进行存储,哪怕字符串个数不足,也按照11个字符存储
最多能存储255个字节的数据
查询效率高
变长字符串,默认最长 11 个字符,真实数据多长就按多长存储
最多能存储 65535 个字节的数据,中文可存储 65535/3 个汉字
相对 char 类型,查询效率低
保存变长的大字符串,可以最多到 65535 个字符
一般用于文章和新闻
YYYY-MM-DD HH:MM:SS (1000-01-01 00:00:00/9999-12-31 23:59:59)
YYYY-MM-DD (1000-01-01/9999-12-31)
insert into 表名称(字段1, 字段2, ...) values(1, "张三", ...);
Example:
insert into tb1(name,age) values("张三",25);
select 字段名(或者*) from 表名称;
select 字段名(或者*) from 表名称 where 条件;
Example:
mysql> select * from tb1;
+----+--------+------+
| id | name   | age  |
+----+--------+------+
|  1 | 张三   |   25 |
+----+--------+------+

mysql> select name from tb1;
+--------+
| name   |
+--------+
| 张三   |
+--------+

mysql> select * from tb1 where id = 1;
+----+--------+------+
| id | name   | age  |
+----+--------+------+
|  1 | 张三   |   25 |
+----+--------+------+
delete from 表名称;				--删除所有数据
delete from 表名称 where 条件;	--删除指定数据
Example:
delete from tb1 where id = 1;
delete from tb1 where id = 1 and name = "张三";
delete from tb1 where id = 1 or id = 100;
delete from tb1 where id > 100;
delete from tb1 where id != 50;
delete from tb1 where id in (10,15);
update 表名称 set 列 = 值;				--修改一列
update 表名称 set 列 = 值, 列 = 值;		--修改多列
update 表名称 set 列 = 值 where 条件;		--修改某行某列
Example:
update tb1 set name="李四" where id = 1;
update tb1 set age=age+10 where name=""李四;
命令实现
使用Mysql内置工具(命令)
- 创建数据库: unicom
- 创建数据表: admin
- 表名称: admin
- 列:
- id 整型 自增 主键
- username: 字符串 不为空
- password: 字符串 不为空
- mobile: 字符串 不为空
mysql> show databases;
+--------------------+
| Database           |
+--------------------+
| information_schema |
| d1                 |
| mysql              |
| performance_schema |
| sys                |
| unicom             |
+--------------------+
6 rows in set (0.00 sec)

mysql> use unicom
Database changed
mysql> create table admin (
    -> id int auto_increment primary key,
    -> username varchar(30) not null,
    -> password varchar(30) not null,
    -> mobile varchar(20) not null) default charset=utf8;
Query OK, 0 rows affected (0.01 sec)

mysql> desc admin;
+----------+-------------+------+-----+---------+----------------+
| Field    | Type        | Null | Key | Default | Extra          |
+----------+-------------+------+-----+---------+----------------+
| id       | int(11)     | NO   | PRI | NULL    | auto_increment |
| username | varchar(30) | NO   |     | NULL    |                |
| password | varchar(30) | NO   |     | NULL    |                |
| mobile   | varchar(20) | NO   |     | NULL    |                |
+----------+-------------+------+-----+---------+----------------+
4 rows in set (0.00 sec)
代码实现
Python 代码实现:
- 添加用户
- 删除用户
- 查看用户
- 更新用户信息
安装pymysql包
pip3 install pymysql
编辑python文件
#!/usr/bin/env python3

import pymysql

# 1.连接Mysql
conn = pymysql.connect(host='127.0.0.1', port=3306, user='root', passwd='Syz123!@#', charset='utf8', db='unicom')
cursor = conn.cursor(cursor=pymysql.cursors.DictCursor)

# 2.发送指令
cursor.execute("insert into admin(username, password, mobile) values('poker', '123456', '12345678912');")
conn.commit()

# 3.关闭
cursor.close()
conn.close()
运行
/bin/python3 /root/python/Mysql/createData.py
验证
mysql> select * from admin;
+----+----------+----------+-------------+
| id | username | password | mobile      |
+----+----------+----------+-------------+
|  3 | poker    | 123456   | 12345678912 |
+----+----------+----------+-------------+
1 row in set (0.00 sec)
优化
#!/usr/bin/env python3

import pymysql

# 1.连接Mysql
conn = pymysql.connect(host='127.0.0.1', port=3306, user='root', passwd='Syz123!@#', charset='utf8', db='unicom')
cursor = conn.cursor(cursor=pymysql.cursors.DictCursor)

# 2.发送指令
sql = "insert into admin(username, password, mobile) values(%s, %s, %s);"
cursor.execute(sql, ['toker', '123456', '12355674325'])
conn.commit()

# 3.关闭
cursor.close()
conn.close()
注意: sql语句不要使用字符串格式化,有会SQL注入的风险,需要使用 cursor.execute(sql, [参数1, 参数2, …])
#!/usr/bin/env python3

import pymysql

# 1.连接Mysql
conn = pymysql.connect(host='127.0.0.1', port=3306, user='root',
                       passwd='Syz123!@#', charset='utf8', db='unicom')
cursor = conn.cursor(cursor=pymysql.cursors.DictCursor)

# 2.发送指令
sql = "select * from admin where id > %s"
cursor.execute(sql, [2, ])
# data_list = cursor.fetchall()		查询一条数据,为字典
data_list = cursor.fetchall()		# 查询所有符合条件的数据,为列表套多个
字典
for row_dict in data_list:
    print(row_dict)

# 3.关闭
cursor.close()
conn.close()
输出结果如下
[root@hecs-33592 ~]# /bin/python3 /root/python/Mysql/searchData.py
{'id': 3, 'username': 'poker', 'password': '123456', 'mobile': '12345678912'}
{'id': 4, 'username': 'toker', 'password': '123456', 'mobile': '12355674325'}
删除
id大于 3 的行
#!/usr/bin/env python3

import pymysql

# 1.连接Mysql
conn = pymysql.connect(host='127.0.0.1', port=3306, user='root',
                       passwd='Syz123!@#', charset='utf8', db='unicom')
cursor = conn.cursor(cursor=pymysql.cursors.DictCursor)

# 2.发送指令
sql = "delete from admin where id > %s"
cursor.execute(sql, [3, ])
conn.commit()

# 3.关闭
cursor.close()
conn.close()
#!/usr/bin/env python3

import pymysql

# 1.连接Mysql
conn = pymysql.connect(host='127.0.0.1', port=3306, user='root',
                       passwd='Syz123!@#', charset='utf8', db='unicom')
cursor = conn.cursor(cursor=pymysql.cursors.DictCursor)

# 2.发送指令
sql = "update admin set mobile=%s where id = %s"
cursor.execute(sql, ['12332145665', 3])
conn.commit()

# 3.关闭
cursor.close()
conn.close()
main.py
from flask import Flask, render_template, request
import pymysql

app = Flask(__name__)


@app.route("/add/user", methods=['GET', 'POST'])
def addUser():
    if request.method == 'GET':
        return render_template("addUser.html")
    else:
        username = request.form.get('user')
        password = request.form.get('pwd')
        mobile = request.form.get('mobile')

        # 1.连接Mysql
        conn = pymysql.connect(host='127.0.0.1', port=3306, user='root',
                            passwd='Syz123!@#', charset='utf8', db='unicom')
        cursor = conn.cursor(cursor=pymysql.cursors.DictCursor)

        # 2.发送指令
        sql = "insert into admin(username, password, mobile) values(%s, %s, %s);"
        cursor.execute(sql, [username, password, mobile])
        conn.commit()

        # 3.关闭
        cursor.close()
        conn.close()

        return "添加成功"


if __name__ == '__main__':
    app.run(host='0.0.0.0', port=5200, debug=True)
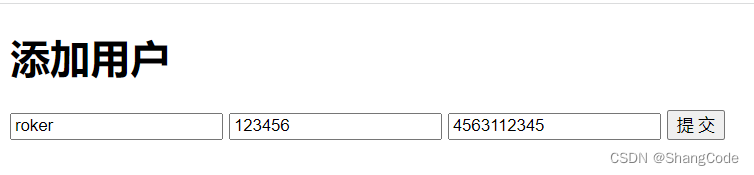
编写一个简单的前端页面添加数据
<!DOCTYPE html>
<html lang="en">
<head>
    <meta charset="UTF-8">
    <title>Document</title>
</head>
<body>
    <h1>添加用户</h1>
    <form method="post" action="/add/user">
        <input type="text" name="user" placeholder="用户名">
        <input type="text" name="pwd" placeholder="密码">
        <input type="text" name="mobile" placeholder="手机号">
        <input type="submit" value="提 交">
    </form>
</body>
</html>

mysql> select * from admin;
+----+----------+----------+-------------+
| id | username | password | mobile      |
+----+----------+----------+-------------+
|  3 | poker    | 123456   | 12332145665 |
|  5 | roker    | 123456   | 4563112345  |
+----+----------+----------+-------------+
main.py
from flask import Flask, render_template, request
import pymysql

app = Flask(__name__)


@app.route("/add/user", methods=['GET', 'POST'])
def addUser():
    if request.method == 'GET':
        return render_template("addUser.html")
    else:
        username = request.form.get('user')
        password = request.form.get('pwd')
        mobile = request.form.get('mobile')

        # 1.连接Mysql
        conn = pymysql.connect(host='127.0.0.1', port=3306, user='root',
                            passwd='Syz123!@#', charset='utf8', db='unicom')
        cursor = conn.cursor(cursor=pymysql.cursors.DictCursor)

        # 2.发送指令
        sql = "insert into admin(username, password, mobile) values(%s, %s, %s);"
        cursor.execute(sql, [username, password, mobile])
        conn.commit()

        # 3.关闭
        cursor.close()
        conn.close()

        return "添加成功"


@app.route("/show/user", methods=['GET', 'POST'])
def showUser():
    username = request.form.get('user')
    password = request.form.get('pwd')
    mobile = request.form.get('mobile')

    # 1.连接Mysql
    conn = pymysql.connect(host='127.0.0.1', port=3306, user='root',
                        passwd='Syz123!@#', charset='utf8', db='unicom')
    cursor = conn.cursor(cursor=pymysql.cursors.DictCursor)

    # 2.发送指令
    sql = "select * from admin"
    cursor.execute(sql)
    data_list = cursor.fetchall()

    # 3.关闭
    cursor.close()
    conn.close()

    return render_template("showUser.html", data_list=data_list)


if __name__ == '__main__':
    app.run(host='0.0.0.0', port=5200, debug=True)
编写HTML文件
<!DOCTYPE html>
<html lang="en">
<head>
    <meta charset="UTF-8">
    <title>Document</title>
</head>
<body>
    <h1>用户列表</h1>
    <table border="1">
        <thead>
            <tr>
                <th>ID</th>
                <th>姓名</th>
                <th>密码</th>
                <th>手机号</th>
            </tr>
        </thead>
        <tbody>
            {% for item in data_list %}
            <tr>
                <td>{{ item.id }}</td>
                <td>{{ item.username }}</td>
                <td>{{ item.password }}</td>
                <td>{{ item.mobile }}</td>
            </tr>
            {% endfor %}
        </tbody>
    </table>
</body>
</html>

优化
加入
bootstrap.css
<!DOCTYPE html>
<html lang="en">
<head>
    <meta charset="UTF-8">
    <title>Document</title>

    <link rel="stylesheet" href="../static/plugins/bootstrap-3.4.1/css/bootstrap.css">

</head>
<body>
    <div class="container">
        <h1>用户列表</h1>
        <table class="table table-bordered">
            <thead>
                <tr>
                    <th>ID</th>
                    <th>姓名</th>
                    <th>密码</th>
                    <th>手机号</th>
                </tr>
            </thead>
            <tbody>
                {% for item in data_list %}
                <tr>
                    <td>{{ item.id }}</td>
                    <td>{{ item.username }}</td>
                    <td>{{ item.password }}</td>
                    <td>{{ item.mobile }}</td>
                </tr>
                {% endfor %}
            </tbody>
        </table>
    </div>

</body>
</html>

我主要使用Ruby来执行此操作,但到目前为止我的攻击计划如下:使用gemsrdf、rdf-rdfa和rdf-microdata或mida来解析给定任何URI的数据。我认为最好映射到像schema.org这样的统一模式,例如使用这个yaml文件,它试图描述数据词汇表和opengraph到schema.org之间的转换:#SchemaXtoschema.orgconversion#data-vocabularyDV:name:namestreet-address:streetAddressregion:addressRegionlocality:addressLocalityphoto:i
我正在编写一个包含C扩展的gem。通常当我写一个gem时,我会遵循TDD的过程,我会写一个失败的规范,然后处理代码直到它通过,等等......在“ext/mygem/mygem.c”中我的C扩展和在gemspec的“扩展”中配置的有效extconf.rb,如何运行我的规范并仍然加载我的C扩展?当我更改C代码时,我需要采取哪些步骤来重新编译代码?这可能是个愚蠢的问题,但是从我的gem的开发源代码树中输入“bundleinstall”不会构建任何native扩展。当我手动运行rubyext/mygem/extconf.rb时,我确实得到了一个Makefile(在整个项目的根目录中),然后当
我已经在Sinatra上创建了应用程序,它代表了一个简单的API。我想在生产和开发上进行部署。我想在部署时选择,是开发还是生产,一些方法的逻辑应该改变,这取决于部署类型。是否有任何想法,如何完成以及解决此问题的一些示例。例子:我有代码get'/api/test'doreturn"Itisdev"end但是在部署到生产环境之后我想在运行/api/test之后看到ItisPROD如何实现? 最佳答案 根据SinatraDocumentation:EnvironmentscanbesetthroughtheRACK_ENVenvironm
有时我需要处理键/值数据。我不喜欢使用数组,因为它们在大小上没有限制(很容易不小心添加超过2个项目,而且您最终需要稍后验证大小)。此外,0和1的索引变成了魔数(MagicNumber),并且在传达含义方面做得很差(“当我说0时,我的意思是head...”)。散列也不合适,因为可能会不小心添加额外的条目。我写了下面的类来解决这个问题:classPairattr_accessor:head,:taildefinitialize(h,t)@head,@tail=h,tendend它工作得很好并且解决了问题,但我很想知道:Ruby标准库是否已经带有这样一个类? 最佳
我们的git存储库中目前有一个Gemfile。但是,有一个gem我只在我的环境中本地使用(我的团队不使用它)。为了使用它,我必须将它添加到我们的Gemfile中,但每次我checkout到我们的master/dev主分支时,由于与跟踪的gemfile冲突,我必须删除它。我想要的是类似Gemfile.local的东西,它将继承从Gemfile导入的gems,但也允许在那里导入新的gems以供使用只有我的机器。此文件将在.gitignore中被忽略。这可能吗? 最佳答案 设置BUNDLE_GEMFILE环境变量:BUNDLE_GEMFI
这似乎非常适得其反,因为太多的gem会在window上破裂。我一直在处理很多mysql和ruby-mysqlgem问题(gem本身发生段错误,一个名为UnixSocket的类显然在Windows机器上不能正常工作,等等)。我只是在浪费时间吗?我应该转向不同的脚本语言吗? 最佳答案 我在Windows上使用Ruby的经验很少,但是当我开始使用Ruby时,我是在Windows上,我的总体印象是它不是Windows原生系统。因此,在主要使用Windows多年之后,开始使用Ruby促使我切换回原来的系统Unix,这次是Linux。Rub
我正在玩HTML5视频并且在ERB中有以下片段:mp4视频从在我的开发环境中运行的服务器很好地流式传输到chrome。然而firefox显示带有海报图像的视频播放器,但带有一个大X。问题似乎是mongrel不确定ogv扩展的mime类型,并且只返回text/plain,如curl所示:$curl-Ihttp://0.0.0.0:3000/pr6.ogvHTTP/1.1200OKConnection:closeDate:Mon,19Apr201012:33:50GMTLast-Modified:Sun,18Apr201012:46:07GMTContent-Type:text/plain
我正在尝试使用Curbgem执行以下POST以解析云curl-XPOST\-H"X-Parse-Application-Id:PARSE_APP_ID"\-H"X-Parse-REST-API-Key:PARSE_API_KEY"\-H"Content-Type:image/jpeg"\--data-binary'@myPicture.jpg'\https://api.parse.com/1/files/pic.jpg用这个:curl=Curl::Easy.new("https://api.parse.com/1/files/lion.jpg")curl.multipart_form_
无论您是想搭建桌面端、WEB端或者移动端APP应用,HOOPSPlatform组件都可以为您提供弹性的3D集成架构,同时,由工业领域3D技术专家组成的HOOPS技术团队也能为您提供技术支持服务。如果您的客户期望有一种在多个平台(桌面/WEB/APP,而且某些客户端是“瘦”客户端)快速、方便地将数据接入到3D应用系统的解决方案,并且当访问数据时,在各个平台上的性能和用户体验保持一致,HOOPSPlatform将帮助您完成。利用HOOPSPlatform,您可以开发在任何环境下的3D基础应用架构。HOOPSPlatform可以帮您打造3D创新型产品,HOOPSSDK包含的技术有:快速且准确的CAD
在应用开发中,有时候我们需要获取系统的设备信息,用于数据上报和行为分析。那在鸿蒙系统中,我们应该怎么去获取设备的系统信息呢,比如说获取手机的系统版本号、手机的制造商、手机型号等数据。1、获取方式这里分为两种情况,一种是设备信息的获取,一种是系统信息的获取。1.1、获取设备信息获取设备信息,鸿蒙的SDK包为我们提供了DeviceInfo类,通过该类的一些静态方法,可以获取设备信息,DeviceInfo类的包路径为:ohos.system.DeviceInfo.具体的方法如下:ModifierandTypeMethodDescriptionstatic StringgetAbiList()Obt