业务系统正常运行的稳定性十分重要,作为SpringBoot的四大核心之一,Actuator让你时刻探知SpringBoot服务运行状态信息,是保障系统正常运行必不可少的组件。
spring-boot-starter-actuator提供的是一系列HTTP或者JMX监控端点,通过监控端点我们可以获取到系统的运行统计信息,同时,我们可以自己选择开启需要的监控端点,也可以自定义扩展监控端点。
Actuator通过端点对外暴露的监控信息是JSON格式数据,我们需要使用界面来展示,目前使用比较多的就是Spring Boot Admin或者Prometheus + Grafana的方式:Spring Boot Admin实现起来相对比较简单,不存在数据库,不能存储和展示历史监控数据;Prometheus(时序数据库) + Grafana(界面)的方式相比较而言功能更丰富,提供历史记录存储,界面展示也比较美观。
相比较而言,Prometheus + Grafana的方式更为流行一些,现在的微服务及Kubernetes基本是采用这种方式的。但是对于小的项目或者单体应用,Spring Boot Admin会更加方便快捷一些。具体采用那种方式,可以根据自己的系统运维需求来取舍,这里我们把框架集成两种方式,在实际应用过程中自有选择。
本文主要介绍如何集成Spring Boot Admin以及通过SpringSecurity控制Actuator的端点权限。
无论是使用Spring Boot Admin还是使用Prometheus + Grafana的方式都需要spring-boot-starter-actuator来获取监控信息,这里将spring-boot-starter-actuator包添加到gitegg-platform-boot基础平台包中,这样所有的微服务都集成了此功能。
        <!-- spring boot 健康监控 -->
        <dependency>
            <groupId>org.springframework.boot</groupId>
            <artifactId>spring-boot-starter-actuator</artifactId>
        </dependency>
spring-boot-admin-starter-server是Spring Boot Admin的服务端,我们需要新建一个SpringBoot工程来启动这个服务端,用来接收需要监控的服务注册,展示监控告警信息。spring-boot-admin-starter-client是客户端,需要被监控的服务需要引入这个依赖包。
此处请注意: 看到网上很多文章里面写着添加spring-boot-admin-starter-client包,在SpringCloud微服务中是不需要引入的,spring-boot-admin-starter-client包仅仅是为了引入我们gitegg-platform平台工程的对应版本,在gitegg-boot框架中使用,在SpringCloud微服务框架中,不需要引入spring-boot-admin-starter-client,SpringBootAdmin会自动根据微服务注册信息查找服务端点,官方文档说明:spring-cloud-discovery-support 。
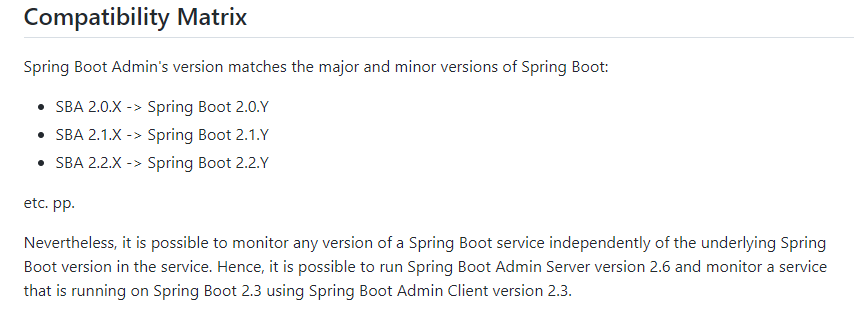
在选择版本时,一定要找到对应SpringBoot版本的Spring Boot Admin,GitHub上有版本对应关系的说明:
我们在gitegg-platform-pom中来定义需要引入的spring-boot-admin-starter-server和spring-boot-admin-starter-client依赖包版本,然后在微服务业务开发中具体引入,这里不做统一引入,方便微服务切换监控方式。
......
        <!-- spring-boot-admin 微服务监控-->
        <spring.boot.admin.version>2.3.1</spring.boot.admin.version>
......
            <!-- spring-boot-admin监控 服务端 https://mvnrepository.com/artifact/de.codecentric/spring-boot-admin-starter-server -->
            <dependency>
                <groupId>de.codecentric</groupId>
                <artifactId>spring-boot-admin-starter-server</artifactId>
                <version>${spring.boot.admin.version}</version>
            </dependency>

            <!-- spring-boot-admin监控 客户端 https://mvnrepository.com/artifact/de.codecentric/spring-boot-admin-starter-client -->
            <dependency>
                <groupId>de.codecentric</groupId>
                <artifactId>spring-boot-admin-starter-client</artifactId>
                <version>${spring.boot.admin.version}</version>
            </dependency>.
......
    <dependencies>
        <!-- gitegg Spring Boot自定义及扩展 -->
        <dependency>
            <groupId>com.gitegg.platform</groupId>
            <artifactId>gitegg-platform-boot</artifactId>
            <!-- 去除gitegg-platform-boot默认的依赖-->
            <exclusions>
                <exclusion>
                    <groupId>com.gitegg.platform</groupId>
                    <artifactId>gitegg-platform-cache</artifactId>
                </exclusion>
            </exclusions>
        </dependency>
        <!-- gitegg Spring Cloud自定义及扩展 -->
        <dependency>
            <groupId>com.gitegg.platform</groupId>
            <artifactId>gitegg-platform-cloud</artifactId>
        </dependency>
        <!-- security -->
        <dependency>
            <groupId>org.springframework.boot</groupId>
            <artifactId>spring-boot-starter-security</artifactId>
            <!-- 去除springboot默认的logback配置-->
            <exclusions>
                <exclusion>
                    <groupId>org.springframework.boot</groupId>
                    <artifactId>spring-boot-starter-logging</artifactId>
                </exclusion>
            </exclusions>
        </dependency>
        <dependency>
            <groupId>de.codecentric</groupId>
            <artifactId>spring-boot-admin-starter-server</artifactId>
        </dependency>
    </dependencies>
@EnableAdminServer
@SpringBootApplication
@RefreshScope
public class GitEggMonitorApplication {

    public static void main(String[] args)
    {
        SpringApplication.run(GitEggMonitorApplication.class, args);
    }

}
@Configuration(proxyBeanMethods = false)
public class SecuritySecureConfig extends WebSecurityConfigurerAdapter {

    private final AdminServerUiProperties adminUi;

    private final AdminServerProperties adminServer;

    private final SecurityProperties security;

    public SecuritySecureConfig(AdminServerUiProperties adminUi, AdminServerProperties adminServer, SecurityProperties security) {
        this.adminUi = adminUi;
        this.adminServer = adminServer;
        this.security = security;
    }

    @Override
    protected void configure(HttpSecurity http) throws Exception {

        // 当设置了publicUrl时,Gateway跳转到login或logout链接需要redirect到publicUrl
        String publicUrl = this.adminUi.getPublicUrl() != null ? this.adminUi.getPublicUrl() : this.adminServer.getContextPath();
        SavedRequestAwareAuthenticationSuccessHandler successHandler = new SavedRequestAwareAuthenticationSuccessHandler();
        successHandler.setTargetUrlParameter("redirectTo");
        successHandler.setDefaultTargetUrl(publicUrl + "/");

        http.authorizeRequests(
                (authorizeRequests) -> authorizeRequests.antMatchers(this.adminServer.path("/assets/**")).permitAll()
                        .antMatchers(this.adminServer.path("/actuator/info")).permitAll()
                        .antMatchers(this.adminServer.path("/actuator/health")).permitAll()
                        .antMatchers(this.adminServer.path("/login")).permitAll().anyRequest().authenticated()
        ).formLogin(
                (formLogin) -> formLogin.loginPage(publicUrl + "/login").loginProcessingUrl(this.adminServer.path("/login")).successHandler(successHandler).and()
        ).logout((logout) -> logout.logoutUrl(publicUrl + "/logout")).httpBasic(Customizer.withDefaults())
                .csrf((csrf) -> csrf.csrfTokenRepository(CookieCsrfTokenRepository.withHttpOnlyFalse())
                        .ignoringRequestMatchers(
                                new AntPathRequestMatcher(this.adminServer.path("/instances"),
                                        HttpMethod.POST.toString()),
                                new AntPathRequestMatcher(this.adminServer.path("/instances/*"),
                                        HttpMethod.DELETE.toString()),
                                new AntPathRequestMatcher(this.adminServer.path("/actuator/**"))
                        ))
                .rememberMe((rememberMe) -> rememberMe.key(UUID.randomUUID().toString()).tokenValiditySeconds(1209600));
    }

    /**
     * Required to provide UserDetailsService for "remember functionality"
     * @param auth
     * @throws Exception
     */
    @Override
    protected void configure(AuthenticationManagerBuilder auth) throws Exception {
        auth.inMemoryAuthentication().withUser(security.getUser().getName())
                .password("{noop}" + security.getUser().getPassword()).roles(security.getUser().getRoles().toArray(new String[0]));
    }

}
spring:
  boot:
    admin:
      ui:
        brand: <img src="https://img2022.cnblogs.com/blog/460952/202207/460952-20220727124816822-208395561.png"><span>GitEgg微服务监控系统</span>
        title: GitEgg微服务监控系统
        favicon: https://img2022.cnblogs.com/blog/460952/202207/460952-20220727124816822-208395561.png
        public-url: http://127.0.0.1:80/gitegg-admin-monitor/monitor
      context-path: /monitor
server:
  port: 8009
spring:
  profiles:
    active: '@spring.profiles.active@'
  application:
    name: '@artifactId@'
  cloud:
    inetutils:
      ignored-interfaces: docker0
    nacos:
      discovery:
        server-addr: ${spring.nacos.addr}
        metadata:
          # 启用SpringBootAdmin时 客户端端点信息的安全认证信息
          user.name: ${spring.security.user.name}
          user.password: ${spring.security.user.password}
      config:
        server-addr: ${spring.nacos.addr}
        file-extension: yaml
        extension-configs:
          # 必须带文件扩展名,此时 file-extension 的配置对自定义扩展配置的 Data Id 文件扩展名没有影响
          - data-id: ${spring.nacos.config.prefix}.yaml
            group: ${spring.nacos.config.group}
            refresh: true
          - data-id: ${spring.nacos.config.prefix}-admin-monitor.yaml
            group: ${spring.nacos.config.group}
            refresh: true
SpringSecurity权限验证支持多过滤器配置,同时可配置验证顺序,我们这里需要改造之前的过滤器,这里新增Basic认证过滤器,通过securityMatcher设置,只有健康检查的请求走这个权限过滤器,其他请求继续走之前我们设置的OAuth2+JWT权限验证器。
/**
 * 权限配置
 * 注解需要使用@EnableWebFluxSecurity而非@EnableWebSecurity,因为SpringCloud Gateway基于WebFlux
 *
 * @author GitEgg
 *
 */
@RequiredArgsConstructor(onConstructor_ = @Autowired)
@Configuration
@EnableWebFluxSecurity
public class MultiWebSecurityConfig {

    private final AuthorizationManager authorizationManager;

    private final AuthServerAccessDeniedHandler authServerAccessDeniedHandler;

    private final AuthServerAuthenticationEntryPoint authServerAuthenticationEntryPoint;

    private final AuthUrlWhiteListProperties authUrlWhiteListProperties;

    private final WhiteListRemoveJwtFilter whiteListRemoveJwtFilter;

    private final SecurityProperties securityProperties;

    @Value("${management.endpoints.web.base-path:}")
    private String actuatorPath;

    /**
     * 健康检查接口权限配置
     * @param http
     * @return
     */
    @Order(Ordered.HIGHEST_PRECEDENCE)
    @Bean
    @ConditionalOnProperty( value = {"management.security.enabled", "management.endpoints.enabled-by-default"}, havingValue = "true")
    SecurityWebFilterChain webHttpSecurity(ServerHttpSecurity http) {
        if (StringUtils.isEmpty(actuatorPath))
        {
            throw new BusinessException("当启用健康检查时,不允许健康检查的路径为空");
        }
        http
                .cors()
                .and()
                .csrf().disable()
                .formLogin().disable()
                .securityMatcher(new OrServerWebExchangeMatcher(
                        new PathPatternParserServerWebExchangeMatcher(actuatorPath + "/**"),
                        new PathPatternParserServerWebExchangeMatcher("/**" + actuatorPath + "/**")
                ))
                .authorizeExchange((exchanges) -> exchanges
                        .anyExchange().hasAnyRole(securityProperties.getUser().getRoles().toArray(new String[0]))
                )
                .httpBasic(Customizer.withDefaults());
        return http.build();
    }

    /**
     * 设置Basic认证用户信息
     * @return
     */
    @Bean
    @ConditionalOnProperty( value = {"management.security.enabled", "management.endpoints.enabled-by-default"}, havingValue = "true")
    ReactiveUserDetailsService userDetailsService() {
        return new MapReactiveUserDetailsService(User
                .withUsername(securityProperties.getUser().getName())
                .password(passwordEncoder().encode(securityProperties.getUser().getPassword()))
                .roles(securityProperties.getUser().getRoles().toArray(new String[0]))
                .build());
    }

    /**
     * 设置密码编码
     * @return
     */
    @Bean
    @ConditionalOnProperty( value = {"management.security.enabled", "management.endpoints.enabled-by-default"}, havingValue = "true")
    public static PasswordEncoder passwordEncoder() {
        DelegatingPasswordEncoder delegatingPasswordEncoder =
                (DelegatingPasswordEncoder) PasswordEncoderFactories.createDelegatingPasswordEncoder();
        return  delegatingPasswordEncoder;
    }

    /**
     * 路由转发权限配置
     * @param http
     * @return
     */
    @Bean
    SecurityWebFilterChain apiHttpSecurity(ServerHttpSecurity http) {

        http.oauth2ResourceServer().jwt()
                .jwtAuthenticationConverter(jwtAuthenticationConverter());

        // 自定义处理JWT请求头过期或签名错误的结果
        http.oauth2ResourceServer().authenticationEntryPoint(authServerAuthenticationEntryPoint);

        // 对白名单路径,直接移除JWT请求头,不移除的话,后台会校验jwt
        http.addFilterBefore(whiteListRemoveJwtFilter, SecurityWebFiltersOrder.AUTHENTICATION);

        // Basic认证直接放行
        if (!CollectionUtils.isEmpty(authUrlWhiteListProperties.getTokenUrls()))
        {
            http.authorizeExchange().pathMatchers(ArrayUtil.toArray(authUrlWhiteListProperties.getTokenUrls(), String.class)).permitAll();
        }

        // 判断是否有静态文件
        if (!CollectionUtils.isEmpty(authUrlWhiteListProperties.getStaticFiles()))
        {
            http.authorizeExchange().pathMatchers(ArrayUtil.toArray(authUrlWhiteListProperties.getStaticFiles(), String.class)).permitAll();
        }

        http.authorizeExchange()
                .pathMatchers(ArrayUtil.toArray(authUrlWhiteListProperties.getWhiteUrls(), String.class)).permitAll()
                .anyExchange().access(authorizationManager)
                .and()
                .exceptionHandling()
                /**
                 * 处理未授权
                 */
                .accessDeniedHandler(authServerAccessDeniedHandler)
                /**
                 * 处理未认证
                 */
                .authenticationEntryPoint(authServerAuthenticationEntryPoint)
                .and()
                .cors()
                .and().csrf().disable();

        return http.build();
    }

    /**
     * ServerHttpSecurity没有将jwt中authorities的负载部分当做Authentication,需要把jwt的Claim中的authorities加入
     * 解决方案:重新定义ReactiveAuthenticationManager权限管理器,默认转换器JwtGrantedAuthoritiesConverter
     */
    @Bean
    public Converter<Jwt, ? extends Mono<? extends AbstractAuthenticationToken>> jwtAuthenticationConverter() {
        JwtGrantedAuthoritiesConverter jwtGrantedAuthoritiesConverter = new JwtGrantedAuthoritiesConverter();
        jwtGrantedAuthoritiesConverter.setAuthorityPrefix(AuthConstant.AUTHORITY_PREFIX);
        jwtGrantedAuthoritiesConverter.setAuthoritiesClaimName(AuthConstant.AUTHORITY_CLAIM_NAME);

        JwtAuthenticationConverter jwtAuthenticationConverter = new JwtAuthenticationConverter();
        jwtAuthenticationConverter.setJwtGrantedAuthoritiesConverter(jwtGrantedAuthoritiesConverter);
        return new ReactiveJwtAuthenticationConverterAdapter(jwtAuthenticationConverter);
    }
}
spring:
......
  security:
    # # 启用SpringBootAdmin时,健康检查权限校验,不使用SpringBootAdmin此处可省略
    user:
      name: user
      password: password
      roles: ACTUATOR_ADMIN
......

# 性能监控端点配置
management:
  security:
    enabled: true
    role: ACTUATOR_ADMIN
  endpoint:
    health:
      show-details: always
  endpoints:
    enabled-by-default: true
    web:
      base-path: /actuator
      exposure:
        include: '*'
  server:
    servlet:
      context-path: /actuator
  health:
    mail:
      enabled: false
......
spring:
    gateway:
      discovery:
        locator:
          enabled: true
      routes:
......
        - id: gitegg-admin-monitor
          uri: lb://gitegg-admin-monitor
          predicates:
            - Path=/gitegg-admin-monitor/**
          filters:
            - StripPrefix=1
        - id: monitor
          uri: lb://gitegg-admin-monitor
          predicates:
            - Path=/monitor/**
          filters:
            - StripPrefix=0
......
根据我们在Nacos中的配置,我们这里的登录用户名密码是:user / password


以上为SpringBootAdmin在SpringCloud微服务中的搭建和配置步骤,相比较而言比较简单,但是一定要注意权限问题,不要因为健康检查而泄露了系统信息。我们这里是通过Gateway进行的统一鉴权,在生产环境部署时,一定要注意修改默认的Basic校验用户名密码,甚至需要修改健康检查端点。
我有一个用户工厂。我希望默认情况下确认用户。但是鉴于unconfirmed特征,我不希望它们被确认。虽然我有一个基于实现细节而不是抽象的工作实现,但我想知道如何正确地做到这一点。factory:userdoafter(:create)do|user,evaluator|#unwantedimplementationdetailshereunlessFactoryGirl.factories[:user].defined_traits.map(&:name).include?(:unconfirmed)user.confirm!endendtrait:unconfirmeddoenden
有没有办法在这个简单的get方法中添加超时选项?我正在使用法拉第3.3。Faraday.get(url)四处寻找,我只能先发起连接后应用超时选项,然后应用超时选项。或者有什么简单的方法?这就是我现在正在做的:conn=Faraday.newresponse=conn.getdo|req|req.urlurlreq.options.timeout=2#2secondsend 最佳答案 试试这个:conn=Faraday.newdo|conn|conn.options.timeout=20endresponse=conn.get(url
我想在Ruby中创建一个用于开发目的的极其简单的Web服务器(不,不想使用现成的解决方案)。代码如下:#!/usr/bin/rubyrequire'socket'server=TCPServer.new('127.0.0.1',8080)whileconnection=server.acceptheaders=[]length=0whileline=connection.getsheaders想法是从命令行运行这个脚本,提供另一个脚本,它将在其标准输入上获取请求,并在其标准输出上返回完整的响应。到目前为止一切顺利,但事实证明这真的很脆弱,因为它在第二个请求上中断并出现错误:/usr/b
我意识到这可能是一个非常基本的问题,但我现在已经花了几天时间回过头来解决这个问题,但出于某种原因,Google就是没有帮助我。(我认为部分问题在于我是一个初学者,我不知道该问什么......)我也看过O'Reilly的RubyCookbook和RailsAPI,但我仍然停留在这个问题上.我找到了一些关于多态关系的信息,但它似乎不是我需要的(尽管如果我错了请告诉我)。我正在尝试调整MichaelHartl'stutorial创建一个包含用户、文章和评论的博客应用程序(不使用脚手架)。我希望评论既属于用户又属于文章。我的主要问题是:我不知道如何将当前文章的ID放入评论Controller。
我的工作要求我为某些测试自动生成电子邮件。我一直在四处寻找,但未能找到可以快速实现的合理解决方案。它需要在outlook而不是其他邮件服务器中,因为我们有一些奇怪的身份验证规则,我们需要保存草稿而不是仅仅发送邮件的选项。显然win32ole可以做到这一点,但我找不到任何相当简单的例子。 最佳答案 假设存储了Outlook凭据并且您设置为自动登录到Outlook,WIN32OLE可以很好地完成此操作:require'win32ole'outlook=WIN32OLE.new('Outlook.Application')message=
电脑0x0000001A蓝屏错误怎么U盘重装系统教学分享。有用户电脑开机之后遇到了系统蓝屏的情况。系统蓝屏问题很多时候都是系统bug,只有通过重装系统来进行解决。那么蓝屏问题如何通过U盘重装新系统来解决呢?来看看以下的详细操作方法教学吧。 准备工作: 1、U盘一个(尽量使用8G以上的U盘)。 2、一台正常联网可使用的电脑。 3、ghost或ISO系统镜像文件(Win10系统下载_Win10专业版_windows10正式版下载-系统之家)。 4、在本页面下载U盘启动盘制作工具:系统之家U盘启动工具。 U盘启动盘制作步骤: 注意:制作期间,U盘会被格式化,因此U盘中的重要文件请注
华为OD机试题本篇题目:明明的随机数题目输入描述输出描述:示例1输入输出说明代码编写思路最近更新的博客华为od2023|什么是华为od,od薪资待遇,od机试题清单华为OD机试真题大全,用Python解华为机试题|机试宝典【华为OD机试】全流程解析+经验分享,题型分享,防作弊指南华为o
在应用开发中,有时候我们需要获取系统的设备信息,用于数据上报和行为分析。那在鸿蒙系统中,我们应该怎么去获取设备的系统信息呢,比如说获取手机的系统版本号、手机的制造商、手机型号等数据。1、获取方式这里分为两种情况,一种是设备信息的获取,一种是系统信息的获取。1.1、获取设备信息获取设备信息,鸿蒙的SDK包为我们提供了DeviceInfo类,通过该类的一些静态方法,可以获取设备信息,DeviceInfo类的包路径为:ohos.system.DeviceInfo.具体的方法如下:ModifierandTypeMethodDescriptionstatic StringgetAbiList()Obt
这篇文章是继上一篇文章“Observability:从零开始创建Java微服务并监控它(一)”的续篇。在上一篇文章中,我们讲述了如何创建一个Javaweb应用,并使用Filebeat来收集应用所生成的日志。在今天的文章中,我来详述如何收集应用的指标,使用APM来监控应用并监督web服务的在线情况。源码可以在地址 https://github.com/liu-xiao-guo/java_observability 进行下载。摄入指标指标被视为可以随时更改的时间点值。当前请求的数量可以改变任何毫秒。你可能有1000个请求的峰值,然后一切都回到一个请求。这也意味着这些指标可能不准确,你还想提取最小/
C#实现简易绘图工具一.引言实验目的:通过制作窗体应用程序(C#画图软件),熟悉基本的窗体设计过程以及控件设计,事件处理等,熟悉使用C#的winform窗体进行绘图的基本步骤,对于面向对象编程有更加深刻的体会.Tutorial任务设计一个具有基本功能的画图软件**·包括简单的新建文件,保存,重新绘图等功能**·实现一些基本图形的绘制,包括铅笔和基本形状等,学习橡皮工具的创建**·设计一个合理舒适的UI界面**注明:你可能需要先了解一些关于winform窗体应用程序绘图的基本知识,以及关于GDI+类和结构的知识二.实验环境Windows系统下的visualstudio2017C#窗体应用程序三.