使用kolla-ansible部署一个openstack victoria版集群,然后对接ceph存储。
使用5台虚拟机,详细信息如下
| 角色 | 主机名 | 规格 | IP | 系统 |
|---|---|---|---|---|
| 控制节点+部署机+docker-registry | control-01 | 2u4g | ens33: 192.168.211.20(用于连接公网和openstack-api) ens34: 192.168.112.20 (用于neutron-extenal-network) | Ubuntu20.04 |
| 控制节点 | control-02 | 2u4g | ens33: 192.168.211.21(用于连接公网和openstack-api) ens34: 192.168.112.21 (用于neutron-extenal-network) | Ubuntu20.04 |
| 控制节点 | control-02 | 2u4g | ens33: 192.168.211.22(用于连接公网和openstack-api) ens34: 192.168.112.22 (用于neutron-external-network) | Ubuntu20.04 |
| 计算节点 | compute-01 | 4u8g | ens33: 192.168.211.20(用于连接公网和openstack-api) ens34: 192.168.112.20 (用于虚拟机网络) | Ubuntu20.04 |
| 计算节点 | compute-02 | 4u8g | ens33: 192.168.211.20(用于连接公网和openstack-api) ens34: 192.168.112.20 (用于虚拟机网络) | Ubuntu20.04 |
PASS=123456
for i in {20..24}; do \
sshpass -p $PASS ssh-copy-id -o StrictHostKeyChecking=no ceeinfra@192.168.112.$i;done
在所有节点配置主机名解析,编辑/etc/hosts文件,内容如下:
ceeinfra@control-02:~$ sudo cat /etc/hosts
127.0.0.1 localhost

# The following lines are desirable for IPv6 capable hosts
::1     ip6-localhost ip6-loopback
fe00::0 ip6-localnet
ff00::0 ip6-mcastprefix
ff02::1 ip6-allnodes
ff02::2 ip6-allrouters
192.168.211.20 control-01
192.168.211.21 control-02
192.168.211.22 control-03
192.168.211.23 compute-01
192.168.211.24 compute-02

# openstack api address
192.168.211.25 openstack-api
由于我的网络较差,从dockerhub下载镜像很慢(配置了镜像加速也没用),所以我自己在control-01节点搭建了一个镜像仓库,在公网上将download下来后,再传到我的本地仓库。这个步骤是可选的,如果网络够好,下载镜像很快可以忽略这一步。
在control-01安装相关依赖包
sudo apt install python3-dev libffi-dev gcc libssl-dev python3-pip
在control-01安装ansible
sudo apt install ansible
然后在control-01安装kolla-ansible,选择和openstack版本对应的kolla-ansible版本即可
sudo pip3 install git+https://opendev.org/openstack/kolla-ansible@stable/victoria
复制kolla-ansible的相关配置文件
sudo mkdir -p /etc/kolla
sudo chown $USER:$USER /etc/kolla
cp -r /usr/local/share/kolla-ansible/etc_examples/kolla/* /etc/kolla
cp /usr/local/share/kolla-ansible/ansible/inventory/* .
编辑/etc/ansible/ansible.cfg,修改部分ansible的参数
[defaults]
host_key_checking=False
pipelining=True
forks=100
编辑kolla-ansible的inventory文件,主要涉及到两个文件:一个是all-in-one,这个文件适用于单机构建openstack集群;另一个是multinode,这个文件适用于多节点构建openstack集群。
因为本次部署是多节点,所以编辑multinode文件,主要修改了control、compute、network、monitoring、storage组对应的主机,其余的保持默认配置,具体内容如下:
# These initial groups are the only groups required to be modified. The
# additional groups are for more control of the environment.
[control]
# These hostname must be resolvable from your deployment host
control-01
control-02
control-03

# The above can also be specified as follows:
#control[01:03]     ansible_user=kolla

# The network nodes are where your l3-agent and loadbalancers will run
# This can be the same as a host in the control group
[network:children]
control


[compute]
compute-01
compute-02

[monitoring:children]
control

# When compute nodes and control nodes use different interfaces,
# you need to comment out "api_interface" and other interfaces from the globals.yml
# and specify like below:
#compute01 neutron_external_interface=eth0 api_interface=em1 storage_interface=em1 tunnel_interface=em1

[storage:children]
control

[deployment]
localhost       ansible_connection=local

[baremetal:children]
control
network
compute
storage
monitoring

[tls-backend:children]
control

# You can explicitly specify which hosts run each project by updating the
# groups in the sections below. Common services are grouped together.

[common:children]
control
network
compute
storage
monitoring

[chrony-server:children]
haproxy

[chrony:children]
control
network
compute
storage
monitoring

[collectd:children]
compute

[grafana:children]
monitoring

[etcd:children]
control

[influxdb:children]
monitoring

[prometheus:children]
monitoring

[kafka:children]
control

[karbor:children]
control

[kibana:children]
control

[telegraf:children]
compute
control
monitoring
network
storage

[elasticsearch:children]
control

[haproxy:children]
network

[mariadb:children]
control

[rabbitmq:children]
control

[outward-rabbitmq:children]
control

[qdrouterd:children]
control

[monasca-agent:children]
compute
control
monitoring
network
storage

[monasca:children]
monitoring

[storm:children]
monitoring

[keystone:children]
control

[glance:children]
control

[nova:children]
control

[neutron:children]
network

[openvswitch:children]
network
compute
manila-share

[cinder:children]
control

[cloudkitty:children]
control

[freezer:children]
control

[memcached:children]
control

[horizon:children]
control

[swift:children]
control

[barbican:children]
control

[heat:children]
control

[murano:children]
control

[solum:children]
control

[ironic:children]
control

[magnum:children]
control

[qinling:children]
control

[sahara:children]
control

[mistral:children]
control

[manila:children]
control

[ceilometer:children]
control

[aodh:children]
control

[cyborg:children]
control
compute

[panko:children]
control

[gnocchi:children]
control

[tacker:children]
control

[trove:children]
control

# Tempest
[tempest:children]
control

[senlin:children]
control

[vmtp:children]
control

[vitrage:children]
control

[watcher:children]
control

[rally:children]
control

[searchlight:children]
control

[octavia:children]
control

[designate:children]
control

[placement:children]
control

[bifrost:children]
deployment

[zookeeper:children]
control

[zun:children]
control

[skydive:children]
monitoring

[redis:children]
control

[blazar:children]
control

# Additional control implemented here. These groups allow you to control which
# services run on which hosts at a per-service level.
#
# Word of caution: Some services are required to run on the same host to
# function appropriately. For example, neutron-metadata-agent must run on the
# same host as the l3-agent and (depending on configuration) the dhcp-agent.

# Common
[cron:children]
common

[fluentd:children]
common

[kolla-logs:children]
common

[kolla-toolbox:children]
common

# Elasticsearch Curator
[elasticsearch-curator:children]
elasticsearch

# Glance
[glance-api:children]
glance

# Nova
[nova-api:children]
nova

[nova-conductor:children]
nova

[nova-super-conductor:children]
nova

[nova-novncproxy:children]
nova

[nova-scheduler:children]
nova

[nova-spicehtml5proxy:children]
nova

[nova-compute-ironic:children]
nova

[nova-serialproxy:children]
nova

# Neutron
[neutron-server:children]
control

[neutron-dhcp-agent:children]
neutron

[neutron-l3-agent:children]
neutron

[neutron-metadata-agent:children]
neutron

[neutron-ovn-metadata-agent:children]
compute

[neutron-bgp-dragent:children]
neutron

[neutron-infoblox-ipam-agent:children]
neutron

[neutron-metering-agent:children]
neutron

[ironic-neutron-agent:children]
neutron

# Cinder
[cinder-api:children]
cinder

[cinder-backup:children]
storage

[cinder-scheduler:children]
cinder

[cinder-volume:children]
storage

# Cloudkitty
[cloudkitty-api:children]
cloudkitty

[cloudkitty-processor:children]
cloudkitty

# Freezer
[freezer-api:children]
freezer

[freezer-scheduler:children]
freezer

# iSCSI
[iscsid:children]
compute
storage
ironic

[tgtd:children]
storage

# Karbor
[karbor-api:children]
karbor

[karbor-protection:children]
karbor

[karbor-operationengine:children]
karbor

# Manila
[manila-api:children]
manila

[manila-scheduler:children]
manila

[manila-share:children]
network

[manila-data:children]
manila

# Swift
[swift-proxy-server:children]
swift

[swift-account-server:children]
storage

[swift-container-server:children]
storage

[swift-object-server:children]
storage

# Barbican
[barbican-api:children]
barbican

[barbican-keystone-listener:children]
barbican

[barbican-worker:children]
barbican

# Heat
[heat-api:children]
heat

[heat-api-cfn:children]
heat

[heat-engine:children]
heat

# Murano
[murano-api:children]
murano

[murano-engine:children]
murano

# Monasca
[monasca-agent-collector:children]
monasca-agent

[monasca-agent-forwarder:children]
monasca-agent

[monasca-agent-statsd:children]
monasca-agent

[monasca-api:children]
monasca

[monasca-grafana:children]
monasca

[monasca-log-transformer:children]
monasca

[monasca-log-persister:children]
monasca

[monasca-log-metrics:children]
monasca

[monasca-thresh:children]
monasca

[monasca-notification:children]
monasca

[monasca-persister:children]
monasca

# Storm
[storm-worker:children]
storm

[storm-nimbus:children]
storm

# Ironic
[ironic-api:children]
ironic

[ironic-conductor:children]
ironic

[ironic-inspector:children]
ironic

[ironic-pxe:children]
ironic

[ironic-ipxe:children]
ironic

# Magnum
[magnum-api:children]
magnum

[magnum-conductor:children]
magnum

# Qinling
[qinling-api:children]
qinling

[qinling-engine:children]
qinling

# Sahara
[sahara-api:children]
sahara

[sahara-engine:children]
sahara

# Solum
[solum-api:children]
solum

[solum-worker:children]
solum

[solum-deployer:children]
solum

[solum-conductor:children]
solum

[solum-application-deployment:children]
solum

[solum-image-builder:children]
solum

# Mistral
[mistral-api:children]
mistral

[mistral-executor:children]
mistral

[mistral-engine:children]
mistral

[mistral-event-engine:children]
mistral

# Ceilometer
[ceilometer-central:children]
ceilometer

[ceilometer-notification:children]
ceilometer

[ceilometer-compute:children]
compute

[ceilometer-ipmi:children]
compute

# Aodh
[aodh-api:children]
aodh

[aodh-evaluator:children]
aodh

[aodh-listener:children]
aodh

[aodh-notifier:children]
aodh

# Cyborg
[cyborg-api:children]
cyborg

[cyborg-agent:children]
compute

[cyborg-conductor:children]
cyborg

# Panko
[panko-api:children]
panko

# Gnocchi
[gnocchi-api:children]
gnocchi

[gnocchi-statsd:children]
gnocchi

[gnocchi-metricd:children]
gnocchi

# Trove
[trove-api:children]
trove

[trove-conductor:children]
trove

[trove-taskmanager:children]
trove

# Multipathd
[multipathd:children]
compute
storage

# Watcher
[watcher-api:children]
watcher

[watcher-engine:children]
watcher

[watcher-applier:children]
watcher

# Senlin
[senlin-api:children]
senlin

[senlin-conductor:children]
senlin

[senlin-engine:children]
senlin

[senlin-health-manager:children]
senlin

# Searchlight
[searchlight-api:children]
searchlight

[searchlight-listener:children]
searchlight

# Octavia
[octavia-api:children]
octavia

[octavia-driver-agent:children]
octavia

[octavia-health-manager:children]
octavia

[octavia-housekeeping:children]
octavia

[octavia-worker:children]
octavia

# Designate
[designate-api:children]
designate

[designate-central:children]
designate

[designate-producer:children]
designate

[designate-mdns:children]
network

[designate-worker:children]
designate

[designate-sink:children]
designate

[designate-backend-bind9:children]
designate

# Placement
[placement-api:children]
placement

# Zun
[zun-api:children]
zun

[zun-wsproxy:children]
zun

[zun-compute:children]
compute

[zun-cni-daemon:children]
compute

# Skydive
[skydive-analyzer:children]
skydive

[skydive-agent:children]
compute
network

# Tacker
[tacker-server:children]
tacker

[tacker-conductor:children]
tacker

# Vitrage
[vitrage-api:children]
vitrage

[vitrage-notifier:children]
vitrage

[vitrage-graph:children]
vitrage

[vitrage-ml:children]
vitrage

[vitrage-persistor:children]
vitrage

# Blazar
[blazar-api:children]
blazar

[blazar-manager:children]
blazar

# Prometheus
[prometheus-node-exporter:children]
monitoring
control
compute
network
storage

[prometheus-mysqld-exporter:children]
mariadb

[prometheus-haproxy-exporter:children]
haproxy

[prometheus-memcached-exporter:children]
memcached

[prometheus-cadvisor:children]
monitoring
control
compute
network
storage

[prometheus-alertmanager:children]
monitoring

[prometheus-openstack-exporter:children]
monitoring

[prometheus-elasticsearch-exporter:children]
elasticsearch

[prometheus-blackbox-exporter:children]
monitoring

[masakari-api:children]
control

[masakari-engine:children]
control

[masakari-monitors:children]
compute

[ovn-controller:children]
ovn-controller-compute
ovn-controller-network

[ovn-controller-compute:children]
compute

[ovn-controller-network:children]
network

[ovn-database:children]
control

[ovn-northd:children]
ovn-database

[ovn-nb-db:children]
ovn-database

[ovn-sb-db:children]
ovn-database
修改完成后,可以用ansible ping模块测试所有主机连通性。
ansible -i multinode all -m ping
然后编辑/etc/kolla/globals.yml,这个文件主要包含一些部署openstack时需要用到的环境变量,只修改了下面的部分配置:
kolla_base_distro: "ubuntu"		#基础镜像
kolla_install_type: "binary"	#安装方式,binary或source
openstack_release: "victoria"	#openstack版本
kolla_internal_vip_address: "192.168.211.25"	#openstack api地址
docker_registry: "kolla-image-registry.com:4000"	#下载相关镜像的仓库地址,这是我搭建本地仓库
network_interface: "ens33"						#openstack internal-api地址使用的网卡
kolla_external_vip_interface: "ens33"			#openstack extenal-api 地址使用的网卡
api_interface: "{{ network_interface }}"		#openstack internal-api地址使用的网卡
neutron_external_interface: "ens34"			#neutron默认使用的external网卡,可以后期在openstack配置文件修改
neutron_plugin_agent: "openvswitch"		#neutron网络插件
neutron_ipam_driver: "internal"
keepalived_virtual_router_id: "51"		#在同一局域网有多个keepalived集群时需要指定
enable_openstack_core: "yes"			#启用openstack的核心组件
enable_glance: "{{ enable_openstack_core | bool }}"
enable_haproxy: "yes"
enable_keepalived: "{{ enable_haproxy | bool }}"
enable_keystone: "{{ enable_openstack_core | bool }}"
enable_mariadb: "yes"
enable_memcached: "yes"
enable_neutron: "{{ enable_openstack_core | bool }}"
enable_nova: "{{ enable_openstack_core | bool }}"
enable_rabbitmq: "{{ 'yes' if om_rpc_transport == 'rabbit' or om_notify_transport == 'rabbit' else 'no' }}"
enable_chrony: "yes"
enable_cinder: "yes"	#启用cinder
enable_cinder_backup: "yes"	#启用cinder-backup
enable_heat: "{{ enable_openstack_core | bool }}"
enable_horizon: "{{ enable_openstack_core | bool }}"
enable_horizon_heat: "{{ enable_heat | bool }}"
glance_backend_ceph: "no"
glance_backend_file: "yes"
glance_backend_swift: "no"
glance_backend_vmware: "no"
enable_glance_image_cache: "no"
cinder_backend_ceph: "no"
nova_backend_ceph: "no"
nova_compute_virt_type: "kvm"
最后运行下面的命令,生成openstack相关的密码:
kolla-genpwd
所有的密码都保存在/etc/kolla/passwords.yml文件中,如果想要修改可以编辑这个文件。
首先执行bootstrap-servers指令,在节点上执行一些初始化操作,安装一些依赖包,比如docker。
kolla-ansible -i multinode bootstrap-servers
然后运行prechecks指令,进行部署前的环境检查:
kolla-ansible -i multinode prechecks
开始部署openstack,运行下面命令
kolla-ansible -i multinode deploy
等待命令运行完成,并且ansible-playbook没有failed就表示已经成功部署。
执行kolla-ansible post-deploy生成环境变量文件
kolla-ansible post-deploy
. /etc/kolla/admin-openrc.sh
在control-01安装openstack客户端
sudo apt install python3-openstackclient
然后执行一条openstack,无报错即可。等对接完ceph后再进行创建虚拟机测试。
ceph存储集群是事先部署的,不包含在这里。具体部署过程可以自行百度。
apt install ceph-common ppython3-rbd
创建存储池
ceph osd pool create images 64 64
ceph osd pool create vms 64 64
ceph osd pool create volumes 64 64
ceph osd pool create backups 64 64
初始化pool
rbd pool init images
rbd pool init vms
rbd pool init volumes
rbd pool init backups
ceph auth get-or-create client.cinder mon 'allow r' osd 'allow class-read object_prefix rbd_children, allow rwx pool=volumes, allow rwx pool=vms, allow rx pool=images' -o /etc/ceph/ceph.client.cinder.keyring
ceph auth get-or-create client.glance mon 'allow r' osd 'allow class-read object_prefix rbd_children, allow rwx pool=images' -o /etc/ceph/ceph.client.glance.keyring
在ceph节点上将ceph.conf和client.glance.keyring复制到所有控制节点/etc/kolla/glace-api目录下:
scp /etc/ceph/ceph.conf /etc/ceph/ceph.client.glance.keyring \
root@control-01:/etc/kolla/glance-api/
scp /etc/ceph/ceph.conf /etc/ceph/ceph.client.glance.keyring \
root@control-02:/etc/kolla/glance-api/
scp /etc/ceph/ceph.conf /etc/ceph/ceph.client.glance.keyring \
root@control-03:/etc/kolla/glance-api/
在所有控制节点修改/etc/kolla/glance-api/config.json,将ceph的文件映射到glance_api容器里:
{
    "command": "glance-api",
    "config_files": [
        {
            "source": "/var/lib/kolla/config_files/glance-api.conf",
            "dest": "/etc/glance/glance-api.conf",
            "owner": "glance",
            "perm": "0600"
        },
        #添加面的内容
        {
            "source": "/var/lib/kolla/config_files/ceph.conf",
            "dest": "/etc/ceph/ceph.conf",
            "owner": "glance",
            "perm": "0600"
        },
        {	#添加
            "source": "/var/lib/kolla/config_files/ceph.client.glance.keyring",
            "dest": "/etc/ceph/ceph.client.glance.keyring",
            "owner": "glance",
            "perm": "0600"
        }

    ],
    "permissions": [
        {
            "path": "/var/lib/glance",
            "owner": "glance:glance",
            "recurse": true
        },
        {
            "path": "/var/log/kolla/glance",
            "owner": "glance:glance",
            "recurse": true
        }
    ]
}
修改/etc/kolla/glance-api.conf配置文件,修改内容如下:
[DEFAULT]
enabled_backends = file:file, rbd:rbd
[glance_store]
default_backend = rbd
stores = rbd
#添加这个rbd这端=段配置
[rbd]
rbd_store_pool = images
rbd_store_user = glance
rbd_store_ceph_conf = /etc/ceph/ceph.conf
重启所有控制节点上glance_api容器,创建镜像测试
docker restart glance_api
openstack image create --file ./cirros-0.3.0-x86_64-disk.img \
--disk-format=qcow2 cirros
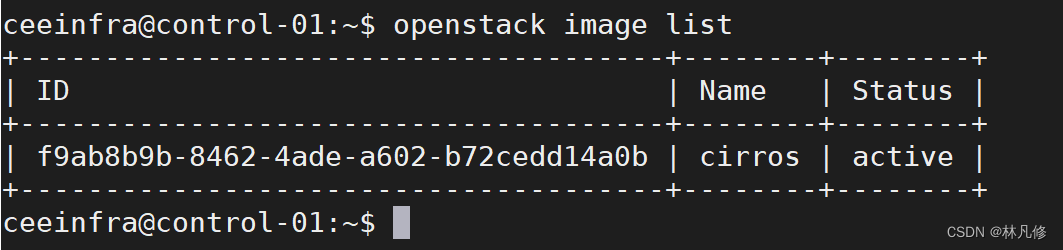
查看镜像已经active,说明对接成功
在ceph节点上将ceph.conf和client.cinder.keyring复制到所有控制节点/etc/kolla/cinder-volume目录下:
scp /etc/ceph/ceph.conf /etc/ceph/ceph.client.cinder.keyring \
root@control-01:/etc/kolla/cinder-volume/
scp /etc/ceph/ceph.conf /etc/ceph/ceph.client.cinder.keyring \
root@control-02:/etc/kolla/cinder-volume/
scp /etc/ceph/ceph.conf /etc/ceph/ceph.client.cinder.keyring \
root@control-03:/etc/kolla/cinder-volume/
在所有控制节点修改/etc/kolla/cinder-volume/config.json,将ceph的文件映射到cinder_volume容器里:
    "command": "cinder-volume --config-file /etc/cinder/cinder.conf",
    "config_files": [
        {
            "source": "/var/lib/kolla/config_files/cinder.conf",
            "dest": "/etc/cinder/cinder.conf",
            "owner": "cinder",
            "perm": "0600"
        },
        #添加
        {
            "source": "/var/lib/kolla/config_files/ceph.client.cinder.keyring",
            "dest": "/etc/ceph/ceph.client.cinder.keyring",
            "owner": "cinder",
            "perm": "0600",
            "optional": true
        },
        #添加
        {
            "source": "/var/lib/kolla/config_files/ceph.conf",
            "dest": "/etc/ceph/ceph.conf",
            "owner": "cinder",
            "perm": "0600",
            "optional": true
        },
        {
            "source": "/var/lib/kolla/config_files/nfs_shares",
            "dest": "/etc/cinder/nfs_shares",
            "owner": "cinder",
            "perm": "0600",
            "optional": true
        }
    ],
    "permissions": [
        {
            "path": "/var/lib/cinder",
            "owner": "cinder:cinder",
            "recurse": true
        },
        {
            "path": "/var/log/kolla/cinder",
            "owner": "cinder:cinder",
            "recurse": true
        }
    ]
}
修改所有控制节点/etc/kolla/cinder-volume/cinder.conf
[DEFAULT]
enabled_backends= rbd
[rbd]
rbd_ceph_conf=/etc/ceph/ceph.conf
rbd_user=cinder
backend_host=rbd:volumes
rbd_pool=volumes
volume_backend_name=rbd
volume_driver=cinder.volume.drivers.rbd.RBDDriver
rbd_secret_uuid = 1fc95a3c-93ab-411d-9728-ed82e629dc7a	#这个值和/etc/kolla/password.yaml里cinder_rbd_secret_uuid的值一致
重启所有控制节点上cinder_volume容器,建卷测试
openstack volume create --size 2 test-vol1	#空白卷
openstack volume create --image cirros --size 2 test-vol1	#镜像卷
查看卷已经创建成功,说明对接成功

在ceph节点上将ceph.conf和client.cinder.keyring复制到所有计算节点/etc/kolla/nova-compute/目录下:
scp /etc/ceph/ceph.conf /etc/ceph/ceph.conf \
root@compute-01:/etc/kolla/cinder-volume/
scp /etc/ceph/ceph.conf /etc/ceph/ceph.client.cinder.keyring \
root@compute-02:/etc/kolla/cinder-volume/
在所有计算节点修改/etc/kolla/nova-compute/config.json,将ceph的文件映射到nova-compute容器里:
{
    "command": "nova-compute",
    "config_files": [
        {
            "source": "/var/lib/kolla/config_files/nova.conf",
            "dest": "/etc/nova/nova.conf",
            "owner": "nova",
            "perm": "0600"
        },
        {
            "source": "/var/lib/kolla/config_files/release",
            "dest": "/etc/nova/release",
            "owner": "nova",
            "perm": "0600",
            "optional": true
        },
        #添加
        {
            "source": "/var/lib/kolla/config_files/ceph.conf",
            "dest": "/etc/ceph/ceph.conf",
            "owner": "nova",
            "perm": "0600"
        },
        {
            "source": "/var/lib/kolla/config_files/auth.conf",
            "dest": "/var/lib/nova/.config/libvirt/auth.conf",
            "owner": "nova",
            "perm": "0600"
        }    ],
    "permissions": [
        {
            "path": "/var/log/kolla/nova",
            "owner": "nova:nova",
            "recurse": true
        },
        {
            "path": "/var/lib/nova",
            "owner": "nova:nova",
            "recurse": true
        }
    ]
}
在所有计算节点执行下面操作:
#查看一下ceph.client.cinder.keyring的内容
cat /etc/kolla/nova-compute/ceph.client.cinder.keyring |grep key
        key = AQBhZHxiuzIsMxAAr7nrPFDWu2sUp7yhJBHnTA==	#key对应的值后边会使用

#进入nova_compute容器执行下面操作
docker exec -it -u0 nova_compute bash
#注意,下面secret.xml文件中uuid值和/etc/kolla/password.yaml里cinder_rbd_secret_uuid的值一致
cat >secret.xml <<EOF
<secret ephemeral='no' private='no'>
<uuid>1fc95a3c-93ab-411d-9728-ed82e629dc7a</uuid>
<usage type='ceph'>
<name>client.cinder secret</name>
</usage>
</secret>
EOF
virsh secret-define --file secret.xml
virsh secret-set-value  1fc95a3c-93ab-411d-9728-ed82e629dc7a AQBhZHxiuzIsMxAAr7nrPFDWu2sUp7yhJBHnTA==
rm -f secret.xml
在所有计算节点修改/etc/kolla/nova-compute/nova.conf
[libvirt]
connection_uri = qemu+tcp://192.168.211.23/system
live_migration_inbound_addr = 192.168.211.23
virt_type = kvm
images_rbd_pool = vms
images_type = rbd
images_rbd_ceph_conf = /etc/ceph/ceph.conf
rbd_user = cinder
rbd_secret_uuid = 1fc95a3c-93ab-411d-9728-ed82e629dc7a
重启nova_compute容器
docker restart nova_compute
#创建flavor
openstack flavor create --vcpu 1 --ram 1024 --disk=5 flavor1
#创建网络
openstack network create net1
#创建子网
openstack subnet create --subnet-range 192.168.11.0/24 --ip-version 4 --gateway 192.168.11.1 --network net1 subnet1
#创建虚拟机,从镜像启动
openstack server create --image cirros --flavor flavor1 --nic net-id=net1 test-vm1
#创建虚拟机,从卷启动
openstack server create --volume test-vol2 --flavor falvor1 --nic net-id=net1 test-vm2
#为虚拟机挂载卷
openstack server add volume test-vm2 test-vol1
#为虚拟机卸载卷
openstack server remove volume test-vm2 test-vol1
我是Google云的新手,我正在尝试对其进行首次部署。我的第一个部署是RubyonRails项目。我基本上是在关注thisguideinthegoogleclouddocumentation.唯一的区别是我使用的是我自己的项目,而不是他们提供的“helloworld”项目。这是我的app.yaml文件runtime:customvm:trueentrypoint:bundleexecrackup-p8080-Eproductionconfig.ruresources:cpu:0.5memory_gb:1.3disk_size_gb:10当我转到我的项目目录并运行gcloudprevie
我试过重新启动apache,缓存的页面仍然出现,所以一定有一个文件夹在某个地方。我没有“公共(public)/缓存”,那么我还应该查看哪些其他地方?是否有一个URL标志也可以触发此效果? 最佳答案 您需要触摸一个文件才能清除phusion,例如:touch/webapps/mycook/tmp/restart.txt参见docs 关于ruby-如何在Ubuntu中清除RubyPhusionPassenger的缓存?,我们在StackOverflow上找到一个类似的问题:
我可以在Azure网站上部署RubyonRails吗? 最佳答案 还没有。目前仅支持.NET和PHP。 关于ruby-on-rails-RubyonRails可以部署在Azure网站上吗?,我们在StackOverflow上找到一个类似的问题: https://stackoverflow.com/questions/12964010/
之前在培训新生的时候,windows环境下配置opencv环境一直教的都是网上主流的vsstudio配置属性表,但是这个似乎对新生来说难度略高(虽然个人觉得完全是他们自己的问题),加之暑假之后对cmake实在是爱不释手,且这样配置确实十分简单(其实都不需要配置),故斗胆妄言vscode下配置CV之法。其实极为简单,图比较多所以很长。如果你看此文还配不好,你应该思考一下是不是自己的问题。闲话少说,直接开始。0.CMkae简介有的人到大二了都不知道cmake是什么,我不说是谁。CMake是一个开源免费并且跨平台的构建工具,可以用简单的语句来描述所有平台的编译过程。它能够根据当前所在平台输出对应的m
前置步骤我们都操作完了,这篇开始介绍jenkins的集成。话不多说,看操作1、登录进入jenkins后会让你选择安装插件,选择第一个默认的就行。安装完成后设置账号密码,重新登录。2、配置JDK和Git都需要执行路径,所以需要先把执行路径找到,先进入服务器的docker容器,2.1JDK的路径root@69eef9ee86cf:/usr/bin#echo$JAVA_HOME/usr/local/openjdk-82.2Git的路径root@69eef9ee86cf:/#whichgit/usr/bin/git3、先配置JDK和Git。点击:ManageJenkins>>GlobalToolCon
深度学习部署:Windows安装pycocotools报错解决方法1.pycocotools库的简介2.pycocotools安装的坑3.解决办法更多Ai资讯:公主号AiCharm本系列是作者在跑一些深度学习实例时,遇到的各种各样的问题及解决办法,希望能够帮助到大家。ERROR:Commanderroredoutwithexitstatus1:'D:\Anaconda3\python.exe'-u-c'importsys,setuptools,tokenize;sys.argv[0]='"'"'C:\\Users\\46653\\AppData\\Local\\Temp\\pip-instal
在VMware16.2.4安装Ubuntu一、安装VMware1.打开VMwareWorkstationPro官网,点击即可进入。2.进入后向下滑动找到Workstation16ProforWindows,点击立即下载。3.下载完成,文件大小615MB,如下图:4.鼠标右击,以管理员身份运行。5.点击下一步6.勾选条款,点击下一步7.先勾选,再点击下一步8.去掉勾选,点击下一步9.点击下一步10.点击安装11.点击许可证12.在百度上搜索VM16许可证,复制填入,然后点击输入即可,亲测有效。13.点击完成14.重启系统,点击是15.双击VMwareWorkstationPro图标,进入虚拟机主
需求:要创建虚拟机,就需要给他提供一个虚拟的磁盘,我们就在/opt目录下创建一个10G大小的raw格式的虚拟磁盘CentOS-7-x86_64.raw命令格式:qemu-imgcreate-f磁盘格式磁盘名称磁盘大小qemu-imgcreate-f磁盘格式-o?1.创建磁盘qemu-imgcreate-fraw/opt/CentOS-7-x86_64.raw10G执行效果#ls/opt/CentOS-7-x86_64.raw2.安装虚拟机使用virt-install命令,基于我们提供的系统镜像和虚拟磁盘来创建一个虚拟机,另外在创建虚拟机之前,提前打开vnc客户端,在创建虚拟机的时候,通过vnc
Ocra无法处理需要“tk”的应用程序require'tk'puts'nope'用奥克拉http://github.com/larsch/ocra不起作用(如链接中的一个问题所述)问题:https://github.com/larsch/ocra/issues/29(Ocra是1.9的"new"rubyscript2exe,本质上它用于将rb脚本部署为可执行文件)唯一的问题似乎是缺少tcl的DLL文件我不认为这是一个问题据我所知,问题是缺少tk的DLL文件如果它们是已知的,则可以在执行ocra时将它们包括在内有没有办法知道tk工作所需的DLL依赖项? 最佳答
我正在运行Ubuntu11.10并像这样安装Ruby1.9:$sudoapt-getinstallruby1.9rubygems一切都运行良好,但ri似乎有空文档。ri告诉我文档是空的,我必须安装它们。我执行此操作是因为我读到它会有所帮助:$rdoc--all--ri现在,当我尝试打开任何文档时:$riArrayNothingknownaboutArray我搜索的其他所有内容都是一样的。 最佳答案 这个呢?apt-getinstallri1.8编辑或者试试这个:(非rvm)geminstallrdocrdoc-datardoc-da