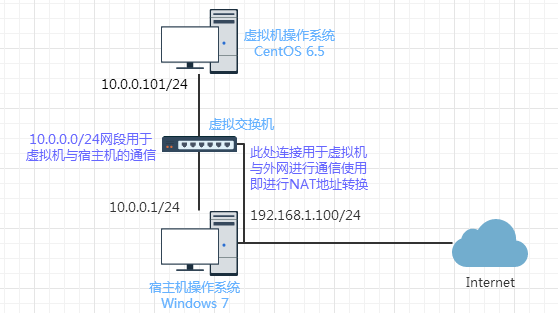
 关于为什么网络拓扑结构是这样的,这里不展开说明,可以参考博主的另一篇博文《在实践中深入理解VMware虚拟机的上网模式NAT模式》,这篇文章深入地分析了VMware虚拟机使用NAT模式上网时的网络结构细节,相信看完这篇文章后,这里搭建Nginx的实验环境也就很容易理解了。
[root@leaf ~]# cat /etc/redhat-release
CentOS release 6.5 (Final)
[root@leaf ~]# uname -r
2.6.32-431.el6.x86_64
[root@leaf ~]# uname -m
x86_64[root@leaf ~]# /application/nginx/sbin/nginx
[root@leaf ~]# netstat -lnp | grep 80
tcp 0 0 0.0.0.0:80 0.0.0.0:* LISTEN 6881/nginx
unix 2 [ ACC ] STREAM LISTENING 9180 1/init @/com/ubuntu/upstart
[root@leaf ~]# curl localhost
<h1>Hello, I'm xpleaf.</h1>
[root@leaf ~]# LANG=en
[root@leaf ~]# wget localhost
--2017-02-24 13:33:43-- http://localhost/
Resolving localhost... ::1, 127.0.0.1
Connecting to localhost|::1|:80... failed: Connection refused.
Connecting to localhost|127.0.0.1|:80... connected.
HTTP request sent, awaiting response... 200 OK
Length: 28 [text/html]
Saving to: `index.html.1'
100%[======================================>] 28 --.-K/s in 0s
2017-02-24 13:33:43 (1.87 MB/s) - `index.html.1' saved [28/28] 从上面的输出可以看到,此时Nginx是可以正常运行和提供服务的。[root@leaf ~]# tree /application/nginx
/application/nginx
|-- client_body_temp
|-- conf
| |-- fastcgi.conf
| |-- fastcgi.conf.default
| |-- fastcgi_params
| |-- fastcgi_params.default
| |-- koi-utf
| |-- koi-win
| |-- mime.types
| |-- mime.types.default
| |-- nginx.conf
| |-- nginx.conf.default
| |-- scgi_params
| |-- scgi_params.default
| |-- uwsgi_params
| |-- uwsgi_params.default
| `-- win-utf
|-- fastcgi_temp
|-- html
| |-- 50x.html
| |-- index.html
| `-- index.html.source
|-- logs
| |-- access.log
| |-- error.log
| `-- nginx.pid
|-- proxy_temp
|-- sbin
| `-- nginx
|-- scgi_temp
`-- uwsgi_temp nginx.conf便是主配置文件,nginx.conf.default则是它的备份,该配置文件有数百行:[root@leaf conf]# wc -l nginx.conf
117 nginx.conf 为了学习的方便,可以考虑将其注释内容去掉:[root@leaf conf]# egrep -v "#|^$" nginx.conf.default >nginx.conf
[root@leaf conf]# cat nginx.conf
worker_processes 1;
events {
worker_connections 1024;
}
http {
include mime.types;
default_type application/octet-stream;
sendfile on;
keepalive_timeout 65;
server {
listen 80;
server_name localhost;
location / {
root html;
index index.html index.htm;
}
error_page 500 502 503 504 /50x.html;
location = /50x.html {
root html;
}
}
}
[root@leaf conf]# wc -l nginx.conf
22 nginx.conf 去掉了注释和空白行后只有22行,就很方便我们待会做实验时进行配置了。[root@leaf conf]# cat nginx.conf
worker_processes 1;
events {
worker_connections 1024;
}
http {
include mime.types;
default_type application/octet-stream;
sendfile on;
keepalive_timeout 65;
server {
listen 80;
server_name www.xpleaf.com;
location / {
root html/www;
index index.html index.htm;
}
}
} 主要是修改了第12行和第14行,其中第14行说明该站点的根目录的html文件在html/www/目录中。[root@leaf nginx]# cd html/
[root@leaf html]# mkdir www
[root@leaf html]# echo "This page is: www.xpleaf.cn">www/index.html
[root@leaf html]# cat www/index.html
This page is: www.xpleaf.cn[root@leaf html]# /application/nginx/sbin/nginx -t # 检查Nginx配置语法
nginx: the configuration file /application/nginx-1.6.3//conf/nginx.conf syntax is ok
nginx: configuration file /application/nginx-1.6.3//conf/nginx.conf test is successful
[root@leaf html]# /application/nginx/sbin/nginx -s reload # 优雅重启Nginx[root@leaf html]# echo "127.0.0.1 www.xpleaf.cn" >>/etc/hosts
[root@leaf html]# tail -1 /etc/hosts
127.0.0.1 www.xpleaf.cn 此时,在CentOS上使用curl命令和wget命令来访问www.xpleaf.cn,查看测试结果:[root@leaf html]# curl www.xpleaf.cn
This page is: www.xpleaf.cn
[root@leaf html]# wget www.xpleaf.cn
--2017-02-24 13:58:29-- http://www.xpleaf.cn/
Resolving www.xpleaf.cn... 127.0.0.1
Connecting to www.xpleaf.cn|127.0.0.1|:80... connected.
HTTP request sent, awaiting response... 200 OK
Length: 28 [text/html]
Saving to: `index.html.1'
100%[======================================>] 28 --.-K/s in 0s
2017-02-24 13:58:29 (2.24 MB/s) - `index.html.1' saved [28/28] 从输出结果可以知道,此时Nginx成功地为域名为www.xpleaf.cn的虚拟主机提供了服务。10.0.0.101 www.xpleaf.cn 这时在浏览器中输入地址www.xpleaf.cn,查看返回的结果: 可以看到,可以正常访问。
[root@leaf conf]# cat nginx.conf
worker_processes  1;
events {
    worker_connections  1024;
}
http {
    include       mime.types;
    default_type  application/octet-stream;
    sendfile        on;
    keepalive_timeout  65;
    server {
        listen       80;
        server_name  www.xpleaf.com;
        location / {
            root   html/www;
            index  index.html index.htm;
        }
    }
    server {
        listen       80;
        server_name  bbs.xpleaf.com;
        location / {
            root   html/bbs;
            index  index.html index.htm;
        }
    }
    server {
        listen       80;
        server_name  blog.xpleaf.com;
        location / {
            root   html/blog;
            index  index.html index.htm;
        }
    }
}[root@leaf html]# mkdir bbs
[root@leaf html]# echo "This page is: bbs.xpleaf.cn" >bbs/index.html
[root@leaf html]# mkdir blog
[root@leaf html]# echo "This page is: blog.xpleaf.cn" >blog/index.html
[root@leaf html]# cat bbs/index.html blog/index.html
This page is: bbs.xpleaf.cn
This page is: blog.xpleaf.cn[root@leaf html]# /application/nginx/sbin/nginx -t # 检查Nginx配置语法
nginx: the configuration file /application/nginx-1.6.3//conf/nginx.conf syntax is ok
nginx: configuration file /application/nginx-1.6.3//conf/nginx.conf test is successful
[root@leaf html]# /application/nginx/sbin/nginx -s reload # 优雅重启Nginx[root@leaf html]# tail -1 /etc/hosts
127.0.0.1 www.xpleaf.cn bbs.xpleaf.cn blog.xpleaf.cn 使用curl命令和wget命令进行测试:[root@leaf html]# curl bbs.xpleaf.cn
This page is: www.xpleaf.cn
[root@leaf html]# curl blog.xpleaf.cn
This page is: www.xpleaf.cn
[root@leaf html]# wget bbs.xpleaf.cn
--2017-02-24 14:19:54-- http://bbs.xpleaf.cn/
Resolving bbs.xpleaf.cn... 127.0.0.1
Connecting to bbs.xpleaf.cn|127.0.0.1|:80... connected.
HTTP request sent, awaiting response... 200 OK
Length: 28 [text/html]
Saving to: `index.html.2'
100%[======================================>] 28 --.-K/s in 0s
2017-02-24 14:19:54 (2.37 MB/s) - `index.html.2' saved [28/28]
[root@leaf html]# wget blog.xpleaf.cn
--2017-02-24 14:20:00-- http://blog.xpleaf.cn/
Resolving blog.xpleaf.cn... 127.0.0.1
Connecting to blog.xpleaf.cn|127.0.0.1|:80... connected.
HTTP request sent, awaiting response... 200 OK
Length: 28 [text/html]
Saving to: `index.html.3'
100%[======================================>] 28 --.-K/s in 0s
2017-02-24 14:20:00 (2.24 MB/s) - `index.html.3' saved [28/28] 从上面结果可以知道,Nginx为各个虚拟主机正常提供服务。10.0.0.101 www.xpleaf.cn bbs.xpleaf.cn blog.xpleaf.cn 在浏览器上分别访问各个域名,查看其返回结果:

 可以看到访问每个域名都返回了期待的页面,说明测试成功!
server {
        listen       80;
        server_name  www.xpleaf.com xpleaf.cn;
        location / {
            root   html/www;
            index  index.html index.htm;
        }
} 测试的话依然按照前面的方法进行,即先检查Nginx配置文件、平滑重启Nginx服务、配置hosts文件,最后通过命令行或浏览器的方式进行验证,因为跟前面是一样的,所以这里就不展开了。Rails2.3可以选择随时使用RouteSet#add_configuration_file添加更多路由。是否可以在Rails3项目中做同样的事情? 最佳答案 在config/application.rb中:config.paths.config.routes在Rails3.2(也可能是Rails3.1)中,使用:config.paths["config/routes"] 关于ruby-on-rails-Rails3中的多个路由文件,我们在StackOverflow上找到一个类似的问题
我有多个ActiveRecord子类Item的实例数组,我需要根据最早的事件循环打印。在这种情况下,我需要打印付款和维护日期,如下所示:ItemAmaintenancerequiredin5daysItemBpaymentrequiredin6daysItemApaymentrequiredin7daysItemBmaintenancerequiredin8days我目前有两个查询,用于查找maintenance和payment项目(非排他性查询),并输出如下内容:paymentrequiredin...maintenancerequiredin...有什么方法可以改善上述(丑陋的)代
我需要从一个View访问多个模型。以前,我的links_controller仅用于提供以不同方式排序的链接资源。现在我想包括一个部分(我假设)显示按分数排序的顶级用户(@users=User.all.sort_by(&:score))我知道我可以将此代码插入每个链接操作并从View访问它,但这似乎不是“ruby方式”,我将需要在不久的将来访问更多模型。这可能会变得很脏,是否有针对这种情况的任何技术?注意事项:我认为我的应用程序正朝着单一格式和动态页面内容的方向发展,本质上是一个典型的网络应用程序。我知道before_filter但考虑到我希望应用程序进入的方向,这似乎很麻烦。最终从任何
我的瘦服务器配置了nginx,我的ROR应用程序正在它们上运行。在我发布代码更新时运行thinrestart会给我的应用程序带来一些停机时间。我试图弄清楚如何优雅地重启正在运行的Thin实例,但找不到好的解决方案。有没有人能做到这一点? 最佳答案 #Restartjustthethinserverdescribedbythatconfigsudothin-C/etc/thin/mysite.ymlrestartNginx将继续运行并代理请求。如果您将Nginx设置为使用多个上游服务器,例如server{listen80;server
我有一个在Linux服务器上运行的ruby脚本。它不使用rails或任何东西。它基本上是一个命令行ruby脚本,可以像这样传递参数:./ruby_script.rbarg1arg2如何将参数抽象到配置文件(例如yaml文件或其他文件)中?您能否举例说明如何做到这一点?提前谢谢你。 最佳答案 首先,您可以运行一个写入YAML配置文件的独立脚本:require"yaml"File.write("path_to_yaml_file",[arg1,arg2].to_yaml)然后,在您的应用中阅读它:require"yaml"arg
我有一个具有一些属性的模型:attr1、attr2和attr3。我需要在不执行回调和验证的情况下更新此属性。我找到了update_column方法,但我想同时更新三个属性。我需要这样的东西:update_columns({attr1:val1,attr2:val2,attr3:val3})代替update_column(attr1,val1)update_column(attr2,val2)update_column(attr3,val3) 最佳答案 您可以使用update_columns(attr1:val1,attr2:val2
我正在尝试修改当前依赖于定义为activeresource的gem:s.add_dependency"activeresource","~>3.0"为了让gem与Rails4一起工作,我需要扩展依赖关系以与activeresource的版本3或4一起工作。我不想简单地添加以下内容,因为它可能会在以后引起问题:s.add_dependency"activeresource",">=3.0"有没有办法指定可接受版本的列表?~>3.0还是~>4.0? 最佳答案 根据thedocumentation,如果你想要3到4之间的所有版本,你可以这
我已经在Sinatra上创建了应用程序,它代表了一个简单的API。我想在生产和开发上进行部署。我想在部署时选择,是开发还是生产,一些方法的逻辑应该改变,这取决于部署类型。是否有任何想法,如何完成以及解决此问题的一些示例。例子:我有代码get'/api/test'doreturn"Itisdev"end但是在部署到生产环境之后我想在运行/api/test之后看到ItisPROD如何实现? 最佳答案 根据SinatraDocumentation:EnvironmentscanbesetthroughtheRACK_ENVenvironm
我已经构建了一些serverspec代码来在多个主机上运行一组测试。问题是当任何测试失败时,测试会在当前主机停止。即使测试失败,我也希望它继续在所有主机上运行。Rakefile:namespace:specdotask:all=>hosts.map{|h|'spec:'+h.split('.')[0]}hosts.eachdo|host|begindesc"Runserverspecto#{host}"RSpec::Core::RakeTask.new(host)do|t|ENV['TARGET_HOST']=hostt.pattern="spec/cfengine3/*_spec.r
我有一个存储主机名的Ruby数组server_names。如果我打印出来,它看起来像这样:["hostname.abc.com","hostname2.abc.com","hostname3.abc.com"]相当标准。我想要做的是获取这些服务器的IP(可能将它们存储在另一个变量中)。看起来IPSocket类可以做到这一点,但我不确定如何使用IPSocket类遍历它。如果它只是尝试像这样打印出IP:server_names.eachdo|name|IPSocket::getaddress(name)pnameend它提示我没有提供服务器名称。这是语法问题还是我没有正确使用类?输出:ge