目录
各个模块的基础介绍:
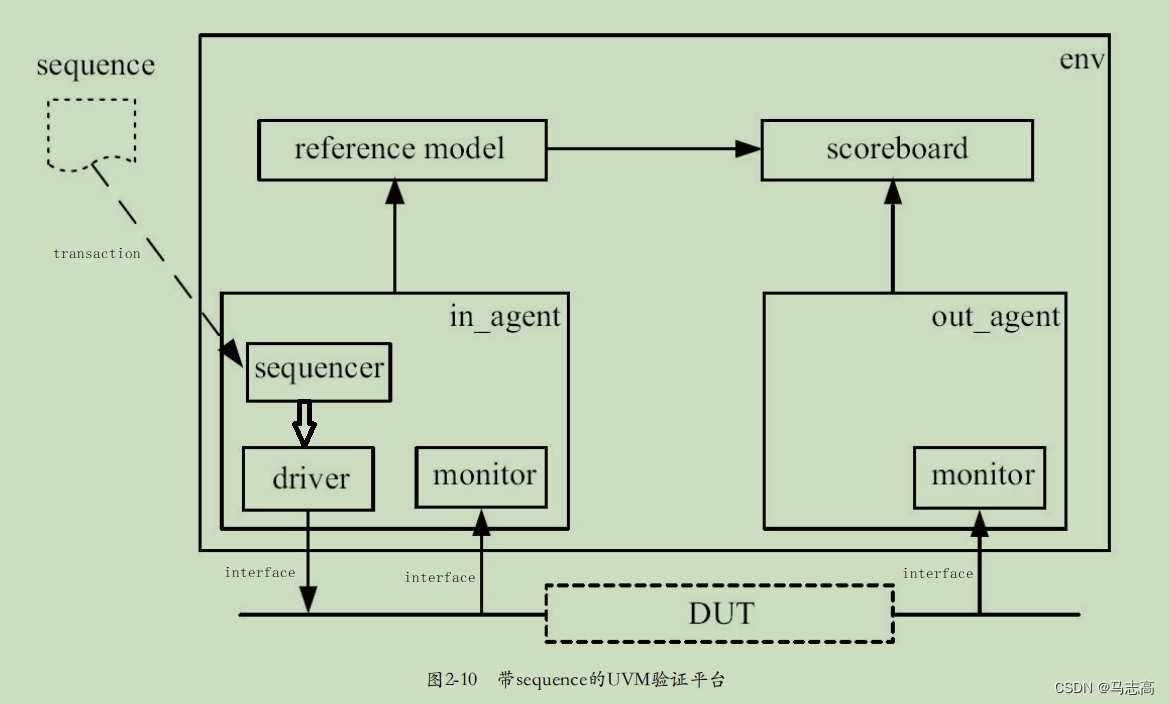
(1)DUT:待测平台,这里为uart串口功能
(2)sequence:创建一个my_straction的实例m_trans,将其随机化,最终将其送给sequencer
(3)sequencer:uvm_sequencer就如同一个管道,从这个管道中产生连续的激励事务,并最终通过TLM端口送至driver一侧
(4)driver:该类会从uvm_sequencer中获取事务(transaction),经过转化进而在接口中对DUT进行时序激励
(5)monitor:负责把transaction级别的数据转变为DUT的端口级别,并驱动给DUT,mointor的行为与其相对,用于收集DUT的端口数据并将其转化成transaction交给后续的组件如reference model,scoreboard等处理
(6)reference model:reference model用于完成和DUT相同的功能
(7)scoreboard:uvm_scoreboard担任和SV中的check一样的功能,即进行数据的对比和报告,这里要比较的一源于reference model,二源于o_agent的monitor
(8)env:从环境层次结构而言,uvm_env包含多个uvm_agent和其他component,这些不同的组件共同构成一个完整的验证环境
uvm_env的角色就是一个结构化的容器,它可以容纳其它组件的同时它也可以作为子环境在更高层次集中被嵌入
(9)interface:driver和DUT,monitor和DUT之间的通过interface来传递transaction,具体使用config_db set/get的方法
(10)transaction:一笔transaction就是一个包,不同的验证平台中,transaction会不同
module dut(clk,rst_n,rxd,rx_dv,txd,tx_en);
input clk;
input rst_n;
input[7:0] rxd;      //rxd接收数据
input rx_dv;         //发送数据有效指示
output [7:0] txd;    //txd发送数据
output tx_en;        //接收数据有效指示

reg[7:0] txd;        //always赋值用reg
reg tx_en;           //always赋值用reg

always @(posedge clk) begin
   if(!rst_n) begin
      txd <= 8'b0;
      tx_en <= 1'b0;
   end
   else begin
      txd <= rxd;    //输出数据txd会打一拍
      tx_en <= rx_dv;
   end
end
endmodule
`timescale 1ns/1ps
`include "uvm_macros.svh" //UVM中的一个文件,包含众多的宏定义

import uvm_pkg::*; //将整个uvm_pkg导入到验证平台中,编译器在编译my_driver.sv文件时才能认识uvm_driver其中的uvm_driver等类名
`include "my_if.sv"
`include "my_transaction.sv"
`include "my_sequencer.sv"
`include "my_driver.sv"
`include "my_monitor.sv"
`include "my_agent.sv"
`include "my_model.sv"
`include "my_scoreboard.sv"
`include "my_env.sv"
`include "base_test.sv"
`include "my_case0.sv"
`include "my_case1.sv"

module top_tb;

reg clk;
reg rst_n;
reg[7:0] rxd;
reg rx_dv;
wire[7:0] txd;
wire tx_en;

my_if input_if(clk, rst_n);
my_if output_if(clk, rst_n);

dut my_dut(.clk(clk),                 //例化DUT
           .rst_n(rst_n),
           .rxd(input_if.data),
           .rx_dv(input_if.valid),
           .txd(output_if.data),
           .tx_en(output_if.valid));

initial begin
   clk = 0;
   forever begin
      #100 clk = ~clk;
   end
end

initial begin
   rst_n = 1'b0;
   #1000;
   rst_n = 1'b1;
end

initial begin
   run_test();
end

initial begin
   //(1) uvm_config_db::set
   uvm_config_db#(virtual my_if)::set(null, "uvm_test_top.env.i_agt.drv", "vif", input_if);
   uvm_config_db#(virtual my_if)::set(null, "uvm_test_top.env.i_agt.mon", "vif", input_if);
   uvm_config_db#(virtual my_if)::set(null, "uvm_test_top.env.o_agt.mon", "vif", output_if);
end

endmodule
(1)uvm_config_db::set
第一个参数:null,会自动转换为uvm_root::get()
第二个参数:“uvm_test_top.env.i_agt_drv”,表示路径索引
第三个参数:“vif”,和get的第三个参数必须完全一致
第四个参数:input_if,表示将那个input_if这个interface通过config_db传递给my_driver
//(1)`ifndef的使用方法
`ifndef MY_DRIVER__SV
`define MY_DRIVER__SV
class my_driver extends uvm_driver#(my_transaction); //类的定义

   virtual my_if vif; //(2)virtual的作用

   //(3)工厂机制
   `uvm_component_utils(my_driver) //工厂的注册
   function new(string name = "my_driver", uvm_component parent = null); //函数的创建
   	  // 所有派生自uvm_driver的类的new函数有两个参数,一个是string类型的name,一个是uvm_component类型的parent。
      super.new(name, parent);
   endfunction

   //(4)build_phase和main_phase
   virtual function void build_phase(uvm_phase phase);
      super.build_phase(phase);
      //(8)uvm_config_db的用法
      if(!uvm_config_db#(virtual my_if)::get(this, "", "vif", vif))
      //(5)uvm_fatal宏
         `uvm_fatal("my_driver", "virtual interface must be set for vif!!!")
   endfunction
	//(7)extern的用法
   extern task main_phase(uvm_phase phase);
   extern task drive_one_pkt(my_transaction tr);
endclass

task my_driver::main_phase(uvm_phase phase);
   vif.data <= 8'b0;
   vif.valid <= 1'b0;
   while(!vif.rst_n)
      @(posedge vif.clk);
   //(9)while循环的理解
   while(1) begin
      seq_item_port.get_next_item(req);
      drive_one_pkt(req);
      seq_item_port.item_done();
   end
endtask

task my_driver::drive_one_pkt(my_transaction tr);
   byte unsigned     data_q[];
   int  data_size;

   data_size = tr.pack_bytes(data_q) / 8;
   `uvm_info("my_driver", "begin to drive one pkt", UVM_LOW);
   repeat(3) @(posedge vif.clk);
   for ( int i = 0; i < data_size; i++ ) begin
      @(posedge vif.clk);
      vif.valid <= 1'b1;
      vif.data <= data_q[i];
   end

   // (6)uvm_info宏。
   @(posedge vif.clk);
   vif.valid <= 1'b0;
   `uvm_info("my_driver", "end drive one pkt", UVM_LOW);
endtask
`endif
(1)如何理解ifndef和define的使用
目的:为了防止同一个文件在编译的时候被重复编译,引起多重定义的问题
即 “if not defined”,也就是说,当文件编译到这一行,如果这个文件还没有被编译过,也就是首次编译,就会执行后续的 `define xxx这句话,把后续的代码定义一次。反之,则不会再重复编译。
详细解释链接
(2)virtual的作用
1)不使用virtual,父类句柄虽指向子类对象,但调用的仍是父类本身的函数
2)使用virtual,父类句柄指向子类对象,调用的是子类的函数
详细解释链接
(3)工厂机制
factory机制的实现被集成在了一个宏中:uvm_component_utils。这个宏所做的事情非常多,其中之一就是将my_driver登记在UVM内部的一张表中,这张表是factory功能实现的基础。只要在定义一个新的类时使用这个宏,就相当于把这个类注册到了这张表中。
(4)build_phase和main_phase
理解build_phase和main_phase build_phase在new函数之后main_phase之前执行 build_phase是一个函数phase,而main_phase是一个任务phase,build_phase是不消耗仿真时间的。build_phase总是在仿真时间($time函数打印出的时间)为0时执行。driver所做的事情几乎都在main_phase中完成。
(5)uvm_fatal宏
在build_phase中出现了uvm_fatal宏,uvm_fatal宏是一个类似于uvm_info的宏,但是它只有两个参数,这两个参数与uvm_info宏的前两个参数的意义完全一样。与uvm_info宏不同的是,当它打印第二个参数所示的信息后,会直接调用Verilog的finish函数来结束仿真。
(6)uvm_info宏
这个宏的功能与Verilog中display语句的功能类似,但是它比display语句更加强大。它有三个参数,第一个参数是字符串,是打印信息类别;第二个参数也是字符串,是具体打印信息;第三个参数是冗余级别。在验证平台中,某些信息是非常关键的,这样的信息可以设置为UVM_LOW,而有些信息可有可无,就可以设置为UVM_HIGH,介于两者之间的就是UVM_MEDIUM。UVM默认只显示UVM_MEDIUM或者UVM_LOW的信息。
(7)extern的用法
extern可以在使得function和task书写在class的外部,避免class过大难以阅读
(8)uvm_config_db的用法
uvm_config_db有set和get两种方法,一般成对出现
set:自顶层向下set,如从top_tb向driver设置参数
//打印结果
UVM_INFO my_driver.sv
(20)//指明此条打印信息的来源,其中括号里的数字表示原始的uvm_info打印语句在my_driver.sv中的行号。
@48500000 //表明此条信息的打印时间
:drv[my_driver]data is drived //这是driver在UVM树中的路径索引。UVM采用树形结构,对于树中任何一个结点,都有一个与其相应的字符串类型的
//路径索引。路径索引可以通过get_full_name函数来获取,把下列代码加入任何UVM树的结点中就可以得知当前结点的路径索引:
`ifndef MY_TRANSACTION__SV
`define MY_TRANSACTION__SV

//(1)uvm_sequence_item
class my_transaction extends uvm_sequence_item;

   rand bit[47:0] dmac;//48bit的以太网目的地址
   rand bit[47:0] smac;//48bit的以太网源地址
   rand bit[15:0] ether_type;//以太网类型
   rand byte      pload[];//携带数据的大小
   rand bit[31:0] crc;//面所有数据的校验值

   constraint pload_cons{
      pload.size >= 46;
      pload.size <= 1500;
   }

   function bit[31:0] calc_crc();
      return 32'h0;
   endfunction
//(2)post_randomize()
   function void post_randomize();
      crc = calc_crc;
   endfunction

//(3)uvm_object_utils
   `uvm_object_utils_begin(my_transaction)
     //(4)域的自动化
      `uvm_field_int(dmac, UVM_ALL_ON)
      `uvm_field_int(smac, UVM_ALL_ON)
      `uvm_field_int(ether_type, UVM_ALL_ON)
      `uvm_field_array_int(pload, UVM_ALL_ON)
      `uvm_field_int(crc, UVM_ALL_ON)
   `uvm_object_utils_end

   function new(string name = "my_transaction");
      super.new();
   endfunction

endclass
`endif
(1)uvm_sequence_item
一是my_transaction的基类是uvm_sequence_item。在UVM中,所有的transaction都要从uvm_sequence_item派生,只有从uvm_sequence_item派生的transaction才可以使用后文讲述的UVM中强大的sequence机制。注意不是派生自uvm_transaction。事实上,uvm_sequence_item是从uvm_transaction派生而来的,因此,uvm_sequence_item相对于uvm_transaction添加了许多实用的成员变量和函数/任务,从uvm_sequence_item直接派生,就可以使用这些新增加的成员变量和函数/任务。
(2)post_randomize()
post_randomize是SystemVerilog中提供的一个函数,当某个类的实例的randomize函数被调用后,post_randomize会紧随其后无条件
地被调用。
(3)uvm_object_utils
二是这里没有使用uvm_component_utils宏来实现factory机制,而是使用了uvm_object_utils。从本质上来说,my_transaction与my_driver是有区别的,在整个仿真期间,my_driver是一直存在的,my_transaction不同,它有生命周期。它在仿真的某一时间产生,经过driver驱动,再经过reference model处理,最终由scoreboard比较完成后,其生命周期就结束了。一般来说,这种类都是派生自uvm_object或者uvm_object的派生类,uvm_sequence_item的祖先就是uvm_object。UVM中具有这种特征的类都要使用uvm_object_utils宏来实现。
(4)域的自动化
这里使用uvm_object_utils_begin和uvm_object_utils_end来实现my_transaction的factory注册,在这两个宏中间,使用uvm_filed宏注册所有字段。uvm_filed系列宏随着trasaction成员变量的不同而不同,如上面的定义中出现了针对bit类型的uvm_filed_int以及针对byte类型动态数组的uvm_filed_array_int。当使用了宏注册之后,可以直接调用copy、compare、print等函数,而无需自己定义。
`ifndef MY_ENV__SV
`define MY_ENV__SV
//(1)为什么要使用my_env
class my_env extends uvm_env;

   my_agent   i_agt;
   my_agent   o_agt;
   my_model   mdl;
   my_scoreboard scb;
   //(5)uvm_tlm_analysis_fifo的作用
   uvm_tlm_analysis_fifo #(my_transaction) agt_scb_fifo;
   uvm_tlm_analysis_fifo #(my_transaction) agt_mdl_fifo;
   uvm_tlm_analysis_fifo #(my_transaction) mdl_scb_fifo;

   function new(string name = "my_env", uvm_component parent);
      super.new(name, parent);
   endfunction
	//(4)my_env和my_driver中的build_phase的执行顺序的问题
   virtual function void build_phase(uvm_phase phase);
      super.build_phase(phase);
      //(2)工厂创建对象的方式
      i_agt = my_agent::type_id::create("i_agt", this);
      o_agt = my_agent::type_id::create("o_agt", this);
      //(7)is_active的理解
      i_agt.is_active = UVM_ACTIVE;
      o_agt.is_active = UVM_PASSIVE;
      mdl = my_model::type_id::create("mdl", this);
      scb = my_scoreboard::type_id::create("scb", this);
      agt_scb_fifo = new("agt_scb_fifo", this);
      agt_mdl_fifo = new("agt_mdl_fifo", this);
      mdl_scb_fifo = new("mdl_scb_fifo", this);

   endfunction

   extern virtual function void connect_phase(uvm_phase phase);
   //(3)uvm_component_utils的位置
   `uvm_component_utils(my_env)
endclass
//(6)如何理解connect_phase
function void my_env::connect_phase(uvm_phase phase);
   super.connect_phase(phase);
   //(5)uvm_tlm_analysis_fifo的作用
   i_agt.ap.connect(agt_mdl_fifo.analysis_export);
   mdl.port.connect(agt_mdl_fifo.blocking_get_export);
   mdl.ap.connect(mdl_scb_fifo.analysis_export);
   scb.exp_port.connect(mdl_scb_fifo.blocking_get_export);
   o_agt.ap.connect(agt_scb_fifo.analysis_export);
   scb.act_port.connect(agt_scb_fifo.blocking_get_export);
endfunction

`endif
(1)为什么使用my_env
在验证平台中加入reference model、scoreboard等之前,思考一个问题:假设这些组件已经定义好了,那么在验证平台的什么位置对它们进行实例化呢?在top_tb中使用run_test进行实例化显然是不行的,因为run_test函数虽然强大,但也只能实例化一个实例;如果在top_tb中使用2.2.1节中实例化driver的方式显然也不可行,因为run_test相当于在top_tb结构层次之外建立一个新的结构层次,而2.2.1节的方式则是基于top_tb的层次结构,如果基于此进行实例化,那么run_test的引用也就没有太大的意义了;如果在driver中进行实例化则更加不合理。
(2)工厂创建对象的方式
这里没有直接调用my_driver的new函数,而是使用了一种古怪的方式。这种方式就是factory机制带来的独特的实例化方式。只有使用factory机制注册过的类才能使用这种方式实例化;只有使用这种方式实例化的实例,才能使用后文要讲述的factory机制中最为强大的重载功能。验证平台中的组件在实例化时都应该使用type_name::type_id::create的方式。
(3)uvm_component_utils的位置
uvm_componnet_utils常定义在class的最前方,这里放在class的最后不影响结果。
(4)my_env和my_driver中的build_phase的执行顺序的问题
在UVM的树形结构中,build_phase的执行遵照从树根到树叶的顺序,即先执行my_env的build_phase,在执行my_driver等的build_phase。当把整棵树的build_phase都执行完毕后,再执行后面的phase
(5)uvm_tlm_analysis_fifo的作用
在my_monitor和my_model中定义并实现了各自的端口之后,通信的功能并没有实现,还需要在my_env中使用fifo将两个端口联系在一起,为什么需要一个fifo呢?不能直接把my_monitor的analysis_port和my_model的blocking_get_port相连吗?由于analysis_port是非阻塞性质的,ap_write函数调用后马上返回,不会等待数据被接收。假如当write函数调用时,blocking_get_port正在忙于其他事情,而没有准备好接收新的数据时,此时被write函数写入的my_transaction就需要一个暂存的位置,这就是fifo。
(6)如何理解connect_phase
与build_phase类似,connect_phase也是UVM内建的一个phase,它在build_phase执行完成之后马上执行,但是与build_phase不同的是,它的执行顺序并不是从树根到树叶,而是树叶到树根–先执行driver和monitor的connect_phase,再执行agent的connect_phase,最后执行env的connect_phase。
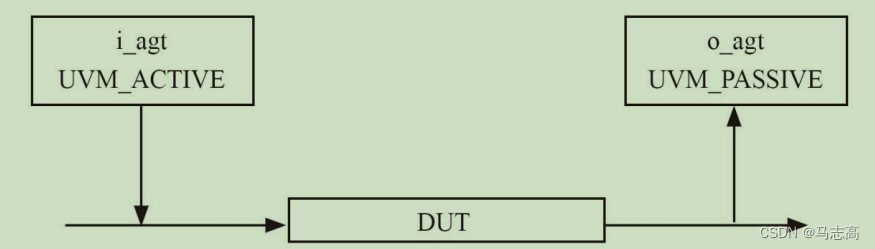
(7)如何理解is_active变量
is_active有两种模式,分别为UVM_PASSIVE和UVM_ACTIVE,is_active默认值为UVM_ACTIVE,这种模式下,是需要例化driver的。那么什么情况下需要UVM_PASSIVE模式呢?下图中,在输出端口上不需要驱动任何信号,只需要监测信号。在这种情况下,端口上是只需要monitor的,所以driver可以不用实例化。
`ifndef MY_MONITOR__SV
`define MY_MONITOR__SV
class my_monitor extends uvm_monitor;//所有的monitor都应该派生自uvm_monitor

   virtual my_if vif;
   //(1)uvm_analysis_port的用法
   uvm_analysis_port #(my_transaction)  ap;

   `uvm_component_utils(my_monitor)
   function new(string name = "my_monitor", uvm_component parent = null);
      super.new(name, parent);
   endfunction

   virtual function void build_phase(uvm_phase phase);
      super.build_phase(phase);
      if(!uvm_config_db#(virtual my_if)::get(this, "", "vif", vif))
         `uvm_fatal("my_monitor", "virtual interface must be set for vif!!!")
      ap = new("ap", this);
   endfunction

   extern task main_phase(uvm_phase phase);
   extern task collect_one_pkt(my_transaction tr);
endclass

task my_monitor::main_phase(uvm_phase phase);
   my_transaction tr;
   while(1) begin
      tr = new("tr");
      collect_one_pkt(tr);
      ap.write(tr);
   end
endtask

task my_monitor::collect_one_pkt(my_transaction tr);
   byte unsigned data_q[$];
   byte unsigned data_array[];
   logic [7:0] data;
   logic valid = 0;
   int data_size;

   while(1) begin
      @(posedge vif.clk);
      if(vif.valid) break;
   end

   `uvm_info("my_monitor", "begin to collect one pkt", UVM_LOW);
   while(vif.valid) begin
      data_q.push_back(vif.data);
      @(posedge vif.clk);
   end
   data_size  = data_q.size();
   data_array = new[data_size];
   for ( int i = 0; i < data_size; i++ ) begin
      data_array[i] = data_q[i];
   end
   tr.pload = new[data_size - 18]; //da sa, e_type, crc
   data_size = tr.unpack_bytes(data_array) / 8;
   `uvm_info("my_monitor", "end collect one pkt", UVM_LOW);
endtask
`endif
有几点需要注意的是:
第一,所有的monitor类应该派生自uvm_monitor;
第二,与driver类似,在my_monitor中也需要有一个virtual my_if;
第三,uvm_monitor在整个仿真中是一直存在的,所以它是一个component,要使用uvm_component_utils宏注册;
第四,由于monitor需要时刻收集数据,永不停歇,所以在main_phase中使用while(1)循环来实现这一目的。
(1)uvm_analysis_port的用法
uvm_analysis_port可以实现数据的发送,transaction是发送的数据类型。
`ifndef MY_AGENT__SV
`define MY_AGENT__SV
//(1)为什么会有agent这个模块
class my_agent extends uvm_agent ;
   my_sequencer  sqr;
   my_driver     drv;
   my_monitor    mon;

   uvm_analysis_port #(my_transaction)  ap;

   function new(string name, uvm_component parent);
      super.new(name, parent);
   endfunction

   extern virtual function void build_phase(uvm_phase phase);
   extern virtual function void connect_phase(uvm_phase phase);

   `uvm_component_utils(my_agent)
endclass


function void my_agent::build_phase(uvm_phase phase);
   super.build_phase(phase);
   if (is_active == UVM_ACTIVE) begin
      sqr = my_sequencer::type_id::create("sqr", this);
      drv = my_driver::type_id::create("drv", this);
   end
   mon = my_monitor::type_id::create("mon", this);
endfunction

function void my_agent::connect_phase(uvm_phase phase);
   super.connect_phase(phase);
   if (is_active == UVM_ACTIVE) begin
      drv.seq_item_port.connect(sqr.seq_item_export);
   end
   ap = mon.ap;
endfunction
`endif
(1)为什么会有agent这个模块?
driver和monitor两者之间的代码高度相似。其本质是因为二者处理的是同一种协议,在同样一套既定的规则下做着不同的事情。由于二者的这种相似性,UVM中通常将二者封装在一起,成为一个agent。因此,不同的agent就代表了不同的协议。
`ifndef MY_MODEL__SV
`define MY_MODEL__SV

class my_model extends uvm_component;
   (1)数据的发送和接收
   uvm_blocking_get_port #(my_transaction)  port;
   uvm_analysis_port #(my_transaction)  ap;

   extern function new(string name, uvm_component parent);
   extern function void build_phase(uvm_phase phase);
   extern virtual  task main_phase(uvm_phase phase);//extern外部定义写了virtual,下面不需要再写virtual

   `uvm_component_utils(my_model)
endclass

function my_model::new(string name, uvm_component parent);
   super.new(name, parent);
endfunction

function void my_model::build_phase(uvm_phase phase);
   super.build_phase(phase);
   port = new("port", this);
   ap = new("ap", this);
endfunction

task my_model::main_phase(uvm_phase phase);
   my_transaction tr;
   my_transaction new_tr;
   super.main_phase(phase);
   while(1) begin
      port.get(tr);
      new_tr = new("new_tr");
      new_tr.copy(tr);
      `uvm_info("my_model", "get one transaction, copy and print it:", UVM_LOW)
      new_tr.print();
      ap.write(new_tr);
   end
endtask
`endif
(1)数据的发送和接收
在UVM中,通常使用TLM(Transaction Level Modeling)实现component之间transaction级别的通信。要实现通信,有两点是值得考虑的:第一,数据是如何发送的?第二,数据是如何接收的?
数据发送使用uvm_analysis_port,my_transaction就是这个analysis_port需要传递的数据的类型。
数据接收使用uvm_blocking_get_port , my_transaction就是blocking_port需要接收的类型。
`ifndef MY_SCOREBOARD__SV
`define MY_SCOREBOARD__SV
class my_scoreboard extends uvm_scoreboard;
   my_transaction  expect_queue[$];
   //(1)exp_port和act_port
   uvm_blocking_get_port #(my_transaction)  exp_port;
   uvm_blocking_get_port #(my_transaction)  act_port;
   `uvm_component_utils(my_scoreboard) //不加封号

   extern function new(string name, uvm_component parent = null);
   extern virtual function void build_phase(uvm_phase phase);
   extern virtual task main_phase(uvm_phase phase);
endclass

function my_scoreboard::new(string name, uvm_component parent = null);
   super.new(name, parent);
endfunction

//(2)build_phase
function void my_scoreboard::build_phase(uvm_phase phase);
   super.build_phase(phase);
   exp_port = new("exp_port", this);
   act_port = new("act_port", this);
endfunction

task my_scoreboard::main_phase(uvm_phase phase);
   my_transaction  get_expect,  get_actual, tmp_tran;
   bit result;

   super.main_phase(phase);
   fork
      while (1) begin
         exp_port.get(get_expect);
         //(3)expect_queue
         expect_queue.push_back(get_expect);
      end
      while (1) begin
         act_port.get(get_actual);
         if(expect_queue.size() > 0) begin
         	//(3)expect_queue
            tmp_tran = expect_queue.pop_front();
            //(4)compare
            result = get_actual.compare(tmp_tran);
            if(result) begin
               `uvm_info("my_scoreboard", "Compare SUCCESSFULLY", UVM_LOW);//这里uvm_info后面加了封号,但是有些书上没加封号,应该是都可以,不影响。
            end
            else begin
               `uvm_error("my_scoreboard", "Compare FAILED");
               $display("the expect pkt is");
               tmp_tran.print();
               $display("the actual pkt is");
               get_actual.print();
            end
         end
         else begin
         //(5)uvm_error
            `uvm_error("my_scoreboard", "Received from DUT, while Expect Queue is empty");
            $display("the unexpected pkt is");
            get_actual.print();
         end
      end
   join
endtask
`endif
(1)exp_port和act_port
scoreboard的两个比较值一个来自于reference model,用exp_port获取,另外一个来自于o_agt,用act_port获取。
(2)main_phase
在main_phase中通过fork建立起了两个进程,一个进程处理exp_port的数据,;另外一个进程处理act_port的数据,这是DUT的输出数据。
(3)expect_queue
当收到数据后,把数据放入expect_queue中,当收集到这些数据后,从expect_queue中弹出之前从exp_port收到的数据,并调用my_transaction的my_compare函数。
(4)compare
my_compare逐字比较两个my_transaction。
(5)uvm_error
UVM_ERROR的默认处理方式为UVM_DISPLAY|UVM_COUNT,将消息输出到标准出口端,增加退出计划变量quit_count,当quit_count达到一定数量时,停止仿真。
`ifndef MY_SEQUENCER__SV
`define MY_SEQUENCER__SV
//(1)sequencer的定义
class my_sequencer extends uvm_sequencer #(my_transaction);
   //(2)sequence和sequencer的区别与联系
   function new(string name, uvm_component parent);
      super.new(name, parent);
   endfunction

   `uvm_component_utils(my_sequencer)
endclass

`endif
(1)sequencer的定义
sequencer的定义非常简单,派生自uvm_sequencer,并且使用uvm_component_utils宏来注册到factory中。uvm_sequencer是一个
参数化的类,其参数是my_transaction,即此sequencer产生的transaction的类型。
(2)sequence和sequencer的区别与联系
sequence不属于验证平台的任何一个部分,但是它与sequencer之间有密切的联系,只有在sequencer的帮助下sequence才能顺利到达driver。当然两者还是有区别,sequencer是一个uvm_component,而sequence是一个uvm_object。与my_transaction一样,sequence有其生命周期。它的生命周期比my_transaction要更长一些,其内的transaction全部发送完毕之后,它的生命周期也就结束了。
`ifndef BASE_TEST__SV
`define BASE_TEST__SV
//(1)base_test存在的意义
class base_test extends uvm_test;

   my_env         env;

   function new(string name = "base_test", uvm_component parent = null);
      super.new(name,parent);
   endfunction

   extern virtual function void build_phase(uvm_phase phase);
   extern virtual function void report_phase(uvm_phase phase);
   `uvm_component_utils(base_test)
endclass


function void base_test::build_phase(uvm_phase phase);
   super.build_phase(phase);
   env  =  my_env::type_id::create("env", this);
endfunction

function void base_test::report_phase(uvm_phase phase);
   uvm_report_server server;
   int err_num;
   //(2)report_phase的理解
   super.report_phase(phase);

   server = get_report_server();
   err_num = server.get_severity_count(UVM_ERROR);

   if (err_num != 0) begin
      $display("TEST CASE FAILED");
   end
   else begin
      $display("TEST CASE PASSED");
   end
endfunction

`endif
(1)base_test的存在意义
真正的测试用例都是基于base_test派生的一个类。
base_test派生自uvm_test,使用uvm_component_utils宏来注册到factory中。
(2)report_phase的理解
report_phase也是UVM内建的一个phase,它在main_phase结束之后执行。
`ifndef MY_CASE0__SV
`define MY_CASE0__SV

class case0_sequence extends uvm_sequence #(my_transaction);

   my_transaction m_trans;

   function  new(string name= "case0_sequence");
      super.new(name);
   endfunction

   //(3)body任务的理解
   virtual task body();
      if(starting_phase != null)
      	//(1)raise_objection
         starting_phase.raise_objection(this);
      repeat (10) begin
      //(2)uvm_do宏的理解
         `uvm_do(m_trans)
      end
      #100;
      if(starting_phase != null)
      	//(1)drop_objection
         starting_phase.drop_objection(this);
   endtask

   `uvm_object_utils(case0_sequence)
endclass

class my_case0 extends base_test;

   function new(string name = "my_case0", uvm_component parent = null);
      super.new(name,parent);
   endfunction
   extern virtual function void build_phase(uvm_phase phase);
   `uvm_component_utils(my_case0)
endclass

function void my_case0::build_phase(uvm_phase phase);
   super.build_phase(phase);

   uvm_config_db#(uvm_object_wrapper)::set(this,
                                           "env.i_agt.sqr.main_phase",
                                           "default_sequence",
                                           case0_sequence::type_id::get());
endfunction

`endif
(1)raise_objection和drop_objection
在每个phase中,UVM会检查是否有objection被提起(raise_objection),如果有,那么等待这个objection被撤销(drop_objection)后停止仿真;如果没有,则马上结束当前phase。
在开始学习时,读者可以简单地将drop_objection语句当成是finish函数的替代者,只是在drop_objection语句之前必须先调用
raise_objection语句,raise_objection和drop_objection总是成对出现。
raise_objection语句必须在main_phase中第一个消耗仿真时间 [1]的语句之前。如$display语句是不消耗仿真时间的,这些语句可
以放在raise_objection之前,但是类似@(posedge top.clk)等语句是要消耗仿真时间的。
(2)uvm_do宏的理解
这个宏是UVM最常用的宏之一,它用于:1)创建一个my_transaction的实例m_trans;2)将其随机化;3)最终将其送给sequencer。
在sequence中,向sequencer发送transaction使用的是uvm_do宏。这个宏什么时候返回呢?uvm_do宏产生了一个transaction并交给sequencer,driver取走这个transaction后,uvm_do并不会立刻返回执行下一次的uvm_do宏,而是等待在哪里直到driver返回item_done信号,此时,uvm_do才算是执行完毕,返回并开始执行下一个uvm_do,并产生新的transaction。
(3)body任务的理解
每一个seqnece都有一个body任务,当一个sequence启动后,会自动执行body中的代码。
`ifndef MY_CASE1__SV
`define MY_CASE1__SV
class case1_sequence extends uvm_sequence #(my_transaction);
   my_transaction m_trans;

   function  new(string name= "case1_sequence");
      super.new(name);
   endfunction

   virtual task body();
      if(starting_phase != null)
         starting_phase.raise_objection(this);
      repeat (10) begin
         `uvm_do_with(m_trans, { m_trans.pload.size() == 60;})
      end
      #100;
      if(starting_phase != null)
         starting_phase.drop_objection(this);
   endtask

   `uvm_object_utils(case1_sequence)
endclass

class my_case1 extends base_test;

   function new(string name = "my_case1", uvm_component parent = null);
      super.new(name,parent);
   endfunction

   extern virtual function void build_phase(uvm_phase phase);
   `uvm_component_utils(my_case1)
endclass

function void my_case1::build_phase(uvm_phase phase);
   super.build_phase(phase);

   uvm_config_db#(uvm_object_wrapper)::set(this,
                                           "env.i_agt.sqr.main_phase",
                                           "default_sequence",
                                           case1_sequence::type_id::get());
endfunction

`endif
uvm_do_with宏,它是uvm_do系列宏中的一个,用于在随机化时提供对某些字段的约束
如何在buildr项目中使用Ruby?我在很多不同的项目中使用过Ruby、JRuby、Java和Clojure。我目前正在使用我的标准Ruby开发一个模拟应用程序,我想尝试使用Clojure后端(我确实喜欢功能代码)以及JRubygui和测试套件。我还可以看到在未来的不同项目中使用Scala作为后端。我想我要为我的项目尝试一下buildr(http://buildr.apache.org/),但我注意到buildr似乎没有设置为在项目中使用JRuby代码本身!这看起来有点傻,因为该工具旨在统一通用的JVM语言并且是在ruby中构建的。除了将输出的jar包含在一个独特的、仅限ruby
在rails源中:https://github.com/rails/rails/blob/master/activesupport/lib/active_support/lazy_load_hooks.rb可以看到以下内容@load_hooks=Hash.new{|h,k|h[k]=[]}在IRB中,它只是初始化一个空哈希。和做有什么区别@load_hooks=Hash.new 最佳答案 查看rubydocumentationforHashnew→new_hashclicktotogglesourcenew(obj)→new_has
我正在查看instance_variable_set的文档并看到给出的示例代码是这样做的:obj.instance_variable_set(:@instnc_var,"valuefortheinstancevariable")然后允许您在类的任何实例方法中以@instnc_var的形式访问该变量。我想知道为什么在@instnc_var之前需要一个冒号:。冒号有什么作用? 最佳答案 我的第一直觉是告诉你不要使用instance_variable_set除非你真的知道你用它做什么。它本质上是一种元编程工具或绕过实例变量可见性的黑客攻击
在我的应用程序中,我需要能够找到所有数字子字符串,然后扫描每个子字符串,找到第一个匹配范围(例如5到15之间)的子字符串,并将该实例替换为另一个字符串“X”。我的测试字符串s="1foo100bar10gee1"我的初始模式是1个或多个数字的任何字符串,例如,re=Regexp.new(/\d+/)matches=s.scan(re)给出["1","100","10","1"]如果我想用“X”替换第N个匹配项,并且只替换第N个匹配项,我该怎么做?例如,如果我想替换第三个匹配项“10”(匹配项[2]),我不能只说s[matches[2]]="X"因为它做了两次替换“1fooX0barXg
我有一个正在构建的应用程序,我需要一个模型来创建另一个模型的实例。我希望每辆车都有4个轮胎。汽车模型classCar轮胎模型classTire但是,在make_tires内部有一个错误,如果我为Tire尝试它,则没有用于创建或新建的activerecord方法。当我检查轮胎时,它没有这些方法。我该如何补救?错误是这样的:未定义的方法'create'forActiveRecord::AttributeMethods::Serialization::Tire::Module我测试了两个环境:测试和开发,它们都因相同的错误而失败。 最佳答案
我的主要目标是能够完全理解我正在使用的库/gem。我尝试在Github上从头到尾阅读源代码,但这真的很难。我认为更有趣、更温和的踏脚石就是在使用时阅读每个库/gem方法的源代码。例如,我想知道RubyonRails中的redirect_to方法是如何工作的:如何查找redirect_to方法的源代码?我知道在pry中我可以执行类似show-methodmethod的操作,但我如何才能对Rails框架中的方法执行此操作?您对我如何更好地理解Gem及其API有什么建议吗?仅仅阅读源代码似乎真的很难,尤其是对于框架。谢谢! 最佳答案 Ru
我正在处理旧代码的一部分。beforedoallow_any_instance_of(SportRateManager).toreceive(:create).and_return(true)endRubocop错误如下:Avoidstubbingusing'allow_any_instance_of'我读到了RuboCop::RSpec:AnyInstance我试着像下面那样改变它。由此beforedoallow_any_instance_of(SportRateManager).toreceive(:create).and_return(true)end对此:let(:sport_
我的假设是moduleAmoduleBendend和moduleA::Bend是一样的。我能够从thisblog找到解决方案,thisSOthread和andthisSOthread.为什么以及什么时候应该更喜欢紧凑语法A::B而不是另一个,因为它显然有一个缺点?我有一种直觉,它可能与性能有关,因为在更多命名空间中查找常量需要更多计算。但是我无法通过对普通类进行基准测试来验证这一点。 最佳答案 这两种写作方法经常被混淆。首先要说的是,据我所知,没有可衡量的性能差异。(在下面的书面示例中不断查找)最明显的区别,可能也是最著名的,是你的
几个月前,我读了一篇关于rubygem的博客文章,它可以通过阅读代码本身来确定编程语言。对于我的生活,我不记得博客或gem的名称。谷歌搜索“ruby编程语言猜测”及其变体也无济于事。有人碰巧知道相关gem的名称吗? 最佳答案 是这个吗:http://github.com/chrislo/sourceclassifier/tree/master 关于ruby-寻找通过阅读代码确定编程语言的rubygem?,我们在StackOverflow上找到一个类似的问题:
我目前正在使用以下方法获取页面的源代码:Net::HTTP.get(URI.parse(page.url))我还想获取HTTP状态,而无需发出第二个请求。有没有办法用另一种方法做到这一点?我一直在查看文档,但似乎找不到我要找的东西。 最佳答案 在我看来,除非您需要一些真正的低级访问或控制,否则最好使用Ruby的内置Open::URI模块:require'open-uri'io=open('http://www.example.org/')#=>#body=io.read[0,50]#=>"["200","OK"]io.base_ur