这里写自定义目录标题
参考网站:https://docs.nerf.studio/en/latest/quickstart/installation.html
因为服务器无法联网,采用本地安装的方法进行安装:
conda create --name nerfstudio -y python=3.8
conda activate nerfstudio
python -m pip install --upgrade pip

pip install torch==1.12.1+cu113 torchvision==0.13.1+cu113 -f https://download.pytorch.org/whl/torch_stable.html
这个链接无法在服务器联网安装,服务器一般不连外网
pip install git+https://github.com/NVlabs/tiny-cuda-nn/#subdirectory=bindings/torch
可以去官网github下载
https://github.com/NVlabs/tiny-cuda-nn/
另外fmt 和 cutlass github 是给的超链接,因此上面的链接并没有下载 这两个包,需要手动下载和安装。
如果报错 ld: cannot find -lcuda
export LIBRARY_PATH="/usr/local/cuda-11.3/lib64/stubs:$LIBRARY_PATH"
cd bindings/torch
python setup.py install
安装nerfstudio:
git clone git@github.com:nerfstudio-project/nerfstudio.git
cd nerfstudio
pip install --upgrade pip setuptools
pip install -e .
下面这些配置是有顺序,更改顺序可能会报错。比如把 --viewer.skip-openrelay True 加在命令行的最后,会报错。应该跟在–viewer 的后面
在之前的权重上继续进行训练,加上 --load_dir 参数指定 ckpt 权重的 路径
ns-train nerfacto --data posters_v3/ --vis viewer --viewer.skip-openrelay True  --viewer.websocket-port 7008

ns-train nerfacto --data kitti360/ --load_dir ckpt_path --vis viewer --viewer.skip-openrelay True  --viewer.websocket-port 7008
打开电脑浏览器的 localhost:7008,可以查看viewer中的训练过程。
ns-train nerfacto --data posters_v3/ --vis viewer --viewer.skip-openrelay True --viewer.websocket-port 7008 --load-dir ./nerfstudio-main/outputs/posters_v3/nerfacto/2022-12-29_142632/nerfstudio_models/
加上==–logdir== 参数可以从预加载模型开始训练
netstat -tunlp
kill -9 pid_number
运行原始的nerf (vanilla-nerf):
## Viewer
ns-train vanilla-nerf --data nerf_synthetic/kitti360 --vis viewer --viewer.skip-openrelay True  --viewer.websocket-port 7007

## Tensorboad
ns-train vanilla-nerf --data nerf_synthetic/kitti360 --vis tensorboard
导出TSDF的Geometry
ns-export tsdf --load-config CONFIG.yml --output-dir OUTPUT_DIR
ns-extract-mesh --load-config outputs/../config.yml --output-path meshes/xxx.ply
这里采用 nohup 的后端执行命令,即使关闭 Terminal 也照样执行程序代码。
nohup ns-render --load-config outputs/datasets-kitti360_mono_priors/monosdf/2023-02-06_125735/config.yml --traj filename --camera-path-filename outputs/datasets-kitti360_mono_priors/monosdf/2023-02-06_125735/camera_path.json --output-path renders/monosdf_output.mp4 &
Pipeline 如下:
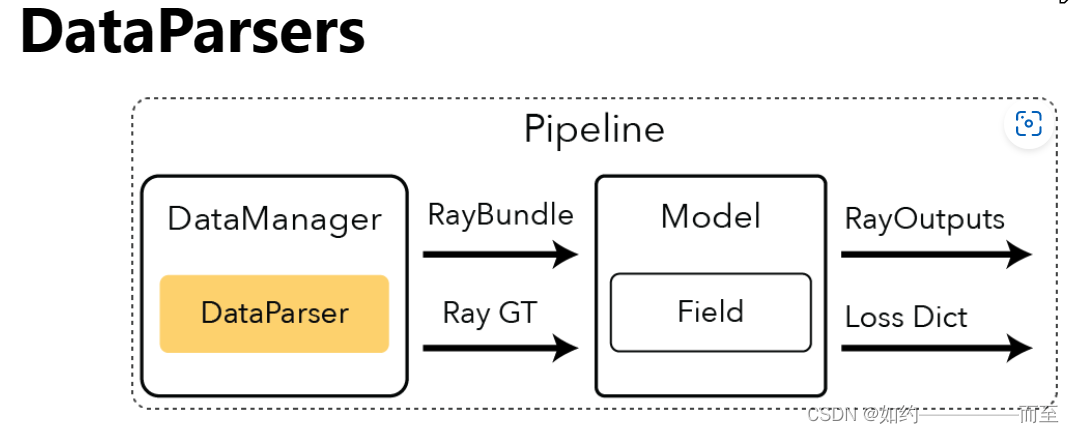
DataParser 将各种形式的数据集作为输入,并且读取各个数据类别的Meta数据,返回的参数是DataparserOutputs
DataManger 返回的是RayBundle 和 RayGT 。对于大多数的NerfPaper ,NerfStudio 设立了 VanillaDataManger. 其随机在DataManger中随机采样了一些像素点。生成了Training Ray 的颜色和Gt 的颜色
每一次采样的 光线数量 由参数 --pipeline.datamanager.train-num-rays-per-batch 来指定,默认数值是1024
Code:
ray_bundle, batch = self.datamanager.next_train(step) Ray_bundle (1024)
具体如何从DataManger 中进行Random Sample pixel 来生成 pixel_batch?
在Sample 函数中,输入的是img_batch 参数,是一个Dict,包含image_idx 列表和 image (batch,H,W,C)的Tensor。
在 pixel_sampler.py 代码中,调用sample_method 均匀采样pixel。具体算法是生成均匀采样的随机数t(batch,3) 和 tensor([num_images, image_height, image_width]) 进行相乘,返回一个Tensor.
 indices = torch.floor(
                torch.rand((batch_size, 3), device=device)
                * torch.tensor([num_images, image_height, image_width], device=device)
            ).long()
Model 是实际执行的 Nerf-based 算法。Model读取RayBundle 对象返回的是每一条Ray对应的 rendered color
一般包含的模块有:
    # Fields
    # Ray Samplers
    # Colliders
    # Renderers
    # Losses
    # Metrics
Field 是 Model 模块中的一个重要的Component 。在大多数经典的应用当中,输入是3D 的Location 和 View direction 输出是 density 和 color 数值。
在Nerfstudio 的代码中,Pipeline 包含Nerf方法所有的代码。在代码中有一个 Vanilla Implementation 类,负责从DataManger 中读取数据然后feed到Model当中。
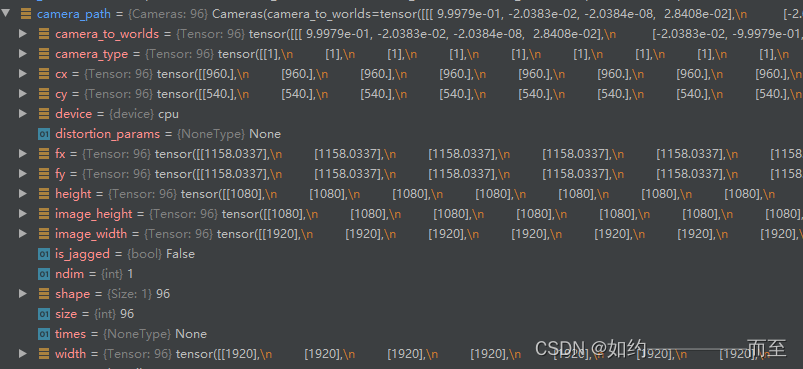
对于在nerfstudio 的 Viewer 中会生成 camera.json 文件,解析这个json 文件,从其中读出 需要渲染的 相机的信息,包括 相机的 c2w 矩阵, 相机的内参数cx,cy 等。
 elif self.traj == "filename":
     with open(self.camera_path_filename, "r", encoding="utf-8") as f:
         camera_path = json.load(f)
     seconds = camera_path["seconds"]
     camera_path = get_path_from_json(camera_path)
came_path 包含的信息如下所示:
得到了相机的参数,主要通过 _render_trajectory_video 进行渲染:
def _render_trajectory_video(
    pipeline: Pipeline,
    cameras: Cameras,
    output_filename: Path,
    rendered_output_names: List[str],
    rendered_resolution_scaling_factor: float = 1.0,
    seconds: float = 5.0,
    output_format: Literal["images", "video"] = "video",
) -> None:
    """Helper function to create a video of the spiral trajectory.

    Args:
        pipeline: Pipeline to evaluate with.
        cameras: Cameras to render.
        output_filename: Name of the output file.
        rendered_output_names: List of outputs to visualise.
        rendered_resolution_scaling_factor: Scaling factor to apply to the camera image resolution.
        seconds: Length of output video.
        output_format: How to save output data.
    """
可以按照相机的位姿 进行螺旋前景跑完整个场景
python scripts/render.py --load-config outputs/data_leader-train_00/nerfacto/2023-03-17_223503/config.yml --traj spiral --output-path trai00.mp4
我正在学习如何使用Nokogiri,根据这段代码我遇到了一些问题:require'rubygems'require'mechanize'post_agent=WWW::Mechanize.newpost_page=post_agent.get('http://www.vbulletin.org/forum/showthread.php?t=230708')puts"\nabsolutepathwithtbodygivesnil"putspost_page.parser.xpath('/html/body/div/div/div/div/div/table/tbody/tr/td/div
我有一个Ruby程序,它使用rubyzip压缩XML文件的目录树。gem。我的问题是文件开始变得很重,我想提高压缩级别,因为压缩时间不是问题。我在rubyzipdocumentation中找不到一种为创建的ZIP文件指定压缩级别的方法。有人知道如何更改此设置吗?是否有另一个允许指定压缩级别的Ruby库? 最佳答案 这是我通过查看rubyzip内部创建的代码。level=Zlib::BEST_COMPRESSIONZip::ZipOutputStream.open(zip_file)do|zip|Dir.glob("**/*")d
类classAprivatedeffooputs:fooendpublicdefbarputs:barendprivatedefzimputs:zimendprotecteddefdibputs:dibendendA的实例a=A.new测试a.foorescueputs:faila.barrescueputs:faila.zimrescueputs:faila.dibrescueputs:faila.gazrescueputs:fail测试输出failbarfailfailfail.发送测试[:foo,:bar,:zim,:dib,:gaz].each{|m|a.send(m)resc
很好奇,就使用rubyonrails自动化单元测试而言,你们正在做什么?您是否创建了一个脚本来在cron中运行rake作业并将结果邮寄给您?git中的预提交Hook?只是手动调用?我完全理解测试,但想知道在错误发生之前捕获错误的最佳实践是什么。让我们理所当然地认为测试本身是完美无缺的,并且可以正常工作。下一步是什么以确保他们在正确的时间将可能有害的结果传达给您? 最佳答案 不确定您到底想听什么,但是有几个级别的自动代码库控制:在处理某项功能时,您可以使用类似autotest的内容获得关于哪些有效,哪些无效的即时反馈。要确保您的提
假设我做了一个模块如下:m=Module.newdoclassCendend三个问题:除了对m的引用之外,还有什么方法可以访问C和m中的其他内容?我可以在创建匿名模块后为其命名吗(就像我输入“module...”一样)?如何在使用完匿名模块后将其删除,使其定义的常量不再存在? 最佳答案 三个答案:是的,使用ObjectSpace.此代码使c引用你的类(class)C不引用m:c=nilObjectSpace.each_object{|obj|c=objif(Class===objandobj.name=~/::C$/)}当然这取决于
我正在尝试使用ruby和Savon来使用网络服务。测试服务为http://www.webservicex.net/WS/WSDetails.aspx?WSID=9&CATID=2require'rubygems'require'savon'client=Savon::Client.new"http://www.webservicex.net/stockquote.asmx?WSDL"client.get_quotedo|soap|soap.body={:symbol=>"AAPL"}end返回SOAP异常。检查soap信封,在我看来soap请求没有正确的命名空间。任何人都可以建议我
关闭。这个问题是opinion-based.它目前不接受答案。想要改进这个问题?更新问题,以便editingthispost可以用事实和引用来回答它.关闭4年前。Improvethisquestion我想在固定时间创建一系列低音和高音调的哔哔声。例如:在150毫秒时发出高音调的蜂鸣声在151毫秒时发出低音调的蜂鸣声200毫秒时发出低音调的蜂鸣声250毫秒的高音调蜂鸣声有没有办法在Ruby或Python中做到这一点?我真的不在乎输出编码是什么(.wav、.mp3、.ogg等等),但我确实想创建一个输出文件。
我在我的项目目录中完成了compasscreate.和compassinitrails。几个问题:我已将我的.sass文件放在public/stylesheets中。这是放置它们的正确位置吗?当我运行compasswatch时,它不会自动编译这些.sass文件。我必须手动指定文件:compasswatchpublic/stylesheets/myfile.sass等。如何让它自动运行?文件ie.css、print.css和screen.css已放在stylesheets/compiled。如何在编译后不让它们重新出现的情况下删除它们?我自己编译的.sass文件编译成compiled/t
我想将html转换为纯文本。不过,我不想只删除标签,我想智能地保留尽可能多的格式。为插入换行符标签,检测段落并格式化它们等。输入非常简单,通常是格式良好的html(不是整个文档,只是一堆内容,通常没有anchor或图像)。我可以将几个正则表达式放在一起,让我达到80%,但我认为可能有一些现有的解决方案更智能。 最佳答案 首先,不要尝试为此使用正则表达式。很有可能你会想出一个脆弱/脆弱的解决方案,它会随着HTML的变化而崩溃,或者很难管理和维护。您可以使用Nokogiri快速解析HTML并提取文本:require'nokogiri'h
我想为Heroku构建一个Rails3应用程序。他们使用Postgres作为他们的数据库,所以我通过MacPorts安装了postgres9.0。现在我需要一个postgresgem并且共识是出于性能原因你想要pggem。但是我对我得到的错误感到非常困惑当我尝试在rvm下通过geminstall安装pg时。我已经非常明确地指定了所有postgres目录的位置可以找到但仍然无法完成安装:$envARCHFLAGS='-archx86_64'geminstallpg--\--with-pg-config=/opt/local/var/db/postgresql90/defaultdb/po