文章目录
Feign是一个声明式的客户端负载均衡器;采用的是基于接口的注解;整合了ribbon,具有负载均衡的能力;整合了Hystrix,具有熔断的能力;
使用RestTemplate + ribbon的方式来进行服务间的调用,会导致我们每次去调用其他服务的一个接口,都要单独写一些代码。
而Feign是声明式调用,可以让我们不用写代码,直接用一些接口和注解就可以完成对其他服务的调用。
- 依赖不同:一个是spring-cloud-starter-feign,一个是spring-cloud-starter-openfeign
- 支持的注解:OpenFeign是springcloud在Feign的基础上支持了SpringMVC的注解,如@RequestMapping等等。
即:OpenFeign的@FeignClient可以解析SpringMVC的@RequestMapping注解下的接口,并通过动态代理的方式产生实现类,实现类中做负载均衡并调用其他服务。
整体项目目录包括四个Module,分别为:eureka-server、feign-server-api、feign-server、feign-consumer。
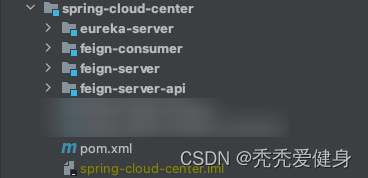
其中eureka-server作为服务注册中心、feign-server-api作为服务提供者给consumer引入、feign-server作为具体的服务提供者实现、feign-consumer作为服务消费者。
<?xml version="1.0" encoding="UTF-8"?>
<project xmlns="http://maven.apache.org/POM/4.0.0"
         xmlns:xsi="http://www.w3.org/2001/XMLSchema-instance"
         xsi:schemaLocation="http://maven.apache.org/POM/4.0.0 http://maven.apache.org/xsd/maven-4.0.0.xsd">
    <parent>
        <groupId>org.springframework.boot</groupId>
        <artifactId>spring-boot-starter-parent</artifactId>
        <version>2.3.7.RELEASE</version>
        <relativePath/> <!-- lookup parent from repository -->
    </parent>
    <modelVersion>4.0.0</modelVersion>
    <packaging>pom</packaging>

    <!--子模块-->
    <modules>
        <module>feign-server-api</module>
        <module>feign-server</module>
        <module>feign-consumer</module>
        <module>eureka-server</module>
    </modules>

    <artifactId>spring-cloud-center</artifactId>
    <groupId>com.saint</groupId>
    <version>0.0.1-SNAPSHOT</version>
    <name>spring-cloud-center</name>

    <properties>
        <java.version>1.8</java.version>
    </properties>

    <dependencyManagement>
        <dependencies>
            <dependency>
                <groupId>org.springframework.boot</groupId>
                <artifactId>spring-boot-dependencies</artifactId>
                <version>2.3.7.RELEASE</version>
                <type>pom</type>
                <scope>import</scope>
            </dependency>
            <!--整合spring cloud-->
            <dependency>
                <groupId>org.springframework.cloud</groupId>
                <artifactId>spring-cloud-dependencies</artifactId>
                <version>Hoxton.SR8</version>
                <type>pom</type>
                <scope>import</scope>
            </dependency>
            <!--整合spring cloud alibaba-->
            <dependency>
                <groupId>com.alibaba.cloud</groupId>
                <artifactId>spring-cloud-alibaba-dependencies</artifactId>
                <version>2.2.5.RELEASE</version>
                <type>pom</type>
                <scope>import</scope>
            </dependency>
        </dependencies>
    </dependencyManagement>

    <build>
        <plugins>
            <!-- java编译插件 -->
            <plugin>
                <groupId>org.apache.maven.plugins</groupId>
                <artifactId>maven-compiler-plugin</artifactId>
                <configuration>
                    <source>1.8</source>
                    <target>1.8</target>
                    <encoding>UTF-8</encoding>
                </configuration>
            </plugin>
            <plugin>
                <groupId>org.springframework.boot</groupId>
                <artifactId>spring-boot-maven-plugin</artifactId>
            </plugin>
        </plugins>
    </build>

</project>
关于Spring-cloud和SpringBoot的版本对应关系,参考博文:SpringBoot、SpringCloud、SpringCloudAlibaba的版本对应关系。
eureka-server整体代码结构目录如下:
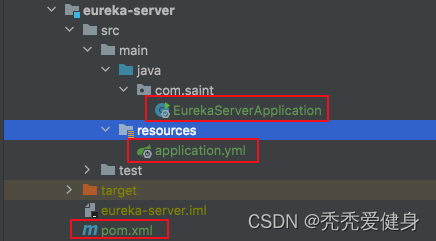
其整体很简单、仅仅包含一个pom.xml文件、一个配置文件、一个启动类。
<?xml version="1.0" encoding="UTF-8"?>
<project xmlns="http://maven.apache.org/POM/4.0.0"
         xmlns:xsi="http://www.w3.org/2001/XMLSchema-instance"
         xsi:schemaLocation="http://maven.apache.org/POM/4.0.0 http://maven.apache.org/xsd/maven-4.0.0.xsd">
    <parent>
        <artifactId>spring-cloud-center</artifactId>
        <groupId>com.saint</groupId>
        <version>0.0.1-SNAPSHOT</version>
    </parent>
    <modelVersion>4.0.0</modelVersion>

    <artifactId>eureka-server</artifactId>
    <version>0.0.1-SNAPSHOT</version>
    <description>eureka-server</description>

    <dependencies>

        <!--集成Eureka-server-->
        <dependency>
            <groupId>org.springframework.cloud</groupId>
            <artifactId>spring-cloud-starter-netflix-eureka-server</artifactId>
        </dependency>

        <dependency>
            <groupId>org.springframework.boot</groupId>
            <artifactId>spring-boot-starter-web</artifactId>
        </dependency>

        <dependency>
            <groupId>org.springframework.boot</groupId>
            <artifactId>spring-boot-starter</artifactId>
            <optional>true</optional>
        </dependency>
        <dependency>
            <groupId>org.springframework.boot</groupId>
            <artifactId>spring-boot-autoconfigure</artifactId>
        </dependency>
    </dependencies>

</project>
server:
  port: 10010
spring:
  application:
    name: eureka-server
eureka:
  client:
    # 把自身注册到Eureka-server中
    register-with-eureka: true
    # 服务注册中心不需要去检索其他服务
    fetch-registry: false
    # 指定服务注册中心的位置
    service-url:
      defaultZone: http://localhost:10010/eureka
  instance:
    hostname: localhost
package com.saint;

import org.springframework.boot.SpringApplication;
import org.springframework.boot.autoconfigure.SpringBootApplication;
import org.springframework.cloud.netflix.eureka.server.EnableEurekaServer;

/**
 * @author Saint
 */
@EnableEurekaServer
@SpringBootApplication
public class EurekaServerApplication {

    public static void main(String[] args) {
        SpringApplication.run(EurekaServerApplication.class, args);
    }
}
这里和普通的启动有一个区别:需要加上 @EnableEurekaServer 注解开启Eureka-Server。
启动成功后,控制台输出如下:

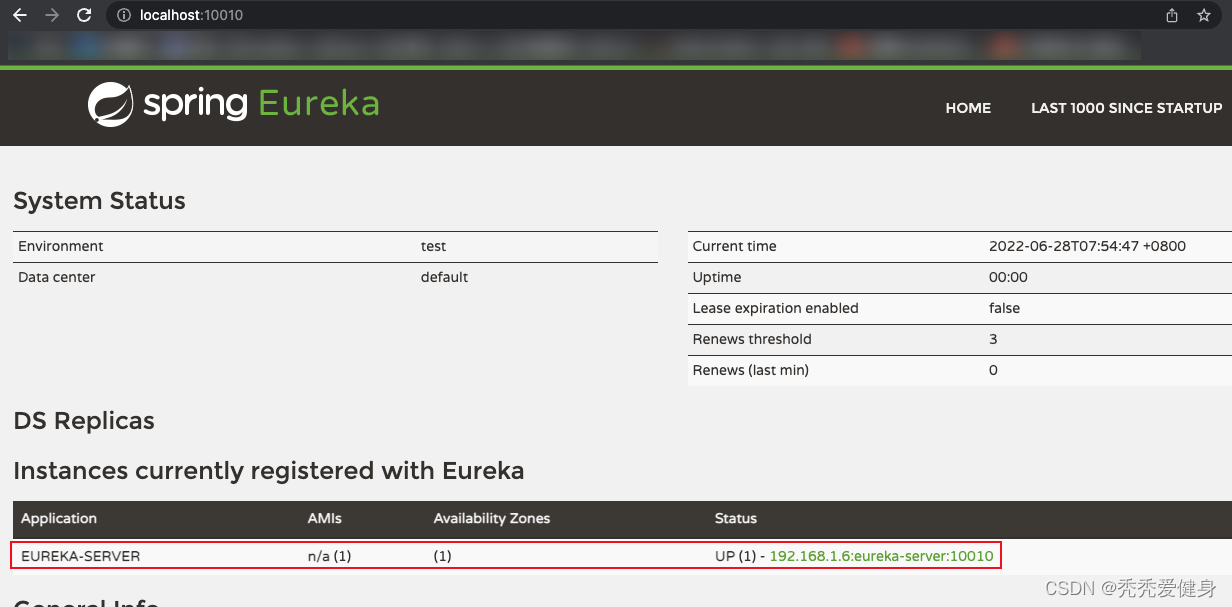
进入到eureka-server 的dashboard,可以看到eureka-server已经上线:
feign-server-api整体代码结构目录如下:

其中包含一个pom.xml文件、一个用户类User、一个标注@RequestMapping注解的接口ServiceA。
<?xml version="1.0" encoding="UTF-8"?>
<project xmlns="http://maven.apache.org/POM/4.0.0"
         xmlns:xsi="http://www.w3.org/2001/XMLSchema-instance"
         xsi:schemaLocation="http://maven.apache.org/POM/4.0.0 http://maven.apache.org/xsd/maven-4.0.0.xsd">
    <parent>
        <artifactId>spring-cloud-center</artifactId>
        <groupId>com.saint</groupId>
        <version>0.0.1-SNAPSHOT</version>
    </parent>
    <modelVersion>4.0.0</modelVersion>
    <artifactId>feign-server-api</artifactId>
    <version>0.0.1-SNAPSHOT</version>
    <description>feign test service provider api</description>

    <dependencies>
        <dependency>
            <groupId>org.springframework.boot</groupId>
            <artifactId>spring-boot-starter-web</artifactId>
        </dependency>
    </dependencies>

</project>
package com.saint.feign.model;

/**
 * @author Saint
 */
public class User {
    private Long id;
    private String name;
    private Integer age;

    public User() {
    }

    public User(Long id, String name, Integer age) {
        this.id = id;
        this.name = name;
        this.age = age;
    }

    public Long getId() {
        return id;
    }

    public void setId(Long id) {
        this.id = id;
    }

    public String getName() {
        return name;
    }

    public void setName(String name) {
        this.name = name;
    }

    public Integer getAge() {
        return age;
    }

    public void setAge(Integer age) {
        this.age = age;
    }

    @Override
    public String toString() {
        return "User [id=" + id + ", name=" + name + ", age=" + age + "]";
    }
}
package com.saint.feign.service;

import com.saint.feign.model.User;
import org.springframework.web.bind.annotation.*;

/**
 * @author Saint
 */
@RequestMapping("/user")
public interface ServiceA {
    @RequestMapping(value = "/sayHello/{id}", method = RequestMethod.GET)
    String sayHello(@PathVariable("id") Long id,
                    @RequestParam("name") String name,
                    @RequestParam("age") Integer age);

    @RequestMapping(value = "/", method = RequestMethod.POST)
    String createUser(@RequestBody User user);

    @RequestMapping(value = "/{id}", method = RequestMethod.PUT)
    String updateUser(@PathVariable("id") Long id, @RequestBody User user);

    @RequestMapping(value = "/{id}", method = RequestMethod.DELETE)
    String deleteUser(@PathVariable("id") Long id);

    @RequestMapping(value = "/{id}", method = RequestMethod.GET)
    User getById(@PathVariable("id") Long id);
}
feign-server-api整体代码结构目录如下:

其中包含一个pom.xml文件、一个application配置文件、一个启动类、一个Controller。
<?xml version="1.0" encoding="UTF-8"?>
<project xmlns="http://maven.apache.org/POM/4.0.0"
         xmlns:xsi="http://www.w3.org/2001/XMLSchema-instance"
         xsi:schemaLocation="http://maven.apache.org/POM/4.0.0 http://maven.apache.org/xsd/maven-4.0.0.xsd">
    <parent>
        <artifactId>spring-cloud-center</artifactId>
        <groupId>com.saint</groupId>
        <version>0.0.1-SNAPSHOT</version>
    </parent>
    <modelVersion>4.0.0</modelVersion>

    <artifactId>feign-server</artifactId>
    <version>0.0.1-SNAPSHOT</version>
    <description>feign test service provider</description>

    <dependencies>

        <dependency>
            <groupId>com.saint</groupId>
            <artifactId>feign-server-api</artifactId>
            <version>0.0.1-SNAPSHOT</version>
        </dependency>

        <!--集成eureka-client-->
        <dependency>
            <groupId>org.springframework.cloud</groupId>
            <artifactId>spring-cloud-starter-netflix-eureka-client</artifactId>
        </dependency>

        <dependency>
            <groupId>org.springframework.boot</groupId>
            <artifactId>spring-boot-starter-web</artifactId>
        </dependency>
    </dependencies>

</project>
server:
  port: 8081
spring:
  application:
    name: service-a
eureka:
  client:
    # 将当前服务注册到服务注册中心
    service-url:
      defaultZone: http://localhost:10010/eureka
package com.saint.feign;

import org.springframework.boot.SpringApplication;
import org.springframework.boot.autoconfigure.SpringBootApplication;
import org.springframework.cloud.netflix.eureka.EnableEurekaClient;

/**
 * @author Saint
 */
@EnableEurekaClient
@SpringBootApplication
public class FeignServerApplication {
    public static void main(String[] args) {
        SpringApplication.run(FeignServerApplication.class, args);
    }
}
ServiceAController实现feign-server-api模块下的ServiceA,提供具体的业务实现。
package com.saint.feign.controller;

import com.saint.feign.model.User;
import com.saint.feign.service.ServiceA;
import org.springframework.web.bind.annotation.PathVariable;
import org.springframework.web.bind.annotation.RequestBody;
import org.springframework.web.bind.annotation.RequestParam;
import org.springframework.web.bind.annotation.RestController;

/**
 * @author Saint
 */
@RestController
public class ServiceAController implements ServiceA {
    @Override
    public String sayHello(@PathVariable("id") Long id,
                           @RequestParam("name") String name,
                           @RequestParam("age") Integer age) {
        System.out.println("打招呼,id=" + id + ", name=" + name + ", age=" + age);
        return "{'msg': 'hello, " + name + "'}";
    }

    @Override
    public String createUser(@RequestBody User user) {
        System.out.println("创建用户," + user);
        return "{'msg': 'success'}";
    }

    @Override
    public String updateUser(@PathVariable("id") Long id, @RequestBody User user) {
        System.out.println("更新用户," + user);
        return "{'msg': 'success'}";
    }

    @Override
    public String deleteUser(@PathVariable("id") Long id) {
        System.out.println("删除用户,id=" + id);
        return "{'msg': 'success'}";
    }

    @Override
    public User getById(@PathVariable("id") Long id) {
        System.out.println("查询用户,id=" + id);
        return new User(1L, "张三", 20);
    }
}
服务启动成功后,控制台输出如下:

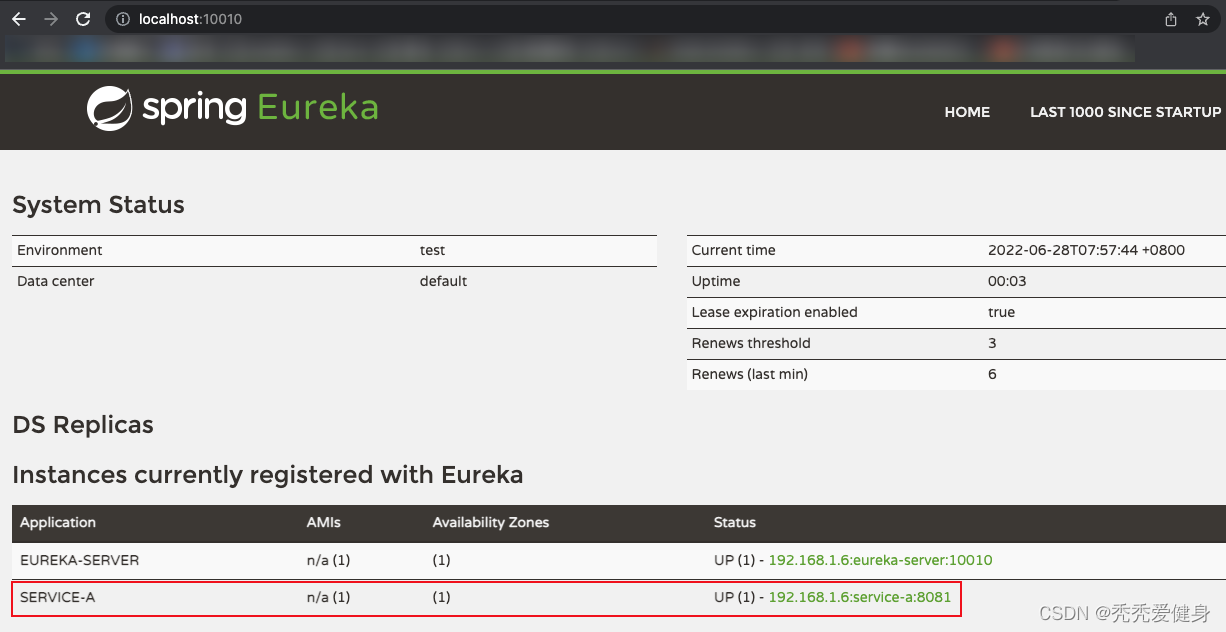
再看eureka-server dashboard中多了一个 SERVICE-A 服务,并且其有一个实例 192.168.1.6:service-a:8081。
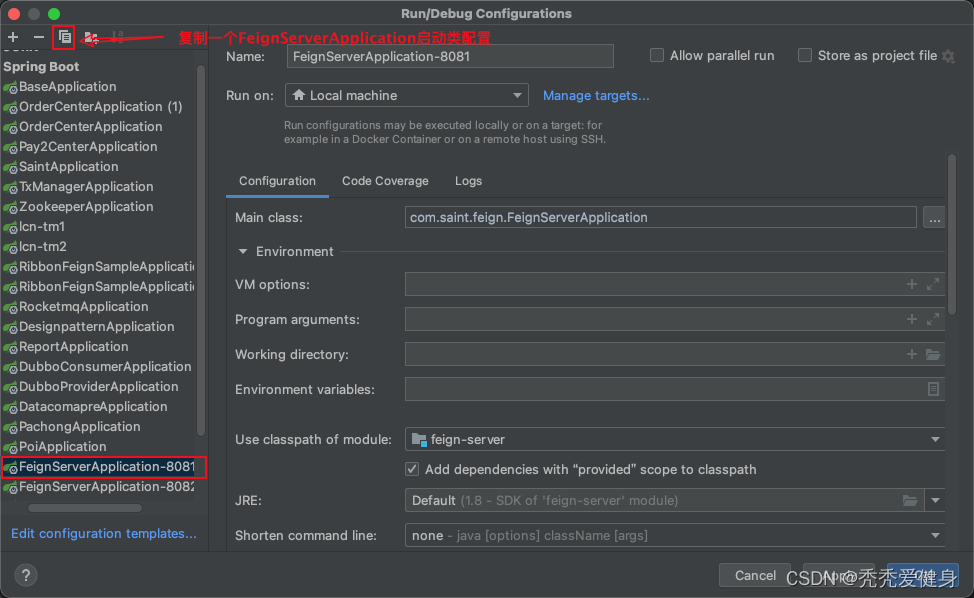
1> 修改FeignServerApplication的配置:

2> 复制出一个FeignServerApplication配置:
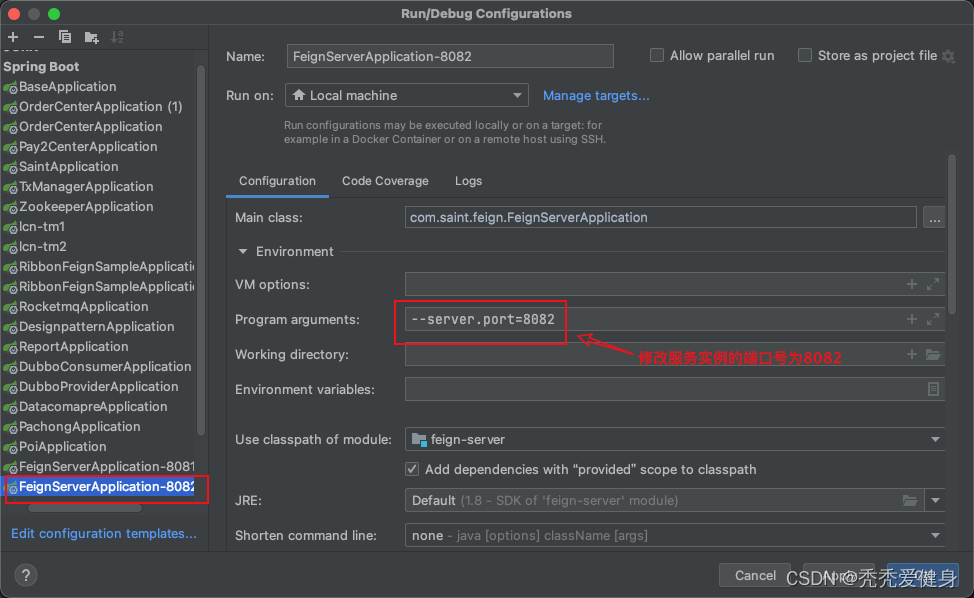
3> 修改第二启动类配置名为:FeignServerApplication-8082,启动端口为8082:
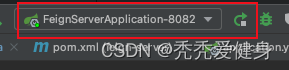
4> 运行FeignServerApplication-8082:
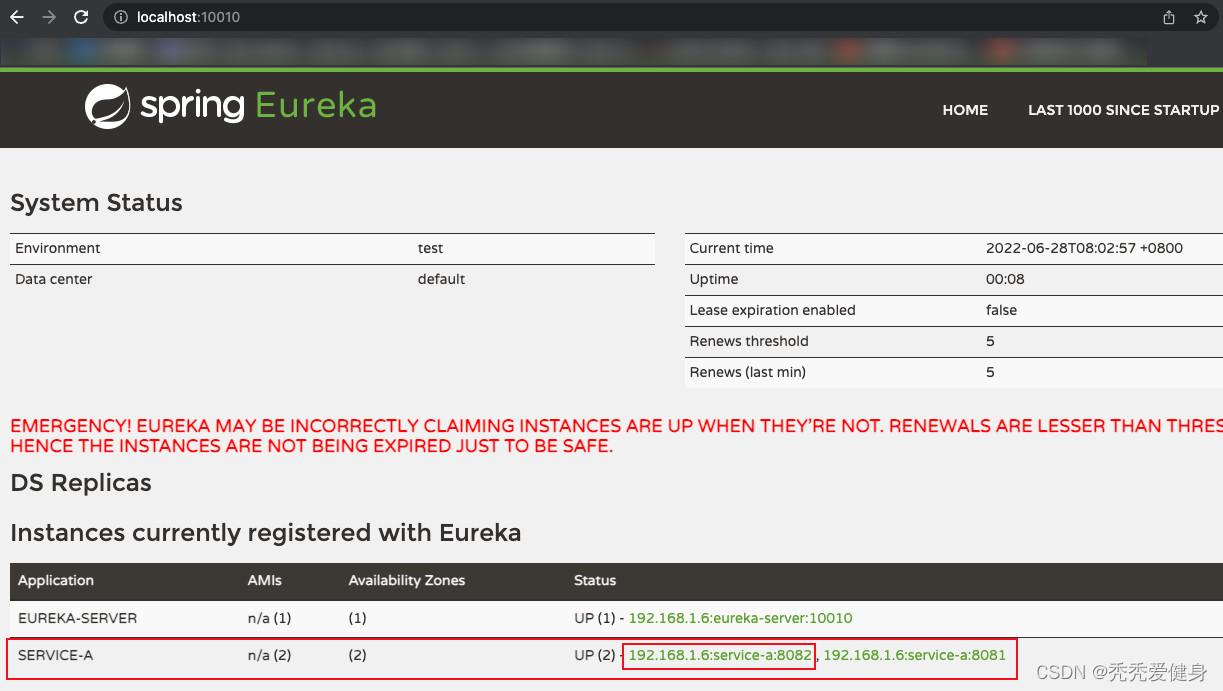
5> 启动之后,看eureka-server dashboard中SERVICE-A 服务多了一个实例 192.168.1.6:service-a:8082:
feign-consumer整体代码结构目录如下:
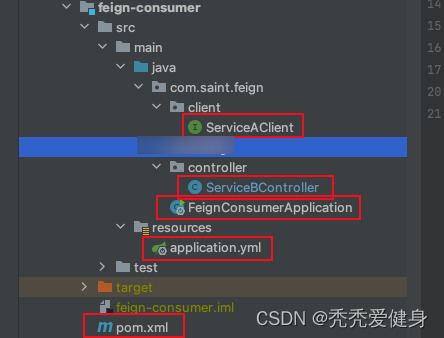
其包含一个pom.xml文件、一个application配置文件、一个启动类、一个FeignClient接口、一个Controller。
这里使用的是open-feign,想使用老版本的feign把代码中的注释放开;并把spring-cloud-starter-openfeign依赖注掉即可。
<?xml version="1.0" encoding="UTF-8"?>
<project xmlns="http://maven.apache.org/POM/4.0.0"
         xmlns:xsi="http://www.w3.org/2001/XMLSchema-instance"
         xsi:schemaLocation="http://maven.apache.org/POM/4.0.0 http://maven.apache.org/xsd/maven-4.0.0.xsd">
    <parent>
        <artifactId>spring-cloud-center</artifactId>
        <groupId>com.saint</groupId>
        <version>0.0.1-SNAPSHOT</version>
    </parent>
    <modelVersion>4.0.0</modelVersion>

    <artifactId>feign-consumer</artifactId>
    <version>0.0.1-SNAPSHOT</version>
    <description>feign test consumer</description>

    <dependencies>

        <dependency>
            <groupId>com.saint</groupId>
            <artifactId>feign-server-api</artifactId>
            <version>0.0.1-SNAPSHOT</version>
        </dependency>

        <!--集成feign PS: 博主使用的SpringCloud版本内部没有管理feign的版本,而是管理的open-feign版本-->
<!--        <dependency>-->
<!--            <groupId>org.springframework.cloud</groupId>-->
<!--            <artifactId>spring-cloud-starter-feign</artifactId>-->
<!--            <version>1.4.7.RELEASE</version>-->
<!--        </dependency>-->

        <!--集成openfeign-->
        <dependency>
            <groupId>org.springframework.cloud</groupId>
            <artifactId>spring-cloud-starter-openfeign</artifactId>
        </dependency>

        <!--集成eureka-client-->
        <dependency>
            <groupId>org.springframework.cloud</groupId>
            <artifactId>spring-cloud-starter-netflix-eureka-client</artifactId>
        </dependency>

        <dependency>
            <groupId>org.springframework.boot</groupId>
            <artifactId>spring-boot-starter-web</artifactId>
        </dependency>
    </dependencies>

</project>
server:
  port: 9090
spring:
  application:
    name: service-b
eureka:
  client:
    # 将当前服务注册到服务注册中心
    service-url:
      defaultZone: http://localhost:10010/eureka
注:服务端口为9090,后面我们进行接口调用的时候会用到。
package com.saint.feign;

import org.springframework.boot.SpringApplication;
import org.springframework.boot.autoconfigure.SpringBootApplication;
import org.springframework.cloud.netflix.eureka.EnableEurekaClient;
import org.springframework.cloud.openfeign.EnableFeignClients;

/**
 * @author Saint
 */
@SpringBootApplication
@EnableEurekaClient
@EnableFeignClients
public class FeignConsumerApplication {
    public static void main(String[] args) {
        SpringApplication.run(FeignConsumerApplication.class, args);
    }
}
其中的@EnableFeignClients注解负责使@FeignClient注解生效,可以被扫描到。
package com.saint.feign.client;
import com.saint.feign.service.ServiceA;
import org.springframework.cloud.openfeign.FeignClient;

/**
 * @author Saint
 */
@FeignClient("SERVICE-A")
public interface ServiceAClient extends ServiceA {
}
FeignClient接口要实现feign-server-api中的ServiceA接口,以表明当前FeignClient针对的对象
package com.saint.feign.controller;

import com.saint.feign.model.User;
import com.saint.feign.client.ServiceAClient;
import org.springframework.beans.factory.annotation.Autowired;
import org.springframework.web.bind.annotation.PathVariable;
import org.springframework.web.bind.annotation.RequestBody;
import org.springframework.web.bind.annotation.RequestMapping;
import org.springframework.web.bind.annotation.RequestMethod;
import org.springframework.web.bind.annotation.RequestParam;
import org.springframework.web.bind.annotation.RestController;


@RestController
@RequestMapping("/ServiceB/user")
public class ServiceBController {

	@Autowired
	private ServiceAClient serviceA;

	@RequestMapping(value = "/sayHello/{id}", method = RequestMethod.GET)
	public String greeting(@PathVariable("id") Long id,
			@RequestParam("name") String name,
			@RequestParam("age") Integer age) {
		return serviceA.sayHello(id, name, age);
	}

	@RequestMapping(value = "/", method = RequestMethod.POST)
	public String createUser(@RequestBody User user) {
		return serviceA.createUser(user);
	}

	@RequestMapping(value = "/{id}", method = RequestMethod.PUT)
	public String updateUser(@PathVariable("id") Long id, @RequestBody User user) {
		return serviceA.updateUser(id, user);
	}

	@RequestMapping(value = "/{id}", method = RequestMethod.DELETE)
	public String deleteUser(@PathVariable("id") Long id) {
		return serviceA.deleteUser(id);
	}

	@RequestMapping(value = "/{id}", method = RequestMethod.GET)
	public User getById(@PathVariable("id") Long id) {
		return serviceA.getById(id);
	}

}
ServiceBController中通过FeignClient做负载均衡调用SERVICE-A服务中提供的接口。
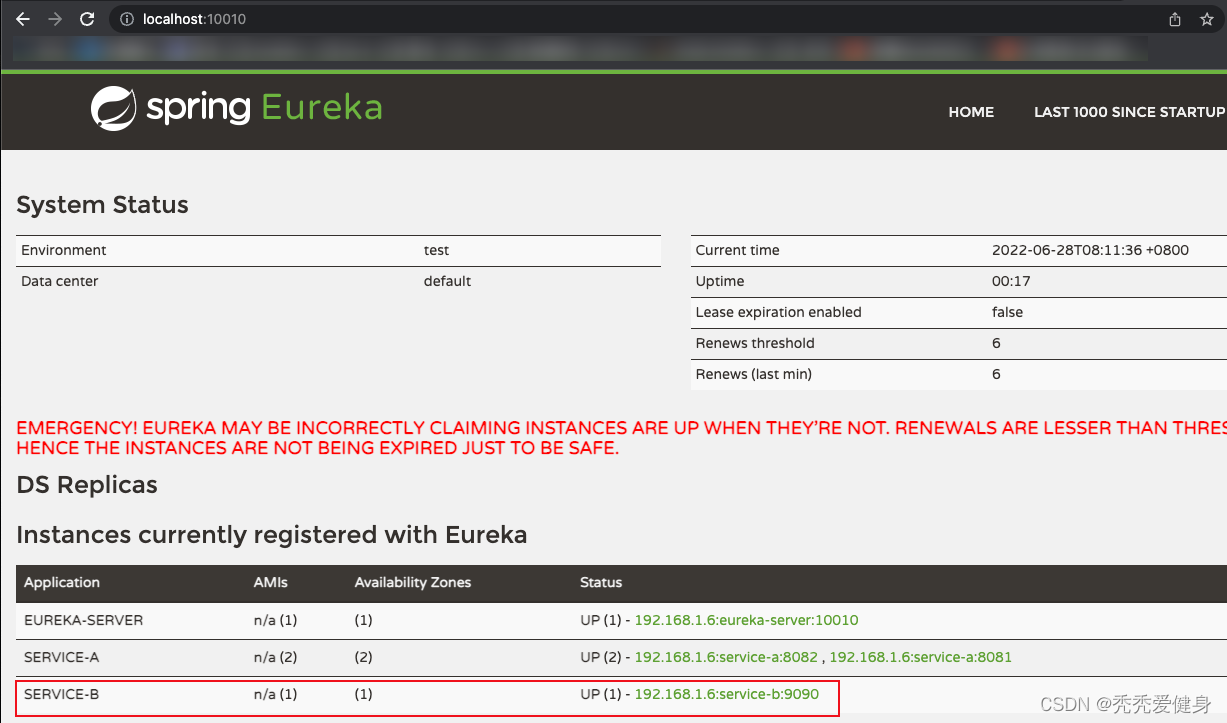
启动成功后,看eureka-server dashboard中多了一个 SERVICE-B 服务,并且其有一个实例 192.168.1.6:service-b:9090。
上述步骤中,我们已经依次启动了eureka-server、feign-server-8081、feign-server-8082、feign-consumer;三个服务、四个实例。
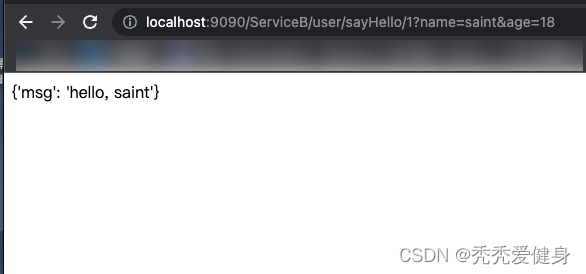
此处我们针对服务消费者ribbon-feign-sample-consumer做四次接口调用,均为:http://localhost:9090/ServiceB/user/sayHello/1?name=saint&age=18
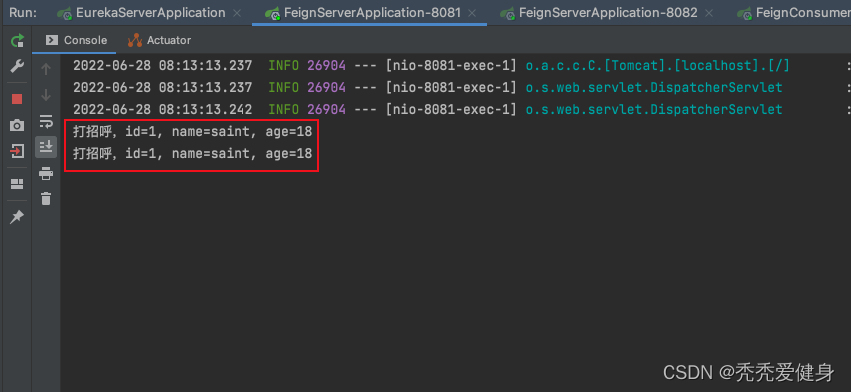
然后我们去看feign-server-8081、feign-server-8082的控制台输出:
1> feign-server-8081控制台输出:
2> feign-server-8082控制台输出:
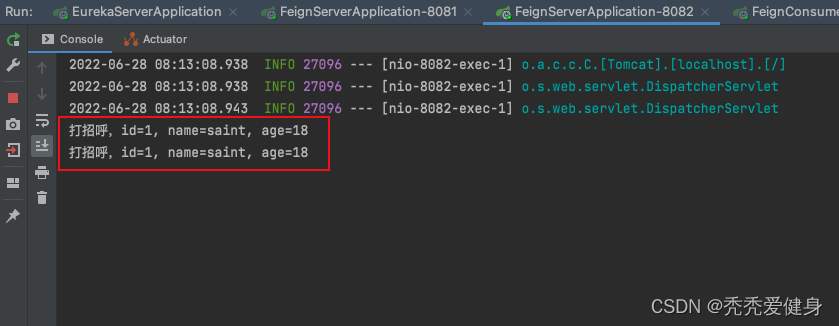
3> 结果说明:
我们可以发现,四个请求,ribbon-feign-sample-8081和ribbon-feign-sample-8082各分担了两个请求。
从现象上来看,已经Feign实现了负载均衡,并且默认是按照轮询的方式。
下文我们接着讨论 Feign是如何实现负载均衡(源码分析)?
我正在尝试测试是否存在表单。我是Rails新手。我的new.html.erb_spec.rb文件的内容是:require'spec_helper'describe"messages/new.html.erb"doit"shouldrendertheform"dorender'/messages/new.html.erb'reponse.shouldhave_form_putting_to(@message)with_submit_buttonendendView本身,new.html.erb,有代码:当我运行rspec时,它失败了:1)messages/new.html.erbshou
我在从html页面生成PDF时遇到问题。我正在使用PDFkit。在安装它的过程中,我注意到我需要wkhtmltopdf。所以我也安装了它。我做了PDFkit的文档所说的一切......现在我在尝试加载PDF时遇到了这个错误。这里是错误:commandfailed:"/usr/local/bin/wkhtmltopdf""--margin-right""0.75in""--page-size""Letter""--margin-top""0.75in""--margin-bottom""0.75in""--encoding""UTF-8""--margin-left""0.75in""-
我在我的项目目录中完成了compasscreate.和compassinitrails。几个问题:我已将我的.sass文件放在public/stylesheets中。这是放置它们的正确位置吗?当我运行compasswatch时,它不会自动编译这些.sass文件。我必须手动指定文件:compasswatchpublic/stylesheets/myfile.sass等。如何让它自动运行?文件ie.css、print.css和screen.css已放在stylesheets/compiled。如何在编译后不让它们重新出现的情况下删除它们?我自己编译的.sass文件编译成compiled/t
我有一个对象has_many应呈现为xml的子对象。这不是问题。我的问题是我创建了一个Hash包含此数据,就像解析器需要它一样。但是rails自动将整个文件包含在.........我需要摆脱type="array"和我该如何处理?我没有在文档中找到任何内容。 最佳答案 我遇到了同样的问题;这是我的XML:我在用这个:entries.to_xml将散列数据转换为XML,但这会将条目的数据包装到中所以我修改了:entries.to_xml(root:"Contacts")但这仍然将转换后的XML包装在“联系人”中,将我的XML代码修改为
为了将Cucumber用于命令行脚本,我按照提供的说明安装了arubagem。它在我的Gemfile中,我可以验证是否安装了正确的版本并且我已经包含了require'aruba/cucumber'在'features/env.rb'中为了确保它能正常工作,我写了以下场景:@announceScenario:Testingcucumber/arubaGivenablankslateThentheoutputfrom"ls-la"shouldcontain"drw"假设事情应该失败。它确实失败了,但失败的原因是错误的:@announceScenario:Testingcucumber/ar
我在我的项目中添加了一个系统来重置用户密码并通过电子邮件将密码发送给他,以防他忘记密码。昨天它运行良好(当我实现它时)。当我今天尝试启动服务器时,出现以下错误。=>BootingWEBrick=>Rails3.2.1applicationstartingindevelopmentonhttp://0.0.0.0:3000=>Callwith-dtodetach=>Ctrl-CtoshutdownserverExiting/Users/vinayshenoy/.rvm/gems/ruby-1.9.3-p0/gems/actionmailer-3.2.1/lib/action_mailer
我的瘦服务器配置了nginx,我的ROR应用程序正在它们上运行。在我发布代码更新时运行thinrestart会给我的应用程序带来一些停机时间。我试图弄清楚如何优雅地重启正在运行的Thin实例,但找不到好的解决方案。有没有人能做到这一点? 最佳答案 #Restartjustthethinserverdescribedbythatconfigsudothin-C/etc/thin/mysite.ymlrestartNginx将继续运行并代理请求。如果您将Nginx设置为使用多个上游服务器,例如server{listen80;server
在MRIRuby中我可以这样做:deftransferinternal_server=self.init_serverpid=forkdointernal_server.runend#Maketheserverprocessrunindependently.Process.detach(pid)internal_client=self.init_client#Dootherstuffwithconnectingtointernal_server...internal_client.post('somedata')ensure#KillserverProcess.kill('KILL',
我已经从我的命令行中获得了一切,所以我可以运行rubymyfile并且它可以正常工作。但是当我尝试从sublime中运行它时,我得到了undefinedmethod`require_relative'formain:Object有人知道我的sublime设置中缺少什么吗?我正在使用OSX并安装了rvm。 最佳答案 或者,您可以只使用“require”,它应该可以正常工作。我认为“require_relative”仅适用于ruby1.9+ 关于ruby-主要:Objectwhenrun
我花了三天的时间用头撞墙,试图弄清楚为什么简单的“rake”不能通过我的规范文件。如果您遇到这种情况:任何文件夹路径中都不要有空格!。严重地。事实上,从现在开始,您命名的任何内容都没有空格。这是我的控制台输出:(在/Users/*****/Desktop/LearningRuby/learn_ruby)$rake/Users/*******/Desktop/LearningRuby/learn_ruby/00_hello/hello_spec.rb:116:in`require':cannotloadsuchfile--hello(LoadError) 最佳