Verilator是一种开源的Verilog/SystemVerilog仿真器,可用于编译代码以及代码在线检查,Verilator能够读取Verilog或者SystemVerilog文件,并进行lint checks(基于lint工具的语法检测),并最终将其转换成C++的源文件.cpp和.h。
Verilator不直接将Verilog HDL转换为C++或者SystemC,反之Verilator将代码编译成更快的优化过的并且支持多线程的模型,该模型被依次包装在(wrapped)在C++/SystemC模型中。这样就生成一个编译的Verilog模型,其功能和Verilog是一致的,但效率由于基于C++即使是单线程模型也可以10倍快于SystemC,100倍快于基于解释Verilog的仿真器,并且通过多线程可以进一步加速。
Verilator的优点:将Verilog/SystemVerilog转换成C++/SystemC,仿真速度快很多,如果有这方面的需求,那Verilator是不错的选择。
本节将先介绍下Verilator的安装以及基本的使用方法,所有操作均在Ubuntu16系统上实现。
安装必要的软件包:
sudo apt-get install git perl python3 make autoconf g++ flex bison ccache
sudo apt-get install libgoogle-perftools-dev numactl perl-doc
sudo apt-get install libfl-dev
sudo apt-get install zlibc zlib1g zlib1g-dev
git上拷贝源代码:
git clone https://github.com/verilator/verilator编译前的准备工作:
unset VERILATOR_ROOT  # For bash
cd verilator
git pull         # Make sure git repository is up-to-date
git tag          # See what versions exist
这里选择编译版本v4.210(最新版本会报错)
git checkout v4.210 配置编译安装:
autoconf         # Create ./configure script
./configure      # Configure and create Makefile
make -j `nproc`  # Build Verilator itself (if error, try just 'make')
sudo make install
如果成功的话输入:
verilator --version可以看到verilator的版本信息:

下面我们看下官方示例,最简单的hello world代码,文件位置在verilator/examples/make_hello_c/下,主要两个文件:
top.v
// DESCRIPTION: Verilator: Verilog example module
//
// This file ONLY is placed under the Creative Commons Public Domain, for
// any use, without warranty, 2017 by Wilson Snyder.
// SPDX-License-Identifier: CC0-1.0

// See also the EXAMPLE section in the verilator manpage/document.
module top;
   initial begin
      $display("Hello World!");
      $finish;
   end
endmodule
sim_main.cpp
// DESCRIPTION: Verilator: Verilog example module
//
// This file ONLY is placed under the Creative Commons Public Domain, for
// any use, without warranty, 2017 by Wilson Snyder.
// SPDX-License-Identifier: CC0-1.0
//======================================================================

// Include common routines
#include <verilated.h>

// Include model header, generated from Verilating "top.v"
#include "Vtop.h"

int main(int argc, char** argv, char** env) {
    // See a similar example walkthrough in the verilator manpage.

    // This is intended to be a minimal example.  Before copying this to start a
    // real project, it is better to start with a more complete example,
    // e.g. examples/c_tracing.

    // Prevent unused variable warnings
    if (false && argc && argv && env) {}

    // Construct the Verilated model, from Vtop.h generated from Verilating "top.v"
    Vtop* top = new Vtop;

    // Simulate until $finish
    while (!Verilated::gotFinish()) {

        // Evaluate model
        top->eval();
    }

    // Final model cleanup
    top->final();

    // Destroy model
    delete top;

    // Return good completion status
    return 0;
}
MakeFile文件:
######################################################################
#
# DESCRIPTION: Verilator Example: Small Makefile
#
# This calls the object directory makefile.  That allows the objects to
# be placed in the "current directory" which simplifies the Makefile.
#
# This file ONLY is placed under the Creative Commons Public Domain, for
# any use, without warranty, 2020 by Wilson Snyder.
# SPDX-License-Identifier: CC0-1.0
#
######################################################################
# Check for sanity to avoid later confusion

ifneq ($(words $(CURDIR)),1)
 $(error Unsupported: GNU Make cannot build in directories containing spaces, build elsewhere: '$(CURDIR)')
endif

######################################################################

# This is intended to be a minimal example.  Before copying this to start a
# real project, it is better to start with a more complete example,
# e.g. examples/make_tracing_c.

# If $VERILATOR_ROOT isn't in the environment, we assume it is part of a
# package install, and verilator is in your path. Otherwise find the
# binary relative to $VERILATOR_ROOT (such as when inside the git sources).
ifeq ($(VERILATOR_ROOT),)
VERILATOR = verilator
else
export VERILATOR_ROOT
VERILATOR = $(VERILATOR_ROOT)/bin/verilator
endif

default:
	@echo "-- Verilator hello-world simple example"
	@echo "-- VERILATE & BUILD --------"
	$(VERILATOR) -cc --exe --build -j top.v sim_main.cpp
	@echo "-- RUN ---------------------"
	obj_dir/Vtop
	@echo "-- DONE --------------------"
	@echo "Note: Once this example is understood, see examples/make_tracing_c."
	@echo "Note: Also see the EXAMPLE section in the verilator manpage/document."

######################################################################

maintainer-copy::
clean mostlyclean distclean maintainer-clean::
	-rm -rf obj_dir *.log *.dmp *.vpd core
MakeFile中核心的编译语句其实就是执行:
verilator -Wall --cc --exe --build top.v sim_main.cpp直接执行编译:
make执行生成的C++可执行文件,结果如下:

可以看到C++实现了和verilog相同的功能。
gtkwave同样是开源的工具其git地址为:
https://github.com/gtkwave/gtkwave.git这里我们直接安装:
sudo apt-get install gtkwave以一个简单的逻辑组合为例:
top.v
module top(
  input a,
  input b,
  input c,
  input d,
  output f
);
  assign f = ~((a&b) | (~(c&d)));
endmodule
top_main.cpp
#include <stdio.h>
#include <stdlib.h>
#include <assert.h>

#include "Vtop.h"  // create `top.v`,so use `Vtop.h`
#include "verilated.h"

#include "verilated_vcd_c.h" //可选,如果要导出vcd则需要加上

int main(int argc, char** argv, char** env) {

  VerilatedContext* contextp = new VerilatedContext;
  contextp->commandArgs(argc, argv);
  Vtop* top = new Vtop{contextp};


  VerilatedVcdC* tfp = new VerilatedVcdC; //初始化VCD对象指针
  contextp->traceEverOn(true); //打开追踪功能
  top->trace(tfp, 0); //
  tfp->open("wave.vcd"); //设置输出的文件wave.vcd


  while (!contextp->gotFinish()) {
    int a = rand() & 1;
    int b = rand() & 1;
    int c = rand() & 1;
    int d = rand() & 1;
    top->a = a;
    top->b = b;
    top->c = c;
    top->d = d;
    top->eval();
    printf("a = %d, b = %d, c = %d, d = %d, f = %d\n", a, b, c, d, top->f);

    tfp->dump(contextp->time()); //dump wave
    contextp->timeInc(1); //推动仿真时间

    assert(top->f == ~((a&b) | (~(c&d))));
  }
  delete top;
  tfp->close();
  delete contextp;
  return 0;
}
执行编译:
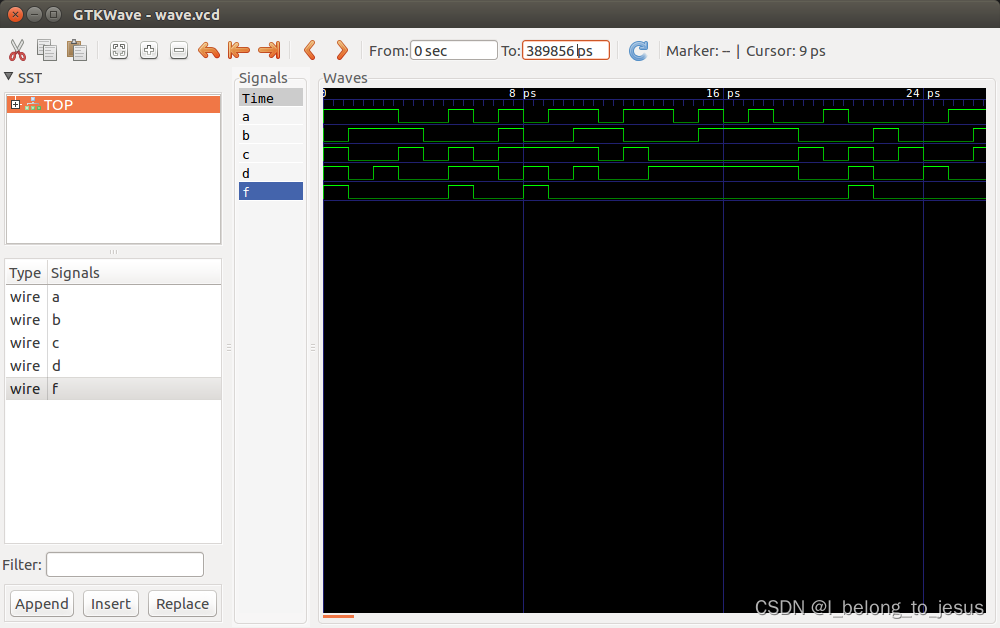
verilator -Wall top.v top_main.cpp --cc --trace --exe --build
#增加了--trace 是为了显示波形的
./obj_dir/Vtop   //必须执行这个,才会出现.vcd文件,需要强制退出
gtkwave wave.vcd //如果报错缺少canberra-gtk-module,apt安装即可
结果如下图:
这一节先说到这里。
很好奇,就使用rubyonrails自动化单元测试而言,你们正在做什么?您是否创建了一个脚本来在cron中运行rake作业并将结果邮寄给您?git中的预提交Hook?只是手动调用?我完全理解测试,但想知道在错误发生之前捕获错误的最佳实践是什么。让我们理所当然地认为测试本身是完美无缺的,并且可以正常工作。下一步是什么以确保他们在正确的时间将可能有害的结果传达给您? 最佳答案 不确定您到底想听什么,但是有几个级别的自动代码库控制:在处理某项功能时,您可以使用类似autotest的内容获得关于哪些有效,哪些无效的即时反馈。要确保您的提
我想为Heroku构建一个Rails3应用程序。他们使用Postgres作为他们的数据库,所以我通过MacPorts安装了postgres9.0。现在我需要一个postgresgem并且共识是出于性能原因你想要pggem。但是我对我得到的错误感到非常困惑当我尝试在rvm下通过geminstall安装pg时。我已经非常明确地指定了所有postgres目录的位置可以找到但仍然无法完成安装:$envARCHFLAGS='-archx86_64'geminstallpg--\--with-pg-config=/opt/local/var/db/postgresql90/defaultdb/po
我打算为ruby脚本创建一个安装程序,但我希望能够确保机器安装了RVM。有没有一种方法可以完全离线安装RVM并且不引人注目(通过不引人注目,就像创建一个可以做所有事情的脚本而不是要求用户向他们的bash_profile或bashrc添加一些东西)我不是要脚本本身,只是一个关于如何走这条路的快速指针(如果可能的话)。我们还研究了这个很有帮助的问题:RVM-isthereawayforsimpleofflineinstall?但有点误导,因为答案只向我们展示了如何离线在RVM中安装ruby。我们需要能够离线安装RVM本身,并查看脚本https://raw.github.com/wayn
我正在编写一个包含C扩展的gem。通常当我写一个gem时,我会遵循TDD的过程,我会写一个失败的规范,然后处理代码直到它通过,等等......在“ext/mygem/mygem.c”中我的C扩展和在gemspec的“扩展”中配置的有效extconf.rb,如何运行我的规范并仍然加载我的C扩展?当我更改C代码时,我需要采取哪些步骤来重新编译代码?这可能是个愚蠢的问题,但是从我的gem的开发源代码树中输入“bundleinstall”不会构建任何native扩展。当我手动运行rubyext/mygem/extconf.rb时,我确实得到了一个Makefile(在整个项目的根目录中),然后当
我有一个奇怪的问题:我在rvm上安装了rubyonrails。一切正常,我可以创建项目。但是在我输入“railsnew”时重新启动后,我有“程序'rails'当前未安装。”。SystemUbuntu12.04ruby-v"1.9.3p194"gemlistactionmailer(3.2.5)actionpack(3.2.5)activemodel(3.2.5)activerecord(3.2.5)activeresource(3.2.5)activesupport(3.2.5)arel(3.0.2)builder(3.0.0)bundler(1.1.4)coffee-rails(
我刚刚为fedora安装了emacs。我想用emacs编写ruby。为ruby提供代码提示、代码完成类型功能所需的工具、扩展是什么? 最佳答案 ruby-mode已经包含在Emacs23之后的版本中。不过,它也可以通过ELPA获得。您可能感兴趣的其他一些事情是集成RVM、feature-mode(Cucumber)、rspec-mode、ruby-electric、inf-ruby、rinari(用于Rails)等。这是我当前用于Ruby开发的Emacs配置:https://github.com/citizen428/emacs
我有一个围绕一些对象的包装类,我想将这些对象用作散列中的键。包装对象和解包装对象应映射到相同的键。一个简单的例子是这样的:classAattr_reader:xdefinitialize(inner)@inner=innerenddefx;@inner.x;enddef==(other)@inner.x==other.xendenda=A.new(o)#oisjustanyobjectthatallowso.xb=A.new(o)h={a=>5}ph[a]#5ph[b]#nil,shouldbe5ph[o]#nil,shouldbe5我试过==、===、eq?并散列所有无济于事。
我有一些Ruby代码,如下所示:Something.createdo|x|x.foo=barend我想编写一个测试,它使用double代替block参数x,这样我就可以调用:x_double.should_receive(:foo).with("whatever").这可能吗? 最佳答案 specify'something'dox=doublex.should_receive(:foo=).with("whatever")Something.should_receive(:create).and_yield(x)#callthere
我正在尝试在我的centos服务器上安装therubyracer,但遇到了麻烦。$geminstalltherubyracerBuildingnativeextensions.Thiscouldtakeawhile...ERROR:Errorinstallingtherubyracer:ERROR:Failedtobuildgemnativeextension./usr/local/rvm/rubies/ruby-1.9.3-p125/bin/rubyextconf.rbcheckingformain()in-lpthread...yescheckingforv8.h...no***e
我的最终目标是安装当前版本的RubyonRails。我在OSXMountainLion上运行。到目前为止,这是我的过程:已安装的RVM$\curl-Lhttps://get.rvm.io|bash-sstable检查已知(我假设已批准)安装$rvmlistknown我看到当前的稳定版本可用[ruby-]2.0.0[-p247]输入命令安装$rvminstall2.0.0-p247注意:我也试过这些安装命令$rvminstallruby-2.0.0-p247$rvminstallruby=2.0.0-p247我很快就无处可去了。结果:$rvminstall2.0.0-p247Search