
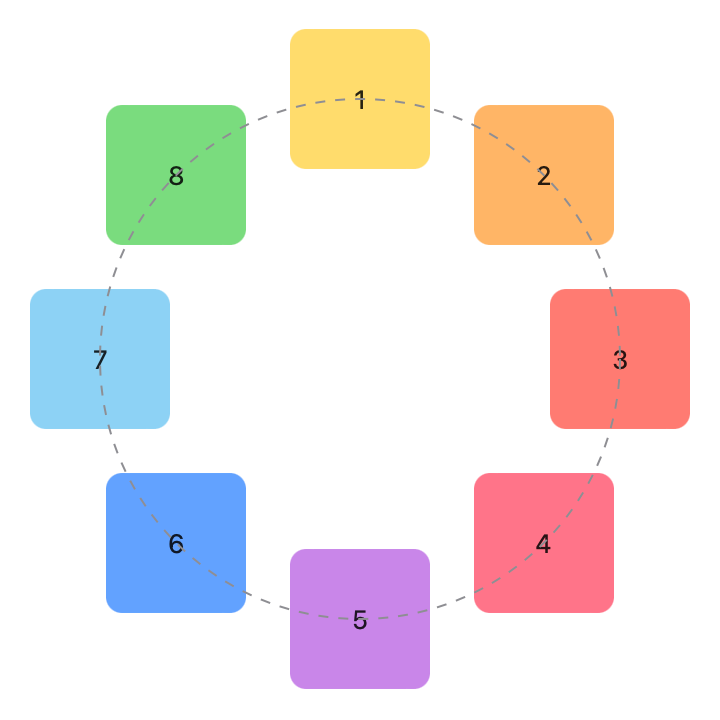
struct ContentView: View {
    let colors: [Color] = [.yellow, .orange, .red, .pink, .purple, .blue, .cyan, .green]

    var body: some View {
        WheelLayout(radius: 130.0, rotation: .zero) {
            ForEach(0..<8) { idx in
                RoundedRectangle(cornerRadius: 8)
                    .fill(colors[idx%colors.count].opacity(0.7))
                    .frame(width: 70, height: 70)
                    .overlay { Text("\(idx+1)") }
            }
        }
    }
}
struct WheelLayout: Layout {
    var radius: CGFloat
    var rotation: Angle
    func sizeThatFits(proposal: ProposedViewSize, subviews: Subviews, cache: inout ()) -> CGSize {
        let maxSize = subviews.map { $0.sizeThatFits(proposal) }.reduce(CGSize.zero) {
            return CGSize(width: max($0.width, $1.width), height: max($0.height, $1.height))
        }
        return CGSize(width: (maxSize.width / 2 + radius) * 2,
                      height: (maxSize.height / 2 + radius) * 2)
    }
    func placeSubviews(in bounds: CGRect, proposal: ProposedViewSize, subviews: Subviews, cache: inout ())
    {
        let angleStep = (Angle.degrees(360).radians / Double(subviews.count))
        for (index, subview) in subviews.enumerated() {
            let angle = angleStep * CGFloat(index) + rotation.radians
            // Find a vector with an appropriate size and rotation.
            var point = CGPoint(x: 0, y: -radius).applying(CGAffineTransform(rotationAngle: angle))
            // Shift the vector to the middle of the region.
            point.x += bounds.midX
            point.y += bounds.midY
            // Place the subview.
            subview.place(at: point, anchor: .center, proposal: .unspecified)
        }
    }
}
WheelLayout(radius: radius, rotation: angle) {
// ...
}
Button("Rotate") {
    withAnimation(.easeInOut(duration: 2.0)) {
        angle = (angle == .zero ? .degrees(90) : .zero)
    }
} 你有想过如果动画的角度是从0到360会发生什么吗?给你一分钟... 对!...什么都不会发生。开始的位置和结束的位置是一样的,因此就 SwiftUI 而言,没有动画。如果这就是你要找的东西,那就太好了,但由于我们将视图围绕一个圆圈放置,如果视图沿着那个假想的圆圈移动不是更有意义吗?好吧,事实证明,这样做非常容易!我们问题的答案是很幸运的,这个布局协议采用 Animatable 协议!如果你不知道或者忘记这是什么,我建议你查看 SwiftUI 布局协议 - Part 1 的 Animating Shape Paths 部分 。简单的说,通过添加 animatableData 属性到我们的布局,我们要求 SwiftUI 动画的每一帧重新计算布局。但是,在每个布局传递中,角度都会收到一个内插值。现在 SwiftUI 不会为我们插入位置。相反,它会插入角度值。我们的布局代码将会完成剩下的工作。
struct Wheel: Layout {
    // ...
    var animatableData: CGFloat {
        get { rotation.radians }
        set { rotation = .radians(newValue) }
    }
    // ...
}var animatableData: AnimatablePair<CGFloat, CGFloat> {
get { AnimatablePair(rotation.radians, radius) }
set {
rotation = Angle.radians(newValue.first)
radius = newValue.second
}
} 布局协议只能决定视图位置和它们的建议尺寸,但是不能应用样式、旋转或者其他的效果。如果我们想要这些效果,那么布局应该有一种传达回视图的方式。这时候布局值就变得重要起来,到目前为止,我们已经使用它们传递信息给布局,但只要加上一点创意,我们就可以反向使用它们。我之前提到过的 LayoutValues 并不局限于传递
 CGFloats ,你可以将它用于任何事情,包括Binding,在这个例子中,我们将使用 Binding<Angle>:struct Rotation: LayoutValueKey {
static let defaultValue: Binding<Angle>? = nil
}struct WheelLayout: Layout {
// ...
func placeSubviews(in bounds: CGRect, proposal: ProposedViewSize, subviews: Subviews, cache: inout ())
{
let angleStep = (Angle.degrees(360).radians / Double(subviews.count))
for (index, subview) in subviews.enumerated() {
let angle = angleStep * CGFloat(index) + rotation.radians
// ...
DispatchQueue.main.async {
    subview[Rotation.self]?.wrappedValue = .radians(angle)
}
}
}
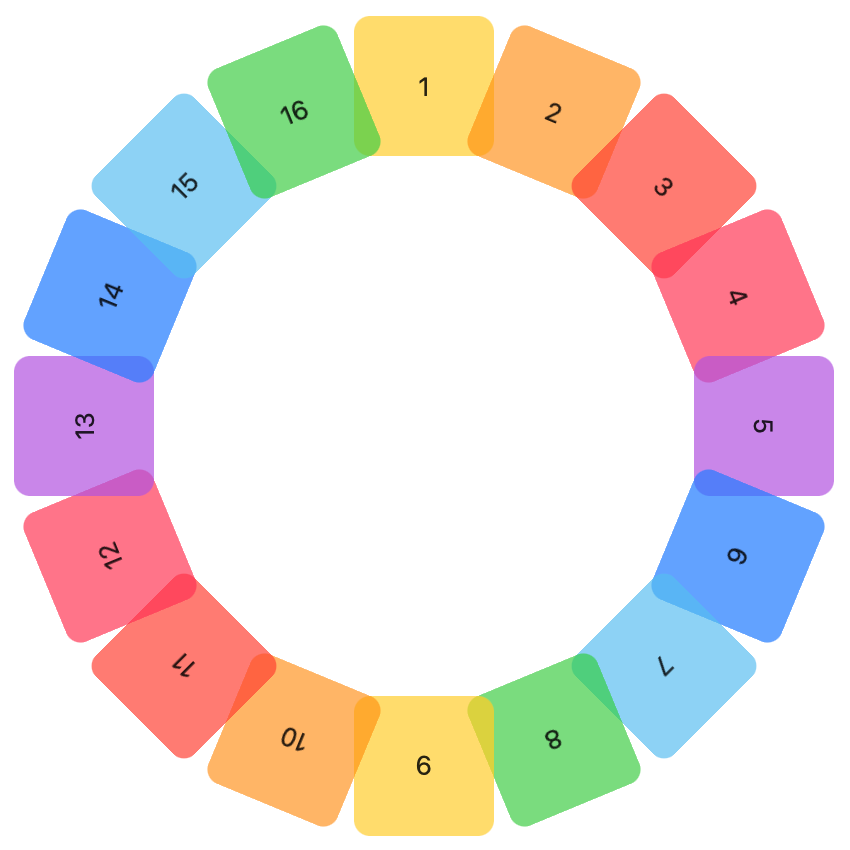
}struct ContentView: View {
// ...
@State var rotations: [Angle] = Array<Angle>(repeating: .zero, count: 16)
var body: some View {
WheelLayout(radius: radius, rotation: angle) {
ForEach(0..<16) { idx in
RoundedRectangle(cornerRadius: 8)
.fill(colors[idx%colors.count].opacity(0.7))
.frame(width: 70, height: 70)
.overlay { Text("\(idx+1)") }
.rotationEffect(rotations[idx])
.layoutValue(key: Rotation.self, value: $rotations[idx])
}
}
// ...
}struct WheelComponent<V: View>: View {
@ViewBuilder let content: () -> V
@State private var rotation: Angle = .zero
var body: some View {
content()
.rotationEffect(rotation)
.layoutValue(key: Rotation.self, value: $rotation)
}
}WheelLayout(radius: radius, rotation: angle) {
ForEach(0..<16) { idx in
WheelComponent {
RoundedRectangle(cornerRadius: 8)
.fill(colors[idx%colors.count].opacity(0.7))
.frame(width: 70, height: 70)
.overlay { Text("\(idx+1)") }
}
}
}DispatchQueue.main.async {
subview[Rotation.self]?.wrappedValue = .radians(angle)
}struct ContentView: View {
var body: some View {
CrashLayout {
Text("Hello, World!")
}
}
}
struct CrashLayout: Layout {
func sizeThatFits(proposal: ProposedViewSize, subviews: Subviews, cache: inout ()) -> CGSize {
if proposal.width == 0 {
return CGSize(width: CGFloat.infinity, height: CGFloat.infinity)
} else if proposal.width == .infinity {
return CGSize(width: 0, height: 0)
}
return CGSize(width: 0, height: 0)
}
func placeSubviews(in bounds: CGRect, proposal: ProposedViewSize, subviews: Subviews, cache: inout ())
{
}
}for (index, subview) in subviews[0..<12].enumerated() {
// ...
}placeSubviews(in: bounds,
proposal: proposal,
subviews: subviews[12..<subviews.count],
cache: &cache)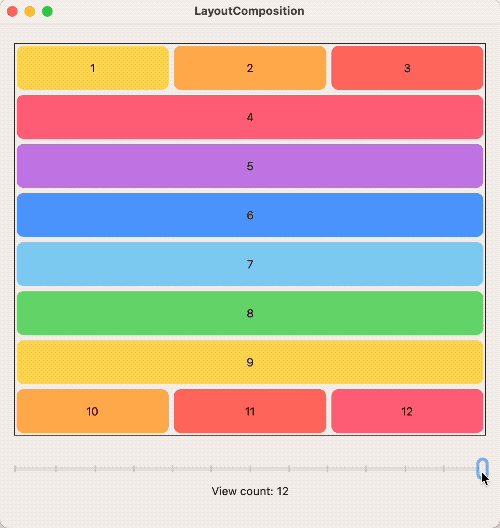 我们不需要编写垂直或者水平的间距逻辑代码,因为 SwiftUI 已经有这样的布局了:HStackLayout 和 VStackLayout。只是有点小问题,很轻易就可以修复。由于某些原因,系统布局私下实现了 sizeThatFits 和 placeSubviews 。这意味着我们无法调用它们。但是,类型消除布局确实暴露它的所有方法,所以不要这样做:
HStackLayout(spacing: 0).sizeThatFits(...) // not possibleAnyLayout(HStackLayout(spacing: 0)).sizeThatFits(...) // it is possible!struct ComposedLayout: Layout {
private let hStack = AnyLayout(HStackLayout(spacing: 0))
private let vStack = AnyLayout(VStackLayout(spacing: 0))
struct Caches {
var topCache: AnyLayout.Cache
var centerCache: AnyLayout.Cache
var bottomCache: AnyLayout.Cache
}
func makeCache(subviews: Subviews) -> Caches {
Caches(topCache: hStack.makeCache(subviews: topViews(subviews: subviews)),
centerCache: vStack.makeCache(subviews: centerViews(subviews: subviews)),
bottomCache: hStack.makeCache(subviews: bottomViews(subviews: subviews)))
}
// ...
}(wheelValue * pct) + (waveValue * (1-pct))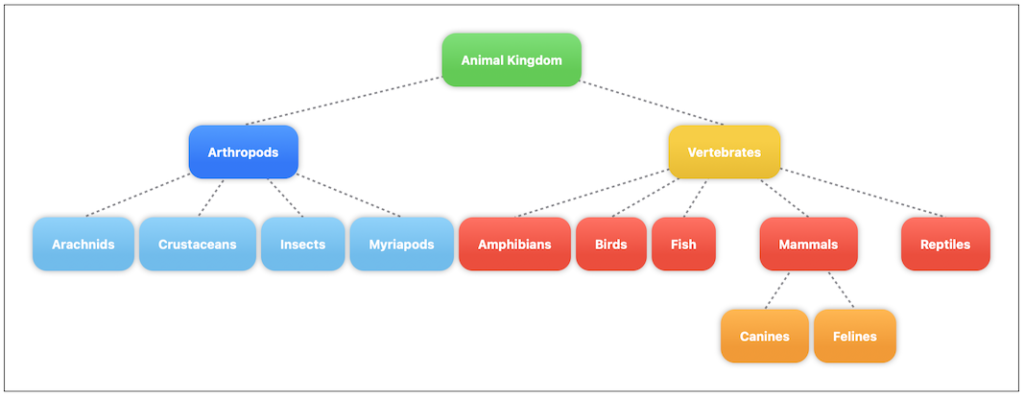 还有其它方法可以实现它,例如,使用 Canvas[2] ,但是我们这里都是关于布局协议的,让我们来看看可以如何解决连接线的问题。我们现在都知道,这根线不可能被布局绘制出来。那我们需要的是一种让布局告诉视图如何绘制线条的方法。初步想法可以(在这个问题上苹果的工程师是这么建议的[3]) 使用布局值。这正是我们在上一个例子中做的事情,双向自定义值。但是,仔细思考之后,还有一种更简单的方式。相比于使用布局值去分别通知树的每个节点的最终位置,使用布局代码创建整个路径来的更简单一点。然后,我们只需要将路径返回给负责展示的视图。通过添加绑定布局参数很容易完成。
struct TreeLayout {

    @Binding var linesPath: Path

    // ...
}let newPath = ...
if newPath.description != linesPath.description {
DispatchQueue.main.async {
linesPath = newPath
}
}struct ContentView: View {
@State var path: Path = Path()
var body: some View {
let dash = StrokeStyle(lineWidth: 2, dash: [3, 3], dashPhase: 0)
TreeLayout(linesPath: $path) {
ForEach(tree.flattenNodes) { node in
Text(node.name)
.padding(20)
.background {
RoundedRectangle(cornerRadius: 15)
.fill(node.color.gradient)
.shadow(radius: 3.0)
}
.node(node.id, parentId: node.parentId)
}
}
.background {
// Connecting lines
path.stroke(.gray, style: dash)
}
}
}
extension View {
func node(_ id: UUID, parentId: UUID?) -> some View {
self
.layoutValue(key: NodeId.self, value: id)
.layoutValue(key: ParentNodeId.self, value: parentId)
}
}func showSizes(_ proposals: [MeasureLayout.SizeRequest] = [.minimum, .ideal, .maximum]) -> some ViewMyView()
.showSizes()showSizes() // minimum, ideal and maximum
showSizes([.current, .ideal]) // the current size of the view and the ideal size
showSizes([.minimum, .maximum]) // the minimum and maximum
showSizes([.proposal(size: ProposedViewSize(width: 30, height: .infinity))]) // a specific proposal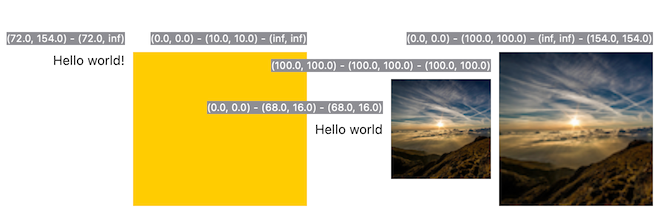
ScrollView {
    Text("Hello world!")
}
.showSizes([.current, .maximum])

Rectangle()
    .fill(.yellow)
    .showSizes()

Text("Hello world")
    .showSizes()
Image("clouds")
    .showSizes()

Image("clouds")
    .resizable()
    .aspectRatio(contentMode: .fit)
.showSizes([.minimum, .ideal, .maximum, .current])是否可以为特定(或所有)项目使用多个布局?例如,我有几个项目,我想对其应用两种不同的布局。一个是绿色的,一个是蓝色的(但是)。我想将它们编译到我的输出目录中的两个不同文件夹中(例如v1和v2)。我一直在玩弄规则和编译block,但我不知道这是怎么回事。因为,每个项目在编译过程中只编译一次,我不能告诉nanoc第一次用layout1编译,第二次用layout2编译。我试过这样的东西,但它导致输出文件损坏。compile'*'doifitem.binary?#don’tfilterbinaryitemselsefilter:erblayout'layout1'layout'layout2'
最近在学习CAN,记录一下,也供大家参考交流。推荐几个我觉得很好的CAN学习,本文也是在看了他们的好文之后做的笔记首先是瑞萨的CAN入门,真的通透;秀!靠这篇我竟然2天理解了CAN协议!实战STM32F4CAN!原文链接:https://blog.csdn.net/XiaoXiaoPengBo/article/details/116206252CAN详解(小白教程)原文链接:https://blog.csdn.net/xwwwj/article/details/105372234一篇易懂的CAN通讯协议指南1一篇易懂的CAN通讯协议指南1-知乎(zhihu.com)视频推荐CAN总线个人知识总
尝试通过SSL连接到ImgurAPI时出现错误。这是代码和错误:API_URI=URI.parse('https://api.imgur.com')API_PUBLIC_KEY='Client-ID--'ENDPOINTS={:image=>'/3/image',:gallery=>'/3/gallery'}#Public:Uploadanimage##args-Theimagepathfortheimagetoupload#defupload(image_path)http=Net::HTTP.new(API_URI.host)http.use_ssl=truehttp.verify
一、什么是MQTT协议MessageQueuingTelemetryTransport:消息队列遥测传输协议。是一种基于客户端-服务端的发布/订阅模式。与HTTP一样,基于TCP/IP协议之上的通讯协议,提供有序、无损、双向连接,由IBM(蓝色巨人)发布。原理:(1)MQTT协议身份和消息格式有三种身份:发布者(Publish)、代理(Broker)(服务器)、订阅者(Subscribe)。其中,消息的发布者和订阅者都是客户端,消息代理是服务器,消息发布者可以同时是订阅者。MQTT传输的消息分为:主题(Topic)和负载(payload)两部分Topic,可以理解为消息的类型,订阅者订阅(Su
一、RIPV2协议简介 RIP(RoutingInformationProtocol)路由协议是一种相对古老,在小型以及同介质网络中得到了广泛应用的一种路由协议。RIP采用距离向量算法,是一种距离向量协议。RIP-1是有类别路由协议(ClassfulRoutingProtocol),它只支持以广播方式发布协议报文。RIP-1的协议报文无法携带掩码信息,它只能识别A、B、C类这样的自然网段的路由,因此RIP-1不支持非连续子网(DiscontiguousSubnet)。RIP-2是一种无类别路由协议(ClasslessRoutingProtocol),支持路由标记,在路由策略中可根据路由标记对
我想为网站的管理和公共(public)部分设置一对样式指南。每个都需要自己的布局,其中包含静态html和调用erbpartials的混合(因此静态页面不会削减它)。我不需要Controller来为这些页面提供服务,而且我不希望有效的仅开发内容使其余代码困惑。这让我想知道是否有一种方法可以直接呈现布局。免责声明:我明白这不是我应该经常/永远做的事情,而且我知道有很多争论可以解释为什么这是一个坏主意。我对这是否可能感兴趣。有没有办法让我直接从routes.rb渲染布局而不通过Controller? 最佳答案 出于某种奇怪的原因,我想暂时
这个问题在这里已经有了答案:differentlayoutforsign_inactionindevise(8个答案)关闭7年前。如何更改设计Controller中的布局?
我有request.env['http_host']在本地主机上工作,但在heroku的布局页面中引用时会导致错误。此请求在View中工作并显示正确的基本url,但是当我将代码移动到布局时它会导致错误。注意-我正在使用它来为html电子邮件中的图像构建绝对url。收到错误:ActionView::Template::Error(undefinedmethod`env'fornil:NilClass): 最佳答案 如果你想要没有端口的主机,只需使用:request.host编辑:糟糕,我刚刚注意到您正在使用View中的代码。我不知道它
我对RubyGUI设计做了很多研究,这似乎是Ruby倾向于落后的领域。我探索了MonkeyBars、wxRuby、fxRuby、Shoes等选项,只是想从Ruby社区获得一些意见。虽然它们绝对可用,但每一个的开发似乎都在下降。我在任何(减去fxRuby书)上都找不到大量有用的文档或用户基础。我只是想制作一个简单的GUI,所以我真的不想花费数百小时来学习更复杂的工具的复杂性或尝试使用甚至不再开发的东西(鞋子是应用程序的类型我正在寻找,但它有很多问题并且没有得到积极开发。)在所有选项中,你们会推荐哪个选项是最快的,并且仍然具有某种开发基础?谢谢! 最佳答案
我正在覆盖设计注册Controller的创建操作。我有两种注册表格,个人或公司,公司有一个名为company_form的字段设置为true以区分这两种表格。在表单验证后,我希望呈现正确的表单(以前无论我使用什么表单,它都会返回默认表单)。我遇到了一个问题,即只渲染了部分(很明显,因为我只渲染了部分),但我还需要渲染布局/应用程序文件。classRegistrationsControllerifresource.company_formrenderpartial:'shared/company_signup_form'elserenderpartial:'/shared/individu