USB高速(USBHS)支持主机模式、设备模式和OTG模式,并且包含了一个内部的全速USB PHY。对于全速和低速操作,不需要外部的USB PHY。本文为学习记录,介绍了在主机模式下,利用内部PHY实现U盘的通信。
在主机或设备模式下,利用内部 PHY 的连接示意图如下所示。

上图信号线的作用如下表所示。
| I/O端口 | 类型 | 描述 |
| VBUS | 输入 | 总线电源端口 |
| DM | 输入/输出 | 差分信号线 - 端口 |
| DP | 输入/输出 | 差分信号线 + 端口 |
在主机模式下,由于USBHS并不检测VBUS引脚的电平状态, VBUS引脚可以忽略。我们只需要配置DP、DM两个信号引脚,查询《GD32F450xx_Datasheet》,两引脚的配置如下:
| 接口 | CPU引脚 | 复用 |
| DM | PB14 | USBHS_DM AF12 |
| DP | PB15 | USBHS_DP AF12 |
1、STM32官方程序:GD32F4xx_usb_library (用 USB host MSC模式)
2、文件系统:FatFs为官方R0.13C版。
GD32F4xx 系列 MCU 的 USBFS/USBHS 接口模块固件库架构如下图所示,固件库分为三层,顶层为用户可修改的应用接口层,中间层为USB_Hos,底层为USB_Drivers,中间层和底层统称为 USB 固件库驱动,该驱动层用户不可修改。
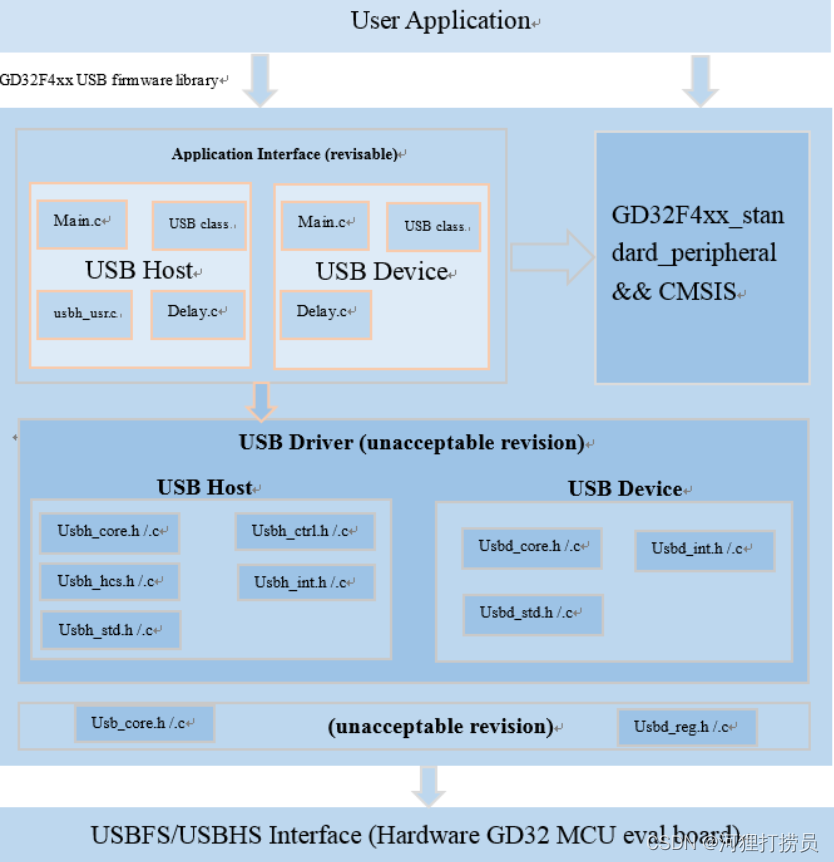
使用主机模式,所需要的文件及其说明如下表所示:
| 固件库 | 文件名称 | 说明 |
| 底层 | usb_core.h/.c | USB 内核驱动 |
| usb_reg.h | USB 寄存器操作 | |
| 中间层 | usbh_core.h/.c | USB 主机状态机处理函数 |
| usbh_ctrl.h/.c | USB 主机控制传输处理函数 | |
| usbh_hcs.h/.c | USB 主机通道处理函数 | |
| usbh_int.h/.c | USB 主机模式中断处理函数 | |
| usbh_std.h/.c | USB 主机枚举标准处理函数 | |
| 顶层 | main.c | 主应用程序接口 |
| usbh_usr.c | 用户应用程序接口 | |
| usb_delay.c | 延迟函数实现接口 | |
| application class | 设备类应用程序接口 |
FatFs 是面向小型嵌入式系统的一种通用的 FAT 文件系统。这里我们使用R0.13c版本,一般我们只用到f_mount()、 f_open()、 f_write()、 f_read()就可以实现文件的读写操作。
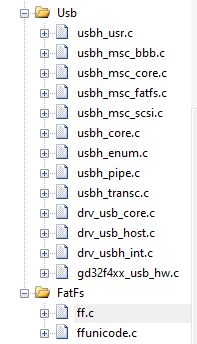
本文移植过程中,涉及的文件如下:
void Usb_PeriphInit(void)
{
	/*----------GPIO_config---------*/
	rcu_periph_clock_enable(RCU_SYSCFG);
	rcu_periph_clock_enable(RCU_GPIOB);
	gpio_af_set(GPIOB, GPIO_AF_12, GPIO_PIN_14 | GPIO_PIN_15);
	gpio_mode_set(GPIOB, GPIO_MODE_AF, GPIO_PUPD_NONE, GPIO_PIN_14 | GPIO_PIN_15);
    gpio_output_options_set(GPIOB, GPIO_OTYPE_PP, GPIO_OSPEED_50MHZ, GPIO_PIN_14 | GPIO_PIN_15);


	/*----------48M时钟设置---------*/
	rcu_pll48m_clock_config(RCU_PLL48MSRC_PLLQ);
	rcu_ck48m_clock_config(RCU_CK48MSRC_PLL48M);
	rcu_periph_clock_enable(RCU_USBHS);


	/*--------USB延迟函数设置--------*/
    nvic_vector_table_set(NVIC_VECTTAB_FLASH, 0x00U);
    nvic_priority_group_set(NVIC_PRIGROUP_PRE2_SUB2);
    nvic_irq_enable((uint8_t)TIMER2_IRQn, 1U, 0U);
    rcu_periph_clock_enable(RCU_TIMER2);


	usbh_class_register(&usb_host_msc, &usbh_msc);
	usbh_init(&usb_host_msc,&usbh_core, USB_CORE_ENUM_HS,&usr_cb);		//register device class


	/*-----------中断设置----------*/
	nvic_priority_group_set(NVIC_PRIGROUP_PRE2_SUB2);
	nvic_irq_enable((uint8_t)USBHS_IRQn, 2U, 0U);						//开启USBHS_IRQn
}开启TIMER2和USB_HS中断:
void TIMER2_IRQHandler(void)
{
    usb_timer_irq();
}


void USBHS_IRQHandler(void)
{
    usbh_isr(&usbh_core);
}
在usbh_usr.c编写我们需要执行的程序。这里我们参考GD32官方demo案例库,插入u盘后将会枚举信息,之后显示U盘根目录文件,最后向程序中写入测试文件。
#include <string.h>
#include "usbh_usr.h"
#include "drv_usb_hw.h"
#include "usbh_msc_core.h"
#include "usbh_msc_scsi.h"
#include "usbh_msc_bbb.h"
#include "ff.h"

extern usb_core_driver usbh_core;
extern usbh_host usb_host_msc;

FATFS fatfs;
FIL file;

uint8_t line_idx = 0;
uint8_t usbh_usr_application_state = USBH_USR_FS_INIT;

/*  points to the DEVICE_PROP structure of current device */
usbh_user_cb usr_cb =
{
    usbh_user_init,
    usbh_user_deinit,
    usbh_user_device_connected,
    usbh_user_device_reset,
    usbh_user_device_disconnected,
    usbh_user_over_current_detected,
    usbh_user_device_speed_detected,
    usbh_user_device_desc_available,
    usbh_user_device_address_assigned,
    usbh_user_configuration_descavailable,
    usbh_user_manufacturer_string,
    usbh_user_product_string,
    usbh_user_serialnum_string,
    usbh_user_enumeration_finish,
    usbh_user_userinput,
    usbh_usr_msc_application,
    usbh_user_device_not_supported,
    usbh_user_unrecovered_error
};

static uint8_t explore_disk     (char* path, uint8_t recu_level);
static void toggle_leds         (void);

/*!
    \brief      user operation for host-mode initialization
    \param[in]  none
    \param[out] none
    \retval     none
*/
void usbh_user_init(void)
{
    static uint8_t startup = 0U;

    if (0U == startup) {
        startup = 1U;
        printf("> USB host library started\n");
    }
}

/*!
    \brief      user operation for device attached
    \param[in]  none
    \param[out] none
    \retval     none
*/
void usbh_user_device_connected(void)
{
    printf("> Device Attached.\n");
}

/*!
    \brief      user operation when unrecoveredError happens
    \param[in]  none
    \param[out] none
    \retval     none
*/
void usbh_user_unrecovered_error (void)
{
    printf("> UNRECOVERED ERROR STATE.\n");
}

/*!
    \brief      user operation for device disconnect event
    \param[in]  none
    \param[out] none
    \retval     none
*/
void usbh_user_device_disconnected (void)
{
    printf("> Device Disconnected.\n");
}

/*!
    \brief      user operation for reset USB Device
    \param[in]  none
    \param[out] none
    \retval     none
*/
void usbh_user_device_reset(void)
{
    /* users can do their application actions here for the USB-Reset */
    printf("> Reset the USB device.\n");
}

/*!
    \brief      user operation for detectting device speed
    \param[in]  device_speed: device speed
    \param[out] none
    \retval     none
*/
void usbh_user_device_speed_detected(uint32_t device_speed)
{
    if (PORT_SPEED_HIGH == device_speed) {
        printf("> High speed device detected.\r\n");
    } else if(PORT_SPEED_FULL == device_speed) {
        printf("> Full speed device detected.\r\n");
    } else if(PORT_SPEED_LOW == device_speed) {
        printf("> Low speed device detected.\r\n");
    } else {
        printf("> Device Fault.\r\n");
    }
}

/*!
    \brief      user operation when device descriptor is available
    \param[in]  device_desc: device descriptor
    \param[out] none
    \retval     none
*/
void usbh_user_device_desc_available(void *device_desc)
{
    usb_desc_dev *pDevStr = device_desc;

    printf("\r\n > VID: %04Xh ",(uint32_t)pDevStr->idVendor);
    printf("\r\n > PID: %04Xh ",(uint32_t)pDevStr->idProduct);
}

/*!
    \brief      usb device is successfully assigned the Address
    \param[in]  none
    \param[out] none
    \retval     none
*/
void usbh_user_device_address_assigned(void)
{
}

/*!
    \brief      user operation when configuration descriptor is available
    \param[in]  cfg_desc: pointer to configuration descriptor
    \param[in]  itf_desc: pointer to interface descriptor
    \param[in]  ep_desc: pointer to endpoint descriptor
    \param[out] none
    \retval     none
*/
void usbh_user_configuration_descavailable(usb_desc_config *cfg_desc,
                                           usb_desc_itf *itf_desc,
                                           usb_desc_ep *ep_desc)
{
    usb_desc_itf *id = itf_desc;

    if (0x08U == (*id).bInterfaceClass) {
        printf("\r\n > Mass storage device connected.\n");
    } else if (0x03U == (*id).bInterfaceClass) {
        printf("\r\n > HID device connected.\n");
    } else {

    }
}

/*!
    \brief      user operation when manufacturer string exists
    \param[in]  manufacturer_string: manufacturer string of usb device
    \param[out] none
    \retval     none
*/
void usbh_user_manufacturer_string(void *manufacturer_string)
{
  printf("\r\n > manufacture string is : %s ",(uint8_t *)manufacturer_string);
}

/*!
    \brief      user operation when product string exists
    \param[in]  product_string: product string of usb device
    \param[out] none
    \retval     none
*/
void usbh_user_product_string(void *product_string)
{
    printf("\r\n > product string is : %s ",(uint8_t *)product_string);
}

/*!
    \brief      user operatin when serialNum string exists
    \param[in]  serial_num_string: serialNum string of usb device
    \param[out] none
    \retval     none
*/
void usbh_user_serialnum_string(void *serial_num_string)
{
    printf("\r\n > Serial Number string is : %s ",(uint8_t *)serial_num_string);

}

/*!
    \brief      user response request is displayed to ask for application jump to class
    \param[in]  none
    \param[out] none
    \retval     none
*/
void usbh_user_enumeration_finish(void)
{
    printf("\r\n > Enumeration completed.");
    printf("\r\n > ------------------------------------");
    printf("\r\n > To start the MSC class operations: ");
}

/*!
    \brief      user operation when device is not supported
    \param[in]  none
    \param[out] none
    \retval     none
*/
void usbh_user_device_not_supported(void)
{
    printf("\r\n > Device not supported.");
}

/*!
    \brief      user action for application state entry
    \param[in]  none
    \param[out] none
    \retval     user response for user key
*/
usbh_user_status usbh_user_userinput(void)
{
    usbh_user_status usbh_usr_status = USBH_USER_NO_RESP;

    /*Key USER is in polling mode to detect user action */
        usbh_usr_status = USBH_USER_RESP_OK;

    return usbh_usr_status;
}

/*!
    \brief      user operation for device overcurrent detection event
    \param[in]  none
    \param[out] none
    \retval     none
*/
void usbh_user_over_current_detected (void)
{
    printf("\r\n > Overcurrent detected.");
}

/*!
    \brief      demo application for mass storage
    \param[in]  pudev: pointer to device
    \param[in]  id: no use here
    \param[out] none
    \retval     status
*/
int usbh_usr_msc_application(void)
{
    FRESULT res;
    msc_lun info;
    uint8_t WriteTextBuff[] = "GD32 Connectivity line Host Demo application using FAT_FS   ";
    uint16_t bytesWritten, bytesToWrite;

    switch(usbh_usr_application_state)
    {
        case USBH_USR_FS_INIT:
            /* initializes the file system*/
            if (FR_OK != f_mount(&fatfs, "0:/", 0)) {
                   printf("\r\n > Cannot initialize File System.");

                return(-1);
            }

            printf("\r\n > File System initialized.");

            if (USBH_OK == usbh_msc_lun_info_get(&usb_host_msc, 0, &info)){
                    printf("\r\n > Disk capacity: %ud Bytes.", info.capacity.block_nbr * info.capacity.block_size);
            }

            usbh_usr_application_state = USBH_USR_FS_READLIST;
            break;

        case USBH_USR_FS_READLIST:
            printf("\r\n > Exploring disk flash ...");
            printf("\r\n > ------To see the root content of disk-----");

            /*Key TAMPER in polling*/
            while (usbh_core.host.connect_status == 0)  { }
            explore_disk("0:/", 1);
            line_idx = 0;
            usbh_usr_application_state = USBH_USR_FS_WRITEFILE;
            break;

        case USBH_USR_FS_WRITEFILE:
            usb_mdelay(100);

            printf("\r\n > ------------- write file test -----------");

            /*key WAKEUP in polling*/
            while (usbh_core.host.connect_status==0) { }

            printf("\r\n > Writing File to disk flash ...\r\n");

            /* register work area for logical drives */
            f_mount(&fatfs, "0:/", 1);

            if (FR_OK == f_open(&file, "0:GD32.TXT", FA_CREATE_ALWAYS | FA_WRITE)) {
                /* write buffer to file */
                bytesToWrite = sizeof(WriteTextBuff);
                res = f_write (&file, WriteTextBuff, bytesToWrite, (void *)&bytesWritten);
                /* EOF or error */
                if ((0U == bytesWritten) || (FR_OK != res)) {
                    printf("\r\n > GD32.TXT CANNOT be written.");
                } else {
                    printf("\r\n > GD32.TXT created in the disk.");
                }

                /* close file and file system */
                f_close(&file);
                f_mount(NULL, "0:/", 1);
            } else {
                printf("\r\n > GD32.TXT created in the disk.");
            }

            usbh_usr_application_state = USBH_USR_FS_DEMOEND;
            printf("\r\n > The MSC host demo is end.");
            break;

        case USBH_USR_FS_DEMOEND:
            break;

        default:
            break;
    }

    return(0);
}

/*!
    \brief      displays disk content
    \param[in]  path: pointer to root path
    \param[in]  recu_level: recursive level
    \param[out] none
    \retval     status
*/
static uint8_t explore_disk (char* path, uint8_t recu_level)
{
    FRESULT res;
    FILINFO fno;
    DIR dir;
    char *fn;

    res = f_opendir(&dir, path);

    if (res == FR_OK) {
        while ((usbh_core.host.connect_status)) {
            res = f_readdir(&dir, &fno);
            if (FR_OK != res || 0U == fno.fname[0]) {
                break;
            }

            if ('.' == fno.fname[0]) {
                continue;
            }

            fn = fno.fname;

            line_idx++;

            if (line_idx > 4) {
                line_idx = 0;

//                printf("\r\n > Press User Key to continue....");

                /*key USER in polling*/
//                while ((usbh_core.host.connect_status) && \
//                       (SET == gd_eval_key_state_get (KEY_USER))) {
//                    toggle_leds();
//                }
            }

            if(1U == recu_level){
                printf("\r\n   |__");
            }else if(2U == recu_level){
                printf("\r\n   |   |__");
            }

            if(AM_DIR == fno.fattrib){
                printf("\r\n %s", fno.fname);
            }else{
                printf("\r\n %s", fno.fname);
            }

            if((AM_DIR == fno.fattrib) && (1U == recu_level)){
                explore_disk(fn, 2);
            }
        }
    }

    return res;
}

/*!
    \brief      toggle leds to shows user input state
    \param[in]  none
    \param[out] none
    \retval     none
*/
static void toggle_leds(void)
{
    static uint32_t i;

    if (0x10000U == i++) {
//        gd_eval_led_toggle(LED2);
//        gd_eval_led_toggle(LED3);
        i = 0;
    }
}

/*!
    \brief      deinit user state and associated variables
    \param[in]  none
    \param[out] none
    \retval     none
*/
void usbh_user_deinit(void)
{
    usbh_usr_application_state = USBH_USR_FS_INIT;
}
我构建了两个需要相互通信和发送文件的Rails应用程序。例如,一个Rails应用程序会发送请求以查看其他应用程序数据库中的表。然后另一个应用程序将呈现该表的json并将其发回。我还希望一个应用程序将存储在其公共(public)目录中的文本文件发送到另一个应用程序的公共(public)目录。我从来没有做过这样的事情,所以我什至不知道从哪里开始。任何帮助,将不胜感激。谢谢! 最佳答案 无论Rails是什么,几乎所有Web应用程序都有您的要求,大多数现代Web应用程序都需要相互通信。但是有一个小小的理解需要你坚持下去,网站不应直接访问彼此
1.postman介绍Postman一款非常流行的API调试工具。其实,开发人员用的更多。因为测试人员做接口测试会有更多选择,例如Jmeter、soapUI等。不过,对于开发过程中去调试接口,Postman确实足够的简单方便,而且功能强大。2.下载安装官网地址:https://www.postman.com/下载完成后双击安装吧,安装过程极其简单,无需任何操作3.使用教程这里以百度为例,工具使用简单,填写URL地址即可发送请求,在下方查看响应结果和响应状态码常用方法都有支持请求方法:getpostputdeleteGet、Post、Put与Delete的作用get:请求方法一般是用于数据查询,
MIMO技术的优缺点优点通过下面三个增益来总体概括:阵列增益。阵列增益是指由于接收机通过对接收信号的相干合并而活得的平均SNR的提高。在发射机不知道信道信息的情况下,MIMO系统可以获得的阵列增益与接收天线数成正比复用增益。在采用空间复用方案的MIMO系统中,可以获得复用增益,即信道容量成倍增加。信道容量的增加与min(Nt,Nr)成正比分集增益。在采用空间分集方案的MIMO系统中,可以获得分集增益,即可靠性性能的改善。分集增益用独立衰落支路数来描述,即分集指数。在使用了空时编码的MIMO系统中,由于接收天线或发射天线之间的间距较远,可认为它们各自的大尺度衰落是相互独立的,因此分布式MIMO
在VMware16.2.4安装Ubuntu一、安装VMware1.打开VMwareWorkstationPro官网,点击即可进入。2.进入后向下滑动找到Workstation16ProforWindows,点击立即下载。3.下载完成,文件大小615MB,如下图:4.鼠标右击,以管理员身份运行。5.点击下一步6.勾选条款,点击下一步7.先勾选,再点击下一步8.去掉勾选,点击下一步9.点击下一步10.点击安装11.点击许可证12.在百度上搜索VM16许可证,复制填入,然后点击输入即可,亲测有效。13.点击完成14.重启系统,点击是15.双击VMwareWorkstationPro图标,进入虚拟机主
1.1.1 YARN的介绍 为克服Hadoop1.0中HDFS和MapReduce存在的各种问题⽽提出的,针对Hadoop1.0中的MapReduce在扩展性和多框架⽀持⽅⾯的不⾜,提出了全新的资源管理框架YARN. ApacheYARN(YetanotherResourceNegotiator的缩写)是Hadoop集群的资源管理系统,负责为计算程序提供服务器计算资源,相当于⼀个分布式的操作系统平台,⽽MapReduce等计算程序则相当于运⾏于操作系统之上的应⽤程序。 YARN被引⼊Hadoop2,最初是为了改善MapReduce的实现,但是因为具有⾜够的通⽤性,同样可以⽀持其他的分布式计算模
我是Ruby新手,并被要求在我们的新项目中使用它。我们还被要求使用Padrino(Sinatra)作为后端/框架。我们被要求使用Rspec进行测试。我一直在寻找可以指导在Padrino上使用RspecforRuby的教程。我得到的主要是引用RoR。但是,我需要RubyonPadrino。请在任何入门/指南/引用/讨论等方面指导我。如有不妥之处请指正。可能是我没有针对我的问题搜索正确的词/短语组合。我正在使用Ruby1.9.3和Padrinov.0.10.6。注意:我还提到了SOquestion,但它没有帮助。 最佳答案 我没用过Pa
文章目录1.任务背景2.任务目标3.相关知识点4.任务实操4.1安装配置JDK4.2启动FISCOBCOS4.3下载解压WeBASE-Front4.4拷贝sdk证书文件4.5启动节点4.6访问节点4.7检查运行状态5.任务总结1.任务背景FISCOBCOS其实是有控制台管理工具,用来对区块链系统进行各种管理操作。但是对于初学者来说,还是可视化界面更友好,本节就来介绍WeBASE管理平台,这是一款微众银行开源的自研区块链中间件平台,可以降低区块链使用的门槛,大幅提高区块链应用的开发效率。微众银行是腾讯牵头设立的民营银行,在国内民营银行里还是比较出名的。微众银行参与FISCOBCOS生态建设,一定
这个问题在这里已经有了答案:关闭10年前。PossibleDuplicate:FlashMessagesinPartials(Rails3)我正在做MichaelHartl的Railstutorial和listing7.26将flash消息添加到应用程序布局:...">...这很好用。但是,我试图通过在我的部分文件夹中创建一个_flash.html.erb来清理这段代码...">-->...并且比使用......在我的应用程序布局中,我的所有Rspec测试开始失败,每个测试都显示以下消息:Failure/Error:before{visitsignup_path}ActionView:
我正在使用SublimeText2,同时遵循MichaelHartl的RubyonRails教程。可以在http://ruby.railstutorial.org/book/ruby-on-rails-tutorial找到我所指的教程的具体部分。(ctrl+F“list5.26”)。我能够创建规范/支持文件。但是,在尝试创建spec/support/utilities.rb文件时,我收到消息“无法保存~/rails_projects/sample_app/spec/support/utilities.rb”。有人知道为什么会这样吗?SublimeText论坛上有人似乎遇到了完全相同的问
目录一、安装包链接二、安装详细步骤1.安装Wireshark和WinPcap2.安装OracleVMVirtualBox3.安装ensp三、安装后注册四、启动路由器出现40错误怎么解决一、安装包链接二、安装详细步骤链接:https://pan.baidu.com/s/1QbUUYMOMIV2oeIKHWP1SpA?pwd=xftx提取码:xftx1.安装Wireshark和WinPcap找到Wireshark安装包所在文件夹,双击它,按照以下步骤安装。2.安装OracleVMVirtualBox找到OracleVMVirtualBox安装包所在文件夹,双击它,按照以下步骤安装。注:可自定义安装