目录
🦐博客主页:大虾好吃吗的博客
🦐MySQL专栏:MySQL专栏地址
在实际项目中, Mycat 服务也需要考虑高可用性,如果 Mycat 所在服务器出现宕机,或 Mycat 服务故障,需要有备机提供服务,需要考虑 Mycat 集群。
我们可以使用 HAProxy + Keepalived 配合两台 Mycat 搭起 Mycat 集群,实现高可用性。 HAProxy实现了MyCat 多节点的集群高可用和负载均衡, 而 HAProxy 自身的高可用则可以通过 Keepalived 来实现。继续上一章的部署,添加一台mycat做轮询,mycat2部署和mycat1一样,需要提前配置,添加两台haproxy加keepalived。
拓扑图如下:
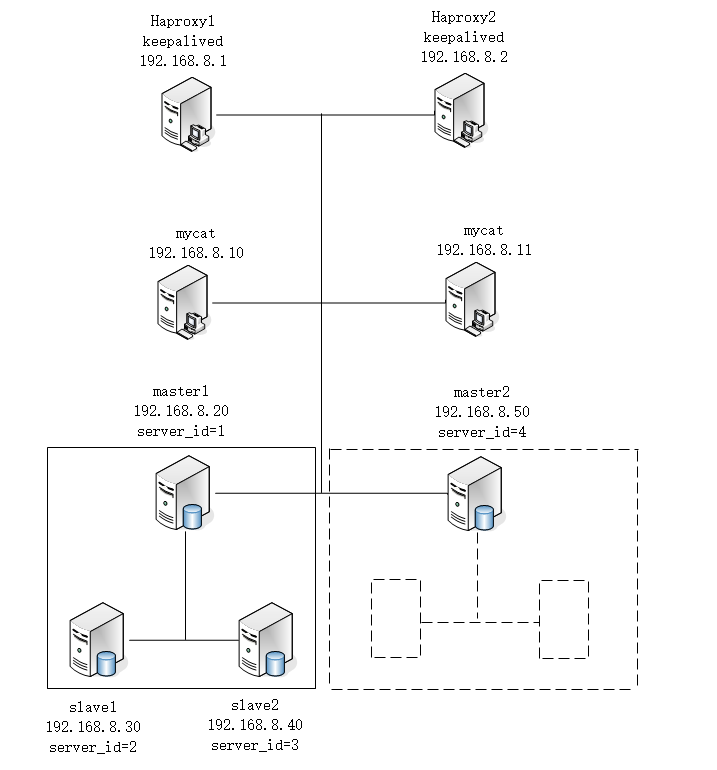
注意:两台haproxy服务器都需要安装。
1. 准备好HAProxy安装包,传到/opt目录下 解压到/usr/local/src
[root@haproxy1 ~]# tar zxf haproxy-2.1.2.tar.gz -C /usr/local/src2. 进入解压后的目录,查看内核版本, 进行编译
[root@haproxy1 ~]# cd /usr/local/src/haproxy-2.1.2
[root@haproxy1 haproxy-2.1.2]# uname -r
3.10.0-1160.el7.x86_64
[root@haproxy1 haproxy-2.1.2]# make TARGET=linux310 PREFIX=/usr/local/haproxy ARCH=x86_64
ARGET=linux310,内核版本,使用uname -r查看内核,如: 3.10.0-514.el7,此时该参数就为linux310;
ARCH=x86_64,系统位数;
PREFIX=/usr/local/haprpxy #/usr/local/haprpxy,为haprpxy安装路径。
3. 编译完成后,进行安装,向配置文件中插入以下配置信息,并保存
[root@haproxy1 haproxy-2.1.2]# make install PREFIX=/usr/local/haproxy
[root@haproxy1 haproxy-2.1.2]# vim /usr/local/haproxy/haproxy.conf
global
log 127.0.0.1 local0
#log 127.0.0.1 local1 notice
#log loghost local0 info
maxconn 4096
chroot /usr/local/haproxy
pidfile /usr/local/haproxy/haproxy.pid
uid 99
gid 99
daemon
#debug
#quiet
defaults
log global
mode tcp
option abortonclose
option redispatch
retries 3
maxconn 2000
timeout connect 5000
timeout client 50000
timeout server 50000
listen proxy_status
bind :48066
mode tcp
balance roundrobin
server mycat_1 192.168.8.10:8066 check inter 10s            #mycat1主机
server mycat_2 192.168.8.11:8066 check inter 10s            #mycat2主机
frontend admin_stats
bind :7777
mode http
stats enable
option httplog
maxconn 10
stats refresh 30s
stats uri /admin
stats auth admin:123123
stats hide-version
stats admin if TRUE注意:haproxy2配置和haproxy1相同,这里不在重复。
1. 启动HAProxy
[root@haproxy1 haproxy-2.1.2]# /usr/local/haproxy/sbin/haproxy -f /usr/local/haproxy/haproxy.conf2. 查看HAProxy进程
[root@haproxy1 haproxy-2.1.2]# ps -ef | grep haproxy
nobody   101066      1  0 17:14 ?        00:00:00 /usr/local/haproxy/sbin/haproxy -f /usr/local/haproxy/haproxy.conf
root     101086   5343  0 17:15 pts/2    00:00:00 grep --color=auto haproxy
3. 打开浏览器访问 http://192.168.8.1:7777/admin 或者8.2主机,在弹出登录框后输入用户名: admin密码: 123123,注意开启mycat。

4. 验证负载均衡,通过haproxy1和haproxy2访问mycat登录mysql,端口号为48066
[root@master1 ~]# mysql -umycat -p123456 -h192.168.8.1 -P 48066注意:两台haproxy主机都需要安装keepalived,这里以haproxy1主机为例。
1. 准备好Keepalived安装包,传到/opt目录下 解压到/usr/local/src
[root@haproxy1 ~]# tar zxf keepalived-2.2.7.tar.gz -C /usr/local/src2. 安装依赖插件
[root@haproxy1 ~]# yum install -y gcc openssl-devel popt-devel3. 进入解压后的目录, 进行配置, 进行编译
[root@haproxy1 ~]# cd /usr/local/src/keepalived-2.2.7/
[root@haproxy1 keepalived-2.2.7]# ./configure --prefix=/usr/local/keepalived
4. 进行编译, 完成后进行安装
[root@haproxy1 keepalived-2.2.7]# make && make install5. 运行前配置
[root@haproxy1 keepalived-2.2.7]# cp /usr/local/src/keepalived-2.2.7/keepalived/etc/init.d/keepalived /etc/init.d/
[root@haproxy1 keepalived-2.2.7]# mkdir /etc/keepalived
[root@haproxy1 keepalived-2.2.7]# cp /usr/local/keepalived/etc/keepalived/keepalived.conf.sample /etc/keepalived/
[root@haproxy1 keepalived-2.2.7]# mv /etc/keepalived/keepalived.conf.sample /etc/keepalived/keepalived.conf
[root@haproxy1 keepalived-2.2.7]# cp /usr/local/src/keepalived-2.2.7/keepalived/etc/sysconfig/keepalived /etc/sysconfig/
[root@haproxy1 keepalived-2.2.7]# cp /usr/local/keepalived/sbin/keepalived /usr/sbin/haproxy1配置文件
[root@haproxy1 ~]# vim /etc/keepalived/keepalived.conf
! Configuration File for keepalived

global_defs {
   router_id ha1
}

vrrp_instance VI_1 {
    state MASTER
    interface ens33
    virtual_router_id 51
    priority 100
    advert_int 1
    authentication {
        auth_type PASS
        auth_pass 1111
    }
    virtual_ipaddress {
        192.168.8.100
    }
}

virtual_server 192.168.8.100 48066 {
    delay_loop 6
    lb_algo rr
    lb_kind NAT
    persistence_timeout 50
    protocol TCP

    real_server 192.168.8.1 48066 {
        weight 1
        TCP_CHECK {
            connect_timeout 3
            retry 3
            delay_before_retry 3
        }
    }
    real_server 192.168.8.2 48066 {
        weight 1
        TCP_CHECK {
            connect_timeout 3
            retry 3
            delay_before_retry 3
        }
    }
}
haproxy2配置文件
[root@haproxy2 ~]# cat /etc/keepalived/keepalived.conf
! Configuration File for keepalived

global_defs {
   router_id ha2
}

vrrp_instance VI_1 {
    state BACKUP
    interface ens33
    virtual_router_id 51
    priority 50
    advert_int 1
    authentication {
        auth_type PASS
        auth_pass 1111
    }
    virtual_ipaddress {
        192.168.8.100
    }
}

virtual_server 192.168.8.100 48066 {
    delay_loop 6
    lb_algo rr
    lb_kind NAT
    persistence_timeout 50
    protocol TCP

    real_server 192.168.8.1 48066 {
        weight 1
        TCP_CHECK {
            connect_timeout 3
            retry 3
            delay_before_retry 3
        }
    }
    real_server 192.168.8.2 48066 {
        weight 1
        TCP_CHECK {
            connect_timeout 3
            retry 3
            delay_before_retry 3
        }
    }
}两台主机都启动Keepalived
[root@haproxy1 ~]# systemctl start keepalived
[root@haproxy1 ~]# ps -ef | grep keep
root       2864   2487  0 16:21 ?        00:00:00 /usr/libexec/gsd-housekeeping
root     108226      1  0 17:43 ?        00:00:00 /usr/local/keepalived/sbin/keepalived --dont-fork -D
root     108227 108226  0 17:43 ?        00:00:00 /usr/local/keepalived/sbin/keepalived --dont-fork -D
root     108228 108226  0 17:43 ?        00:00:00 /usr/local/keepalived/sbin/keepalived --dont-fork -D
root     108244   5343  0 17:43 pts/2    00:00:00 grep --color=auto keep
[root@haproxy1 ~]# ip a show dev ens33
2: ens33: <BROADCAST,MULTICAST,UP,LOWER_UP> mtu 1500 qdisc pfifo_fast state UP group default qlen 1000
    link/ether 00:0c:29:e6:ef:60 brd ff:ff:ff:ff:ff:ff
    inet 192.168.8.1/24 brd 192.168.8.255 scope global noprefixroute ens33
       valid_lft forever preferred_lft forever
    inet 192.168.8.100/32 scope global ens33
       valid_lft forever preferred_lft forever
使用一台mysql服务器远程登录验证
[root@slave1 ~]# mysql -umycat -p123456 -P48066 -h192.168.8.100
mysql: [Warning] Using a password on the command line interface can be insecure.
Welcome to the MySQL monitor.  Commands end with ; or \g.
Your MySQL connection id is 16
Server version: 5.6.29-mycat-1.6.7.6-release-20220524173810 MyCat Server (OpenCloudDB)

Copyright (c) 2000, 2022, Oracle and/or its affiliates.

Oracle is a registered trademark of Oracle Corporation and/or its
affiliates. Other names may be trademarks of their respective
owners.

Type 'help;' or '\h' for help. Type '\c' to clear the current input statement.关闭一台mycat通过虚拟ip查询数据,通过mysql访问登录mysql
[root@mycat1 ~]# mycat stop
Stopping Mycat-server...
Stopped Mycat-server.[root@mycat1 ~]# mycat stop
Stopping Mycat-server...
Stopped Mycat-server.
登录mycat
[root@slave1 ~]# mysql -umycat -p123456 -P48066 -h192.168.8.100user 标签权限控制 目前 Mycat 对于中间件的连接控制并没有做太复杂的控制,目前只做了中间件逻辑库级别的读写权限控制。是通过 server.xml 的 user 标签进行配置。
修改server.xml配置文件user部分,通过下面配置文件看到,有mycat用户(这里就不多讲了)和user用户,可以看到user用户密码,逻辑库等信息。
[root@mycat1 ~]# cd /usr/local/mycat/conf
[root@mycat1 conf]# vim server.xml
#省略部分内容
        <user name="mycat" defaultAccount="true">
                <property name="password">123456</property>
                <property name="schemas">TESTDB</property>
                <property name="defaultSchema">TESTDB</property>
        </user>

        <user name="user">
                <property name="password">user</property>
                <property name="schemas">TESTDB</property>
                <property name="readOnly">true</property>
                <property name="defaultSchema">TESTDB</property>
        </user>
privileges 标签权限控制 在 user 标签下的 privileges 标签可以对逻辑库(schema)、表(table)进行精细化的 DML 权限控制。 privileges 标签下的 check 属性,如为 true 开启权限检查,为 false 不开启,默认为 false。 由于 Mycat 一个用户的 schemas 属性可配置多个逻辑库(schema) ,所以 privileges 的下级节点 schema 节点同样可配置多个,对多库多表进行细粒度的 DML 权限控制。
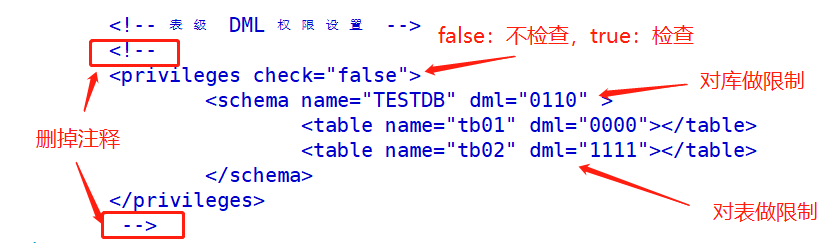
修改server.xml配置文件privileges部分,orders表没有删除权限,配置tb1表没有增删改查权限。
[root@mycat1 ~]# cd /usr/local/mycat/conf
[root@mycat1 conf]# vim server.xml
#省略部分内容
                <!-- 表级 DML 权限设置 -->
                <privileges check="true">
                        <schema name="TESTDB" dml="1111" >
                                <table name="orders" dml="1110"></table>
                                <table name="tb1" dml="0000"></table>
                        </schema>
                </privileges>
[root@mycat1 conf]# mycat restart
Stopping Mycat-server...
Stopped Mycat-server.
Starting Mycat-server...
配置说明
| DML 权限 | 增加(insert) | 更新(update) | 查询(select) | 删除(delete) |
|---|---|---|---|---|
| 0000 | 禁止 | 禁止 | 禁止 | 禁止 |
| 0001 | 禁止 | 禁止 | 禁止 | 允许 |
| 0010 | 禁止 | 禁止 | 允许 | 禁止 |
| 1111 | 允许 | 允许 | 允许 | 允许 |
测试查看两个表是否按照要求修改成功,我这里只修改了mycat1主机,就直接登录mycat1测试了。
[root@master2 ~]# mysql -umycat -p123456 -h192.168.8.10 -P8066
#省略部分内容
mysql> use TESTDB
mysql> select * from orders;
+------+------------+-------------+-----------+
| id   | order_type | customer_id | amount    |
+------+------------+-------------+-----------+
|    2 |        101 |         100 | 100300.00 |
|    4 |        101 |         101 | 103000.00 |
|    6 |        102 |         100 | 100020.00 |
|    1 |        101 |         100 | 100100.00 |
|    3 |        101 |         101 | 120000.00 |
|    5 |        102 |         101 | 100400.00 |
+------+------------+-------------+-----------+
6 rows in set (0.34 sec)

mysql> delete from orders where id=1;
ERROR 3012 (HY000): The statement DML privilege check is not passed, reject for user 'mycat'

mysql> show tables;
+------------------+
| Tables_in_mytest |
+------------------+
| customer         |
| dict_order_type  |
| orders           |
| orders_detail    |
| tb1              |
+------------------+
5 rows in set (0.01 sec)

mysql> select * from tb1;
ERROR 3012 (HY000): The statement DML privilege check is not passed, reject for user 'mycat'
通过上面命令行显示,删除orders以及查看tb1无法成功执行,返回结果为DML权限检查未通过而拒绝。
firewall 标签用来定义防火墙; firewall 下 whitehost 标签用来定义 IP 白名单 , blacklist 用来定义SQL 黑名单。
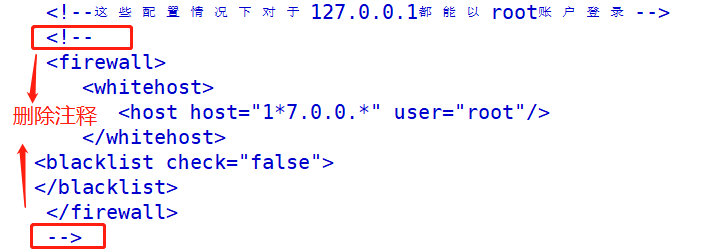
1. 白名单 可以通过设置白名单, 实现某主机某用户可以访问 Mycat,而其他主机用户禁止访问。
修改server.xml配置文件firewall标签,配置只有192.168.8.50主机可以通过mycat用户访问,其他主机拒绝访问。
[root@mycat1 conf]# vim server.xml
		<firewall>
           <whitehost>
              <host host="192.168.8.50" user="mycat"/>
           </whitehost>
        </firewall>
[root@mycat1 conf]# mycat restart
Stopping Mycat-server...
Stopped Mycat-server.
Starting Mycat-server...
测试用mysql服务器通过192.168.8.10登录mysql,最终结果为只有192.168.8.50主机成功登录,至此白名单完成。
[root@master2 ~]# mysql -umycat -p123456 -h192.168.8.10 -P8066
mysql: [Warning] Using a password on the command line interface can be insecure.
Welcome to the MySQL monitor.  Commands end with ; or \g.
Your MySQL connection id is 1
Server version: 5.6.29-mycat-1.6.7.6-release-20220524173810 MyCat Server (OpenCloudDB)

Copyright (c) 2000, 2022, Oracle and/or its affiliates.

Oracle is a registered trademark of Oracle Corporation and/or its
affiliates. Other names may be trademarks of their respective
owners.

Type 'help;' or '\h' for help. Type '\c' to clear the current input statement.

mysql>
2. 黑名单 可以通过设置黑名单, 实现 Mycat 对具体 SQL 操作的拦截, 如增删改查等操作的拦截。
修改server.xml配置文件firewall标签,配置禁止mycat用户进行插入操作
[root@mycat1 conf]# vim server.xml
        <firewall>
           <whitehost>
              <host host="192.168.8.50" user="mycat"/>
           </whitehost>
        <blacklist check="true">
        <property name="insertAllow"> false</property>
        </blacklist>
        </firewall>
[root@mycat1 conf]# mycat restart
Stopping Mycat-server...
Stopped Mycat-server.
Starting Mycat-server...
测试使用8.50主机登录,并且对orders表插入数据,最终结果发现无法插入,黑名单成功。
mysql> use TESTDB
Reading table information for completion of table and column names
You can turn off this feature to get a quicker startup with -A

Database changed
mysql> show tables;
+------------------+
| Tables_in_mytest |
+------------------+
| customer         |
| dict_order_type  |
| orders           |
| orders_detail    |
+------------------+
4 rows in set (0.02 sec)

mysql> select * from orders;
+------+------------+-------------+-----------+
| id   | order_type | customer_id | amount    |
+------+------------+-------------+-----------+
|    2 |        101 |         100 | 100300.00 |
|    4 |        101 |         101 | 103000.00 |
|    6 |        102 |         100 | 100020.00 |
|    1 |        101 |         100 | 100100.00 |
|    3 |        101 |         101 | 120000.00 |
|    5 |        102 |         101 | 100400.00 |
+------+------------+-------------+-----------+
6 rows in set (0.04 sec)

mysql> insert into orders values(^C
mysql> INSERT INTO orders(id,order_type,customer_id,amount) VALUES(7,102,101,111400);
ERROR 3012 (HY000): The statement is unsafe SQL, reject for user 'mycat'
在修改一次,使其可以插入数据,通过下面语法很好理解,false为拒绝,true为允许。
[root@mycat1 conf]# vim server.xml
              <host host="192.168.8.50" user="mycat"/>
           </whitehost>
        <blacklist check="true">
        <property name="insertAllow"> true</property>
        </blacklist>
        </firewall>
[root@mycat1 conf]# mycat restart
Stopping Mycat-server...
Stopped Mycat-server.
Starting Mycat-server...
插入数据成功。
[root@master2 ~]# mysql -umycat -p123456 -P48066 -h192.168.8.100

mysql> INSERT INTO orders(id,order_type,customer_id,amount) VALUES(7,102,101,111400);
Query OK, 1 row affected (0.21 sec)
 OK!

mysql> select * from orders;
+------+------------+-------------+-----------+
| id   | order_type | customer_id | amount    |
+------+------------+-------------+-----------+
|    2 |        101 |         100 | 100300.00 |
|    4 |        101 |         101 | 103000.00 |
|    6 |        102 |         100 | 100020.00 |
|    1 |        101 |         100 | 100100.00 |
|    3 |        101 |         101 | 120000.00 |
|    5 |        102 |         101 | 100400.00 |
|    7 |        102 |         101 | 111400.00 |
+------+------------+-------------+-----------+
7 rows in set (0.06 sec)
可以设置的黑名单 SQL 拦截功能列表
| 配置项 | 缺省值 | 描述 |
|---|---|---|
| selectAllow | true | 是否允许执行 SELECT 语句 |
| deleteAllow | true | 是否允许执行 DELETE 语句 |
| updateAllow | true | 是否允许执行 UPDATE 语句 |
| insertAllow | true | 是否允许执行 INSERT 语句 |
| creaetTableAllow | true | 是否允许创建表 |
| setAllow | true | 是否允许使用SET语法 |
| alterTableAllow | true | 是否允许执行 Alter Table 语句 |
| dropTableAllow | true | 是否允许修改表 |
| commitAllow | true | 是否允许执行 commit 操作 |
| rollbackAllow | true | 是否允许执行 roll back 操作 |
文章目录一、概述简介原理模块二、配置Mysql使用版本环境要求1.操作系统2.mysql要求三、配置canal-server离线下载在线下载上传解压修改配置单机配置集群配置分库分表配置1.修改全局配置2.实例配置垂直分库水平分库3.修改group-instance.xml4.启动监听四、配置canal-adapter1修改启动配置2配置映射文件3启动ES数据同步查询所有订阅同步数据同步开关启动4.验证五、配置canal-admin一、概述简介canal是Alibaba旗下的一款开源项目,Java开发。基于数据库增量日志解析,提供增量数据订阅&消费。Git地址:https://github.co
我看到其他人也遇到过类似的问题,但没有一个解决方案对我有用。0.3.14gem与其他gem文件一起存在。我已经完全按照此处指示完成了所有操作:https://github.com/brianmario/mysql2.我仍然得到以下信息。我不知道为什么安装程序指示它找不到include目录,因为我已经检查过它存在。thread.h文件存在,但不在ruby目录中。相反,它在这里:C:\RailsInstaller\DevKit\lib\perl5\5.8\msys\CORE\我正在运行Windows7并尝试在Aptana3中构建我的Rails项目。我的Ruby是1.9.3。$gemin
我已经开始使用mysql2gem。我试图弄清楚一些基本的事情——其中之一是如何明确地执行事务(对于批处理操作,比如多个INSERT/UPDATE查询)。在旧的ruby-mysql中,这是我的方法:client=Mysql.real_connect(...)inserts=["INSERTINTO...","UPDATE..WHEREid=..",#etc]client.autocommit(false)inserts.eachdo|ins|beginclient.query(ins)rescue#handleerrorsorabortentirelyendendclient.commi
我有一个Ruby数组[1,4]。我想在中间插入另一个数组[2,3],这样它就变成了[1,2,3,4]。我可以使用[1,4].insert(1,[2,3]).flatten实现这一点,但是有更好的方法吗? 最佳答案 您可以通过以下方式进行。[1,4].insert(1,*[2,3])insert()方法处理多个参数。因此,您可以使用splat运算符*将数组转换为参数。 关于ruby-如何在数组中间插入一个数组?,我们在StackOverflow上找到一个类似的问题:
我正在尝试绕过rails配置这个极其复杂的迷宫。到目前为止,我设法在ubuntu上设置了rvm(出于某种原因,ruby在ubuntu存储库中已经过时了)。我设法建立了一个Rails项目。我希望我的测试项目使用mysql而不是mysqlite。当我尝试“rakedb:migrate”时,出现错误:“!!!缺少mysql2gem。将其添加到您的Gemfile:gem'mysql2'”当我尝试“geminstallmysql”时,出现错误,告诉我需要为安装命令提供参数。但是,参数列表很大,我不知道该选择哪些。如何通过在ubuntu上运行的rvm和mysql获取rails3?谢谢。
在rails开发环境中,cache_classes是关闭的,所以你可以修改app/下的代码,不用重启服务器就可以看到变化。不过,在所有环境中,中间件只会创建一次。所以如果我有这样的中间件:classMyMiddlewaredefinitialize(app)@app=appenddefcall(env)env['model']=MyModel.firstendend我在config/environments/development.rb中执行此操作:config.cache_classes=false#thedefaultfordevelopmentconfig.middleware.
如果有人有兴趣将PDF文件保存在PDFKit中间件gem显示的文件系统中,那么这里是...重写middleware.rb文件的call方法。在覆盖中只需替换这一行:body=PDFKit.new(translate_paths(body,env),@options).to_pdf与pdf=PDFKit.new(translate_paths(body,env),@options)file=pdf.to_file('Your/file/name/path')Mymodel.my_method()#Youcanwriteyourmethodheretousethatfilebody=pdf
我的Rails4应用程序使用了一个自定义Rack中间件。如果客户端未提供有效信息(我'正在开发API)。因此,在每个请求之前它会更改这些header,并且在每个请求之后它会添加一个带有自定义媒体类型信息的自定义X-Something-Media-Typeheader。我想切换到Puma,因此我有点担心这种中间件的线程安全性。我没有使用实例变量,除了我们在每个中间件中遇到的常见@app.call一次,但即使在这里我也复制了一些我在RailsCasts的评论中读到的内容:definitialize(app)@app=appenddefcall(env)dup._call(env)endde
我为你们准备了一个简单的。我想要一个特色内容部分,其中排除了当前文章所以这可以通过delete_if使用MiddlemanBlog:但是我使用的是中间人代理,所以我无法访问current_article方法...我有一个YAML结构,其中包含以下模拟数据(以及其他数据),文件夹设置如下:data>site>caseStudy>RANDOM-ID423536.yaml(由CMS生成)在每个yaml文件中,您会发现如下内容::id:2k1YccJrQsKE2siSO6o6ac:title:Heyplace我的config.rb看起来像这样data.site.caseStudy.eachdo
目录1、yum安装mysql修改密码(1)在mysql里面修改(2)第二种方式,利用mysqladmin修改密码2、没有密码,登录mysql修改密码3、mysql的安全设置1、yum安装mysql在CentOS中默认安装有MariaDB(MySQL的一个分支),安装完成之后可以直接覆盖MariaDB。rpm-qa|grepmariadb查询是否安装了mariadbrpm-e--nodepsmariadb-libs-5.5.60-1.el7_5.x86_64卸载mariadwgethttp://dev.mysql.com/get/mysql57-community-release-el7-11.