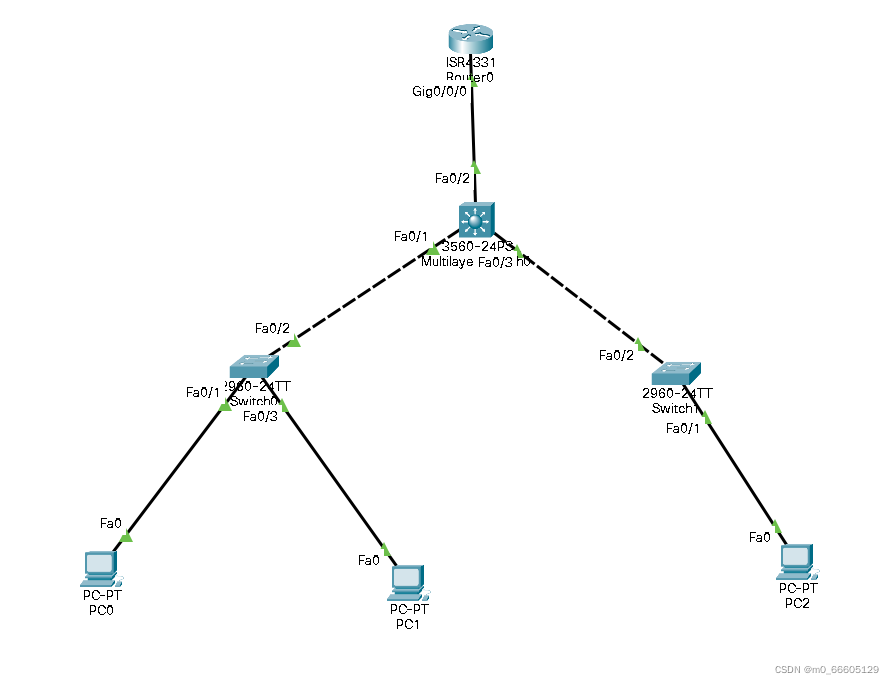
Sw0和sw2配置如下
一,
Switch>en //进入特权模式
Switch#config t // 进入全局配置模式
Switch(config)#vlan 10
Switch(config-vlan)#vlan 20
Switch(config-vlan)#vlan 30 // 配置vlan10. 20. 30
Switch(config-vlan)#interface f0/1
Switch(config-if)#switchport access vlan 10
Switch(config-if)#interface f0/3
Switch(config-if)#switchport access vlan 20 //进入接口划分vlan
Switch(config-if)#interface f0/2
Switch(config-if)#switchport mode trunk //进入交换机0/2的接口配置为中继模式
二, //以下同上
Switch>en
Switch#config t
Switch(config)#vlan 30
Switch(config-vlan)#interface f0/1
Switch(config-if)#switchport access vlan 30
Switch(config-if)#interface f0/2
Switch(config-if)#switchport mode trunk
三层交换机配置如下:
Switch>en //特权模式
Switch#config t //全局配置模式
Switch(config)#vlan 10
Switch(config-vlan)#vlan 20
Switch(config-vlan)#vlan 30 //创建 v10 20 30
Switch(config-vlan)#
Switch(config-vlan)#ex
Switch(config)#ip routing //打开三层交换机的路由功能
Switch(config)#interface vlan 10 //进入虚接口vlan 10
Switch(config-if)#ip address 192.168.10.1 255.255.255.0 //配置地址为10 网段
Switch(config-if)#no shutdown //并且打开
//以下同上
Switch(config-if)#interface vlan 20
Switch(config-if)#ip address 192.168.20.1 255.255.255.0
Switch(config-if)#no shutdown
Switch(config-if)#interface vlan 30
Switch(config-if)#ip address 192.168.30.1 255.255.255.0
Switch(config-if)#no shutdown
Switch#
Switch#show ip route
Codes: C - connected, S - static, I - IGRP, R - RIP, M - mobile, B - BGP
D - EIGRP, EX - EIGRP external, O - OSPF, IA - OSPF inter area
N1 - OSPF NSSA external type 1, N2 - OSPF NSSA external type 2
E1 - OSPF external type 1, E2 - OSPF external type 2, E - EGP
i - IS-IS, L1 - IS-IS level-1, L2 - IS-IS level-2, ia - IS-IS inter area
* - candidate default, U - per-user static route, o - ODR
P - periodic downloaded static route
Gateway of last resort is not set
C 192.168.10.0/24 is directly connected, Vlan10
C 192.168.20.0/24 is directly connected, Vlan20
C 192.168.30.0/24 is directly connected, Vlan30
//查看路由表进行校验
//下面配置三层交换机的dhcp自动获取地址
Switch#config t //要在全局模式下配置
Switch(config)#ip dhcp pool v10 //创建dhcp地址池子 名字为 v10
Switch(dhcp-config)#network 192.168.10.0 255.255.255.0 //网段配置为10
网段 并且配置王子网掩码
Switch(dhcp-config)#default-router 192.168.10.1 //默认网关为10.1
//以下同上
Switch(dhcp-config)#ip dhcp pool v20
Switch(dhcp-config)#network 192.168.20.0 255.255.255.0
Switch(dhcp-config)#default-router 192.168.20.1
Switch(dhcp-config)#ip dhcp pool v30
Switch(dhcp-config)#network 192.168.30.0 255.255.255.0
Switch(dhcp-config)#default-router 192.168.30.1
Switch(dhcp-config)#ex
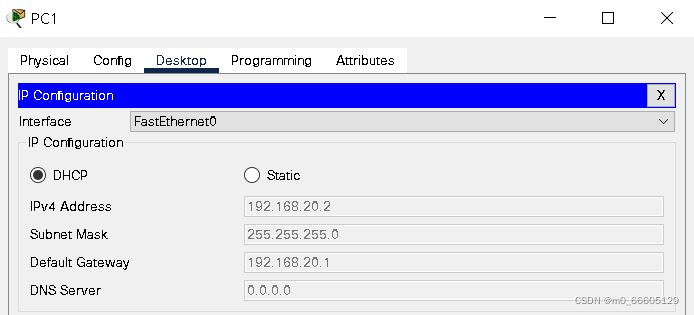
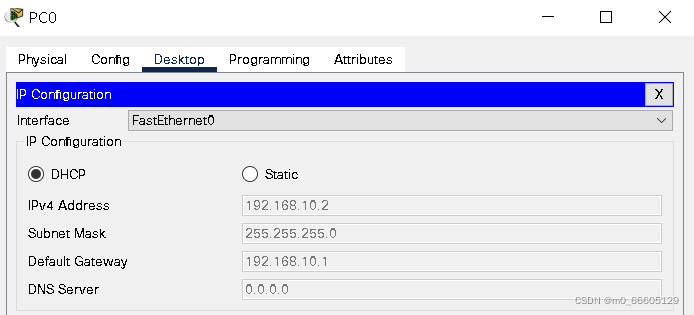
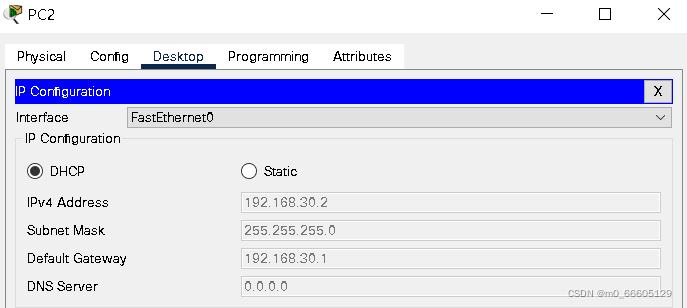
以下为客户端自动获取到的地址


下面配置三层交换的路由功能
Switch(config)#
Switch(config)#interface f0/2 //进入0/2的端口
Switch(config-if)#no switchport //关闭此端口的交换功能
Switch(config-if)#ip address 192.168.100.10 255.255.255.0//地址配置为100网段
Switch(config-if)#ex //退出接口模式
Switch(config)#ip route 0.0.0.0 0.0.0.0 192.168.100.100 //配置默认路由
Switch#show ip route //查看路由表进行检验
C 192.168.10.0/24 is directly connected, Vlan10
C 192.168.20.0/24 is directly connected, Vlan20
C 192.168.30.0/24 is directly connected, Vlan30
C 192.168.100.0/24 is directly connected, FastEthernet0/2
S* 0.0.0.0/0 [1/0] via 192.168.100.100
下面配置路由器如下
Router>en
Router#config t
Router(config)#interface f0/0/0 //进入0/0/0端口
Router(config-if)#no shutdown //将其打开
Router(config-if)#ip address 192.168.100.100 255.255.255.0 //地址配置为100网段的100
Router(config-if)#ex //退出
Router(config)#ip route 0.0.0.0 0.0.0.0 192.168.100.10 //配置默认路由
Router(config)#ex //退出
Router#show ip route //查看路由表进行检验
192.168.100.0/24 is variably subnetted, 2 subnets, 2 masks
C 192.168.100.0/24 is directly connected, GigabitEthernet0/0/0
L 192.168.100.100/32 is directly connected, GigabitEthernet0/0/0
S* 0.0.0.0/0 [1/0] via 192.168.100.10
最后开始实验最后阶段客户端测试

Sw0和sw2配置如下
一,
Switch>en //进入特权模式
Switch#config t // 进入全局配置模式
Switch(config)#vlan 10
Switch(config-vlan)#vlan 20
Switch(config-vlan)#vlan 30 // 配置vlan10. 20. 30
Switch(config-vlan)#interface f0/1
Switch(config-if)#switchport access vlan 10
Switch(config-if)#interface f0/3
Switch(config-if)#switchport access vlan 20 //进入接口划分vlan
Switch(config-if)#interface f0/2
Switch(config-if)#switchport mode trunk //进入交换机0/2的接口配置为中继模式
二, //以下同上
Switch>en
Switch#config t
Switch(config)#vlan 30
Switch(config-vlan)#interface f0/1
Switch(config-if)#switchport access vlan 30
Switch(config-if)#interface f0/2
Switch(config-if)#switchport mode trunk
三层交换机配置如下:
Switch>en //特权模式
Switch#config t //全局配置模式
Switch(config)#vlan 10
Switch(config-vlan)#vlan 20
Switch(config-vlan)#vlan 30 //创建 v10 20 30
Switch(config-vlan)#
Switch(config-vlan)#ex
Switch(config)#ip routing //打开三层交换机的路由功能
Switch(config)#interface vlan 10 //进入虚接口vlan 10
Switch(config-if)#ip address 192.168.10.1 255.255.255.0 //配置地址为10 网段
Switch(config-if)#no shutdown //并且打开
//以下同上
Switch(config-if)#interface vlan 20
Switch(config-if)#ip address 192.168.20.1 255.255.255.0
Switch(config-if)#no shutdown
Switch(config-if)#interface vlan 30
Switch(config-if)#ip address 192.168.30.1 255.255.255.0
Switch(config-if)#no shutdown
Switch#
Switch#show ip route
Codes: C - connected, S - static, I - IGRP, R - RIP, M - mobile, B - BGP
D - EIGRP, EX - EIGRP external, O - OSPF, IA - OSPF inter area
N1 - OSPF NSSA external type 1, N2 - OSPF NSSA external type 2
E1 - OSPF external type 1, E2 - OSPF external type 2, E - EGP
i - IS-IS, L1 - IS-IS level-1, L2 - IS-IS level-2, ia - IS-IS inter area
* - candidate default, U - per-user static route, o - ODR
P - periodic downloaded static route
Gateway of last resort is not set
C 192.168.10.0/24 is directly connected, Vlan10
C 192.168.20.0/24 is directly connected, Vlan20
C 192.168.30.0/24 is directly connected, Vlan30
//查看路由表进行校验
//下面配置三层交换机的dhcp自动获取地址
Switch#config t //要在全局模式下配置
Switch(config)#ip dhcp pool v10 //创建dhcp地址池子 名字为 v10
Switch(dhcp-config)#network 192.168.10.0 255.255.255.0 //网段配置为10
网段 并且配置王子网掩码
Switch(dhcp-config)#default-router 192.168.10.1 //默认网关为10.1
//以下同上
Switch(dhcp-config)#ip dhcp pool v20
Switch(dhcp-config)#network 192.168.20.0 255.255.255.0
Switch(dhcp-config)#default-router 192.168.20.1
Switch(dhcp-config)#ip dhcp pool v30
Switch(dhcp-config)#network 192.168.30.0 255.255.255.0
Switch(dhcp-config)#default-router 192.168.30.1
Switch(dhcp-config)#ex
以下为客户端自动获取到的地址

下面配置三层交换的路由功能
Switch(config)#
Switch(config)#interface f0/2 //进入0/2的端口
Switch(config-if)#no switchport //关闭此端口的交换功能
Switch(config-if)#ip address 192.168.100.10 255.255.255.0//地址配置为100网段
Switch(config-if)#ex //退出接口模式
Switch(config)#ip route 0.0.0.0 0.0.0.0 192.168.100.100 //配置默认路由
Switch#show ip route //查看路由表进行检验
C 192.168.10.0/24 is directly connected, Vlan10
C 192.168.20.0/24 is directly connected, Vlan20
C 192.168.30.0/24 is directly connected, Vlan30
C 192.168.100.0/24 is directly connected, FastEthernet0/2
S* 0.0.0.0/0 [1/0] via 192.168.100.100
下面配置路由器如下
Router>en
Router#config t
Router(config)#interface f0/0/0 //进入0/0/0端口
Router(config-if)#no shutdown //将其打开
Router(config-if)#ip address 192.168.100.100 255.255.255.0 //地址配置为100网段的100
Router(config-if)#ex //退出
Router(config)#ip route 0.0.0.0 0.0.0.0 192.168.100.10 //配置默认路由
Router(config)#ex //退出
Router#show ip route //查看路由表进行检验
192.168.100.0/24 is variably subnetted, 2 subnets, 2 masks
C 192.168.100.0/24 is directly connected, GigabitEthernet0/0/0
L 192.168.100.100/32 is directly connected, GigabitEthernet0/0/0
S* 0.0.0.0/0 [1/0] via 192.168.100.10
最后开始实验最后阶段客户端测试
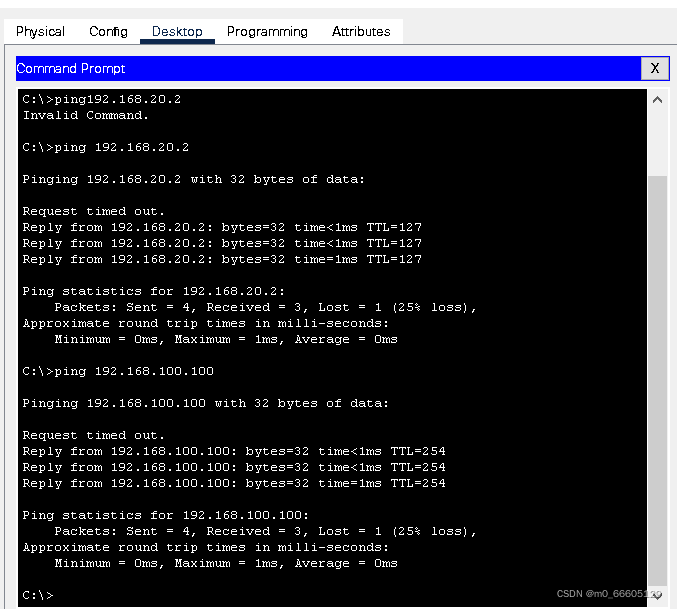
实验结束,客户端可以ping通不同vlan,并且是动态获取的地址,也可以ping通外网,实验成功
本人第一次创作投稿,使用的是思科 packer tracer模拟器,希望这篇文章能给各位带来帮助
如果有模拟器功能不太会的可以评论发我,我会逐个回复,感谢支持
在Ruby中可以使用哪些替代方法来ping一个ip地址?标准库“ping”库的功能似乎非常有限。我对在这里滚动我自己的代码不感兴趣。有没有好的gem?我应该接受它并忍受它吗?(我在Linux上使用Ruby1.8.6编写代码) 最佳答案 net-ping值得一看。它允许TCPping(如标准rubyping),但也允许UDP、HTTP和ICMPping。ICMPping需要root权限,但其他则不需要。 关于ruby-Pingruby网站?,我们在StackOverflow上找到一个类
我基本上来自Java背景并且努力理解Ruby中的模运算。(5%3)(-5%3)(5%-3)(-5%-3)Java中的上述操作产生,2个-22个-2但在Ruby中,相同的表达式会产生21个-1-2.Ruby在逻辑上有多擅长这个?模块操作在Ruby中是如何实现的?如果将同一个操作定义为一个web服务,两个服务如何匹配逻辑。 最佳答案 在Java中,模运算的结果与被除数的符号相同。在Ruby中,它与除数的符号相同。remainder()在Ruby中与被除数的符号相同。您可能还想引用modulooperation.
RSpec似乎按顺序匹配方法接收的消息。我不确定如何使以下代码工作:allow(a).toreceive(:f)expect(a).toreceive(:f).with(2)a.f(1)a.f(2)a.f(3)我问的原因是a.f的一些调用是由我的代码的上层控制的,所以我不能对这些方法调用添加期望。 最佳答案 RSpecspy是测试这种情况的一种方式。要监视一个方法,用allowstub,除了方法名称之外没有任何约束,调用该方法,然后expect确切的方法调用。例如:allow(a).toreceive(:f)a.f(2)a.f(1)
A/ctohttp://wiki.nginx.org/CoreModule#usermaster进程曾经以root用户运行,是否可以以不同的用户运行nginxmaster进程? 最佳答案 只需以非root身份运行init脚本(即/etc/init.d/nginxstart),就可以用不同的用户运行nginxmaster进程。如果这真的是你想要做的,你将需要确保日志和pid目录(通常是/var/log/nginx&/var/run/nginx.pid)对该用户是可写的,并且您所有的listen调用都是针对大于1024的端口(因为绑定(
有没有办法在sinatra的beforedoblock中停止执行并返回不同的值?beforedo#codeishere#Iwouldliketo'return"Message"'#Iwouldlike"/home"tonotgetcalled.end//restofthecodeget'/home'doend 最佳答案 beforedohalt401,{'Content-Type'=>'text/plain'},'Message!'end如果你愿意,你可以只指定状态,这里有状态、标题和正文的例子
我想用sunspot重现以下原始solr查询q=exact_term_text:fooORterm_textv:foo*ORalternate_text:bar*但我无法通过标准的太阳黑子界面理解这是否可能以及如何实现,因为看起来:fulltext方法似乎不接受多个文本/搜索字段参数我不知道将什么参数作为第一个参数传递给fulltext,就好像我通过了"foo"或"bar"结果不匹配如果我传递一个空参数,我得到一个q=*:*范围过滤器(例如with(:term).starting_with('foo*')(顾名思义)作为过滤器查询应用,因此不参与评分。似乎可以手动编写字符串(或者可能使
我是一名决定学习Ruby和RubyonRails的ASP.NETMVC开发人员。我已经有所了解并在RoR上创建了一个网站。在ASP.NETMVC上开发,我一直使用三层架构:数据层、业务层和UI(或表示)层。尝试在RubyonRails应用程序中使用这种方法,我发现没有关于它的信息(或者也许我只是找不到它?)。也许有人可以建议我如何在RubyonRails上创建或使用三层架构?附言我使用ruby1.9.3和RubyonRails3.2.3。 最佳答案 我建议在制作RoR应用程序时遵循RubyonRails(RoR)风格。Rails
我从ui中得到日期范围为-approved_between"=>"2013-03-17-2013-03-18"我需要拆分此approved_start_date="2013-03-17"和approved_end_date="2013-03-18"...我希望使用它在mysql中查询,因为mysql中的日期格式是created_at:2012-07-2810:35:01.我正在做的是:approved=approved_between.split("")approved_start_date=approved[0]approved_end_date=approved[2]很确定这不是处
response是一个散列,可能看起来像以下两种情况之一:response={'demo'=>'nil','test_01'=>'DemoData'}或response={'test'=>'DemoData','demo'=>'nil'}我想做这样的事情:ifresponse.has_key?'test_01'new_response.update(:nps_score=>response['test_01']elsenew_response.update(:nps_score=>response['test']end是否有更“Ruby”的方法来解决这个问题?也许使用||的东西运算符(
我正在编写一个Rails应用程序,它将监视某些特定数据库的数据质量。为了做到这一点,我需要能够对这些数据库执行直接SQL查询——这当然与用于驱动Rails应用程序模型的数据库不同。简而言之,这意味着我无法使用通过ActiveRecord基础连接的技巧。我需要连接的数据库在设计时是未知的(即:我不能将它们的详细信息放在database.yaml中)。相反,我有一个模型“database_details”,用户将使用它来输入应用程序将在运行时执行查询的数据库的详细信息。因此与这些数据库的连接实际上是动态的,细节仅在运行时解析。 最佳答案