Apache 官方 Release 版本请前往Downloads | Apache Doris下载。
这里下载的是百度Palo预编译版本,不需要编译源码,直接安装就行
Palo文档PALO - 预编译版本下载 | Doris (baidu.com)
官方建议 10 ~ 100 台左右的机器,来充分发挥 Doris 的性能(其中 3 台部署 FE(HA),剩余的部署 BE),最少4台机器(一台 FE,三台 BE),我们部署4台简易版。
1.下载。
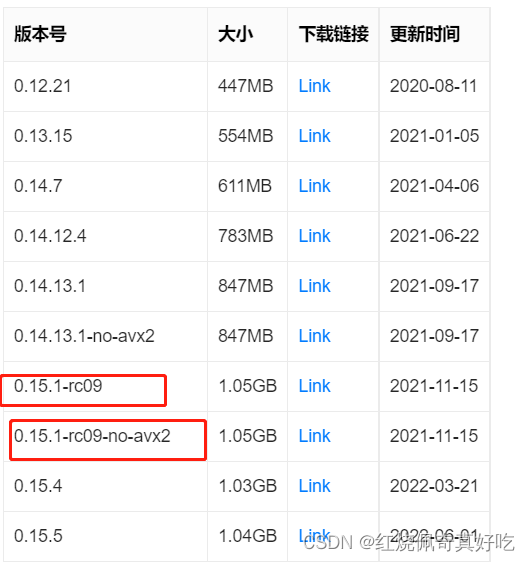
0.14.13.1 及之后的版本需要运行环境的 CPU 支持 avx2 指令,你可以通过 cat /proc/cpuinfo 查看是否支持,这里我们是是不支持avx2指令。

0.15.1-rc09是支持avx2指令,0.15.1-rc09-no-avx2是不支持avx2指令,我下载的是0.15.1-rc09-no-avx2。
1)Linux 文件系统
在这里,我们建议使用 ext4 文件系统。安装操作系统时,请选择 ext4 文件系统
2)时钟同步
Doris 的元数据要求时间精度小于 5000ms,因此集群中的所有机器都需要同步时钟,以避免因时钟问题导致元数据不一致而导致的服务异常。
3)关闭交换分区
Linux交换分区会给Doris带来严重的性能问题,需要在安装前禁用交换分区
1、不重启电脑,禁用启用swap,立刻生效
# 禁用命令 sudo swapoff -a
# 启用命令 sudo swapon -a
# 查看交换分区的状态 sudo free -m
2、重新启动电脑,永久禁用Swap
# 把根目录文件系统设为可读写
sudo mount -n -o remount,rw /
# 用vi修改/etc/fstab文件,在swap分区这行前加 # 禁用掉,保存退出
vi /etc/fstab
# 重新启动电脑,使用free -m查看分区状态
reboot
sudo free -m
4)把limits调到最大
1、查看打开文件的限制数 ulimit -a
显示文件的打开数项为open files (-n) 1024修改
2、修改
临时生效:ulimit -n 65536 (不需要设,直接设置永久)
永久生效:
vim /etc/security/limits.conf添加
* soft nofile 65536
* hard nofile 65536
vim /etc/sysctl.conf中添加fs.file-max=655350
/sbin/sysctl -p 使立即生效
cat /proc/sys/fs/file-max 查看是否设置成功
5)安装gcc,jdk
| Soft | Version |
|---|---|
| Java | 1.8 及以上 |
| GCC | 4.8.2 及以上 |
6) 在所有BE节点上安装ODBC
1)上传至服务器/opt/software目录,每台服务器都需要上传;解压。
[root@slave1 software]# tar -zxvf PALO-0.15.1-rc09-no-avx2-binary
第一台机器把fe挪到/home/doris/目录下去,前提需要创建该目录
root@slave1 PALO-0.15.1-rc09-no-avx2-binary]# mv fe /home/doris/
剩下三台机器把be挪到/home/doris/目录下去
root@slave2 PALO-0.15.1-rc09-no-avx2-binary]# mv be /home/doris/
root@slave3 PALO-0.15.1-rc09-no-avx2-binary]# mv be /home/doris/
root@slave4 PALO-0.15.1-rc09-no-avx2-binary]# mv be /home/doris/
2)进入/home/doris/fe/conf, vim be.conf,需要修改配置
下面我的配置做个参考:
# Licensed to the Apache Software Foundation (ASF) under one
# or more contributor license agreements.  See the NOTICE file
# distributed with this work for additional information
# regarding copyright ownership.  The ASF licenses this file
# to you under the Apache License, Version 2.0 (the
# "License"); you may not use this file except in compliance
# with the License.  You may obtain a copy of the License at
#
#   http://www.apache.org/licenses/LICENSE-2.0
#
# Unless required by applicable law or agreed to in writing,
# software distributed under the License is distributed on an
# "AS IS" BASIS, WITHOUT WARRANTIES OR CONDITIONS OF ANY
# KIND, either express or implied.  See the License for the
# specific language governing permissions and limitations
# under the License.

#####################################################################
## The uppercase properties are read and exported by bin/start_fe.sh.
## To see all Frontend configurations,
## see fe/src/org/apache/doris/common/Config.java
#####################################################################

# the output dir of stderr and stdout
LOG_DIR = ${DORIS_HOME}/log

DATE = `date +%Y%m%d-%H%M%S`
JAVA_OPTS="-Xmx32768m -XX:+UseMembar -XX:SurvivorRatio=8 -XX:MaxTenuringThreshold=7 -XX:+PrintGCDateStamps -XX:+PrintGCDetails -XX:+UseConcMarkSweepGC -XX:+UseParNewGC -XX:+CMSClassUnloadingEnabled -XX:-CMSParallelRemarkEnabled -XX:CMSInitiatingOccupancyFraction=80 -XX:SoftRefLRUPolicyMSPerMB=0 -Xloggc:$DORIS_HOME/log/fe.gc.log.$DATE"

# For jdk 9+, this JAVA_OPTS will be used as default JVM options
JAVA_OPTS_FOR_JDK_9="-Xmx32768m -XX:SurvivorRatio=8 -XX:MaxTenuringThreshold=7 -XX:+CMSClassUnloadingEnabled -XX:-CMSParallelRemarkEnabled -XX:CMSInitiatingOccupancyFraction=80 -XX:SoftRefLRUPolicyMSPerMB=0 -Xlog:gc*:$DORIS_HOME/log/fe.gc.log.$DATE:time"

##
## the lowercase properties are read by main program.
##

# INFO, WARN, ERROR, FATAL
sys_log_level = INFO

# store metadata, must be created before start FE.
# Default value is ${DORIS_HOME}/doris-meta
# meta_dir = ${DORIS_HOME}/doris-meta
meta_dir = /home/doris/fe/doris-meta

http_port = 8030
rpc_port = 9020
query_port = 9030
edit_log_port = 9010
mysql_service_nio_enabled = true
enable_http_server_v2 = true

# Choose one if there are more than one ip except loopback address.
# Note that there should at most one ip match this list.
# If no ip match this rule, will choose one randomly.
# use CIDR format, e.g. 10.10.10.0/24
# Default value is empty.
# priority_networks = 10.10.10.0/24;192.168.0.0/16
priority_networks = 192.168.0.111/24

# Advanced configurations
# log_roll_size_mb = 1024
# sys_log_dir = ${DORIS_HOME}/log
# sys_log_roll_num = 10
# sys_log_verbose_modules = org.apache.doris
# audit_log_dir = ${DORIS_HOME}/log
# audit_log_modules = slow_query, query
# audit_log_roll_num = 10
# meta_delay_toleration_second = 10
# qe_max_connection = 1024
# max_conn_per_user = 100
# qe_query_timeout_second = 300
# qe_slow_log_ms = 5000
dynamic_partition_enable = true
 enable_http_server_v2=true
3)启动fe。
启动和关闭fe的命令是
sh start_fe.sh --daemon
sh stop_fe.sh --daemon
通过MySQL客户端连接到FE,这表明FE已成功启动
mysql官网:
mysql-5.7.36-linux-glibc2.12-x86_64.tar.gz
[root@slave1 software]# tar -zxvf mysql-5.7.36-linux-glibc2.12-x86_64.tar.gz
[root@slave1 software]# cd mysql-5.7.36-linux-glibc2.12-x86_64.tar.gz /bin
[root@slave1 bin]# ./mysql -h 192.168.0.111 -P 9030 -uroot

查看fe节点的状态,主要关注Role角色、IsMaster是否主节点、alive节点存活状态 三列是否正常
mysql> show proc '/frontends';
4)安装BE
进入/home/doris/be/conf目录下,修改配置
下面我的配置做个参考:
# Licensed to the Apache Software Foundation (ASF) under one
# or more contributor license agreements.  See the NOTICE file
# distributed with this work for additional information
# regarding copyright ownership.  The ASF licenses this file
# to you under the Apache License, Version 2.0 (the
# "License"); you may not use this file except in compliance
# with the License.  You may obtain a copy of the License at
#
#   http://www.apache.org/licenses/LICENSE-2.0
#
# Unless required by applicable law or agreed to in writing,
# software distributed under the License is distributed on an
# "AS IS" BASIS, WITHOUT WARRANTIES OR CONDITIONS OF ANY
# KIND, either express or implied.  See the License for the
# specific language governing permissions and limitations
# under the License.

PPROF_TMPDIR="$DORIS_HOME/log/"

# INFO, WARNING, ERROR, FATAL
sys_log_level = INFO

# ports for admin, web, heartbeat service
be_port = 9060
webserver_port = 8040
heartbeat_service_port = 9050
brpc_port = 8060
priority_networks = 192.168.0.222/24
#storage_root_path = /home/doris/doris-data1.hdd,50; /home/doris/doris-data2.ssd,50; /home/doris/doris-data3.ssd,50
max_tablet_version_num = 5000
max_compaction_threads = 16
compaction_task_num_per_disk = 8
cumulative_size_based_promotion_size_mbytes = 2048
row_step_for_compaction_merge_log = 1
total_permits_for_compaction_score = 50000
# Choose one if there are more than one ip except loopback address.
# Note that there should at most one ip match this list.
# If no ip match this rule, will choose one randomly.
# use CIDR format, e.g. 10.10.10.0/24
# Default value is empty.
# priority_networks = 10.10.10.0/24;192.168.0.0/16

# data root path, separate by ';'
# you can specify the storage medium of each root path, HDD or SSD
# you can add capacity limit at the end of each root path, seperate by ','
# eg:
# storage_root_path = /home/disk1/doris.HDD,50;/home/disk2/doris.SSD,1;/home/disk2/doris
# /home/disk1/doris.HDD, capacity limit is 50GB, HDD;
# /home/disk2/doris.SSD, capacity limit is 1GB, SSD;
# /home/disk2/doris, capacity limit is disk capacity, HDD(default)
#
# you also can specify the properties by setting '<property>:<value>', seperate by ','
# property 'medium' has a higher priority than the extension of path
#
# Default value is ${DORIS_HOME}/storage, you should create it by hand.
storage_root_path = /home/doris/be/storage
3台机器都按照以上内容进行配置,后者be.conf改一下ip地址就行。
启动所有be节点
cd /home/doris/be/bin
sh start_be.sh --daemon 5)进入fe 节点,用mysql连接进入sql命令行模式,挨个添加be节点
[root@slave1 software]# cd mysql-5.7.36-linux-glibc2.12-x86_64.tar.gz /bin
[root@slave1 bin]# ./mysql -h 192.168.0.111 -P 9030 -uroot
mysql> ALTER SYSTEM ADD BACKEND "192.168.0.222:9050";
mysql> ALTER SYSTEM ADD BACKEND "192.168.0.333:9050";
mysql> ALTER SYSTEM ADD BACKEND "192.168.0.444:9050";
查看be节点的状态,主要关注alive节点存活状态 是否正常。
mysql> show proc '/backends';
进入网页端
http://192.168.0.111:8030
可以去fe节点改密码,没有的话,直接进。

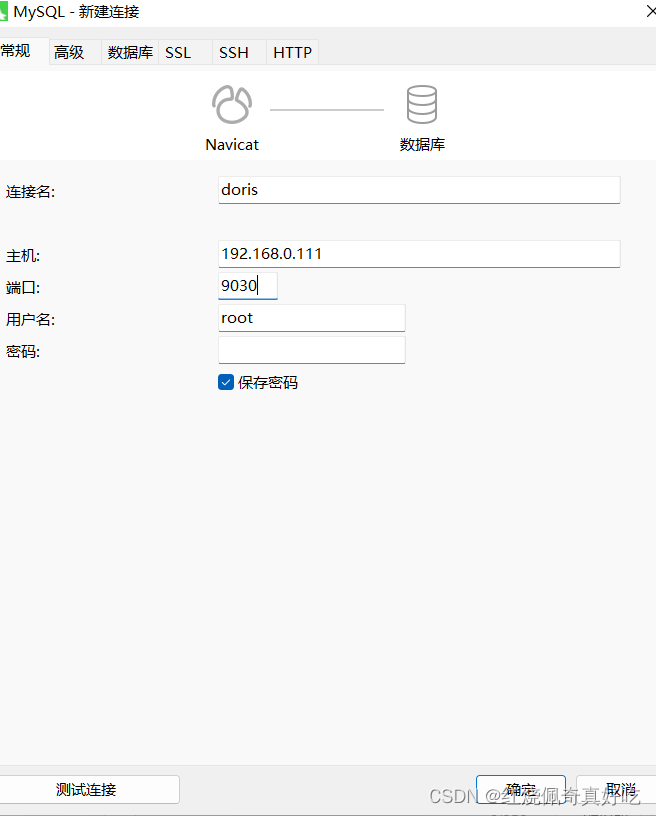
也可以用navicat连接,或DBeaver
连接MySQL方式一样,端口9030;
我想为Heroku构建一个Rails3应用程序。他们使用Postgres作为他们的数据库,所以我通过MacPorts安装了postgres9.0。现在我需要一个postgresgem并且共识是出于性能原因你想要pggem。但是我对我得到的错误感到非常困惑当我尝试在rvm下通过geminstall安装pg时。我已经非常明确地指定了所有postgres目录的位置可以找到但仍然无法完成安装:$envARCHFLAGS='-archx86_64'geminstallpg--\--with-pg-config=/opt/local/var/db/postgresql90/defaultdb/po
我打算为ruby脚本创建一个安装程序,但我希望能够确保机器安装了RVM。有没有一种方法可以完全离线安装RVM并且不引人注目(通过不引人注目,就像创建一个可以做所有事情的脚本而不是要求用户向他们的bash_profile或bashrc添加一些东西)我不是要脚本本身,只是一个关于如何走这条路的快速指针(如果可能的话)。我们还研究了这个很有帮助的问题:RVM-isthereawayforsimpleofflineinstall?但有点误导,因为答案只向我们展示了如何离线在RVM中安装ruby。我们需要能够离线安装RVM本身,并查看脚本https://raw.github.com/wayn
我有一个奇怪的问题:我在rvm上安装了rubyonrails。一切正常,我可以创建项目。但是在我输入“railsnew”时重新启动后,我有“程序'rails'当前未安装。”。SystemUbuntu12.04ruby-v"1.9.3p194"gemlistactionmailer(3.2.5)actionpack(3.2.5)activemodel(3.2.5)activerecord(3.2.5)activeresource(3.2.5)activesupport(3.2.5)arel(3.0.2)builder(3.0.0)bundler(1.1.4)coffee-rails(
我刚刚为fedora安装了emacs。我想用emacs编写ruby。为ruby提供代码提示、代码完成类型功能所需的工具、扩展是什么? 最佳答案 ruby-mode已经包含在Emacs23之后的版本中。不过,它也可以通过ELPA获得。您可能感兴趣的其他一些事情是集成RVM、feature-mode(Cucumber)、rspec-mode、ruby-electric、inf-ruby、rinari(用于Rails)等。这是我当前用于Ruby开发的Emacs配置:https://github.com/citizen428/emacs
我正在尝试在我的centos服务器上安装therubyracer,但遇到了麻烦。$geminstalltherubyracerBuildingnativeextensions.Thiscouldtakeawhile...ERROR:Errorinstallingtherubyracer:ERROR:Failedtobuildgemnativeextension./usr/local/rvm/rubies/ruby-1.9.3-p125/bin/rubyextconf.rbcheckingformain()in-lpthread...yescheckingforv8.h...no***e
我的最终目标是安装当前版本的RubyonRails。我在OSXMountainLion上运行。到目前为止,这是我的过程:已安装的RVM$\curl-Lhttps://get.rvm.io|bash-sstable检查已知(我假设已批准)安装$rvmlistknown我看到当前的稳定版本可用[ruby-]2.0.0[-p247]输入命令安装$rvminstall2.0.0-p247注意:我也试过这些安装命令$rvminstallruby-2.0.0-p247$rvminstallruby=2.0.0-p247我很快就无处可去了。结果:$rvminstall2.0.0-p247Search
我实际上是在尝试使用RVM在我的OSX10.7.5上更新ruby,并在输入以下命令后:rvminstallruby我得到了以下回复:Searchingforbinaryrubies,thismighttakesometime.Checkingrequirementsforosx.Installingrequirementsforosx.Updatingsystem.......Errorrunning'requirements_osx_brew_update_systemruby-2.0.0-p247',pleaseread/Users/username/.rvm/log/138121
由于fast-stemmer的问题,我很难安装我想要的任何rubygem。我把我得到的错误放在下面。Buildingnativeextensions.Thiscouldtakeawhile...ERROR:Errorinstallingfast-stemmer:ERROR:Failedtobuildgemnativeextension./System/Library/Frameworks/Ruby.framework/Versions/2.0/usr/bin/rubyextconf.rbcreatingMakefilemake"DESTDIR="cleanmake"DESTDIR=
我是Google云的新手,我正在尝试对其进行首次部署。我的第一个部署是RubyonRails项目。我基本上是在关注thisguideinthegoogleclouddocumentation.唯一的区别是我使用的是我自己的项目,而不是他们提供的“helloworld”项目。这是我的app.yaml文件runtime:customvm:trueentrypoint:bundleexecrackup-p8080-Eproductionconfig.ruresources:cpu:0.5memory_gb:1.3disk_size_gb:10当我转到我的项目目录并运行gcloudprevie
当我尝试安装Ruby时遇到此错误。我试过查看this和this但无济于事➜~brewinstallrubyWarning:YouareusingOSX10.12.Wedonotprovidesupportforthispre-releaseversion.Youmayencounterbuildfailuresorotherbreakages.Pleasecreatepull-requestsinsteadoffilingissues.==>Installingdependenciesforruby:readline,libyaml,makedepend==>Installingrub