随着『GPT4多模态/Microsoft 365 Copilot/Github Copilot X/ChatGPT插件』的推出,绝大部分公司的技术 产品 服务,以及绝大部分人的工作都将被革新一遍
然ChatGPT/GPT4基本不可能开源了,而通过前两篇文章《从LLaMA到Alpaca、BELLE、ChatLLaMA和ColossalChat》可知,国内外各大公司、研究者推出了很多类ChatGPT开源项目,比如LLaMA、BLOOM
本文则侧重
在2022年上半年,当时主流的预训练框架可以分为三种:
这三种预训练模型各自称霸一方,那么问题来了,可否结合三种预训练模型,以成天下之一统?这便是2022年5月发表的这篇论文《GLM: General Language Model Pretraining with Autoregressive Blank Infilling》的出发点,它提出了GLM架构(这是张义策关于GLM论文的解读之一,下面三小节的内容主要参考自该篇解读)
首先,考虑到三类预训练模型的训练目标
为了大一统,我们必须在结构和训练目标上兼容这三种预训练模型。如何实现呢?文章给出的解决方法
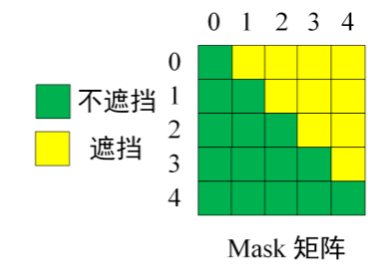

假设原始的文本序列为,采样的两个文本片段为
和
,那么掩码后的文本序列为
(以下简称Part A),如上图所示,拆解图中的三块分别可得

需要说明的是,Part B包含所有被掩码的文本片段,但是文本片段的相对顺序是随机打乱的
作者使用了两个预训练目标来优化GLM,两个目标交替进行:
尽管GLM是BERT、GPT、T5三者的结合,但是在预训练时,为了适应预训练的目标,作者还是选择掩码较长的文本片段,以确保GLM的文本生成能力,并在微调的时候将自然语言理解任务也转化为生成任务,如情感分类任务转化为填充空白的任务

此外,模型架构层面,除了整体基于Transformer之外
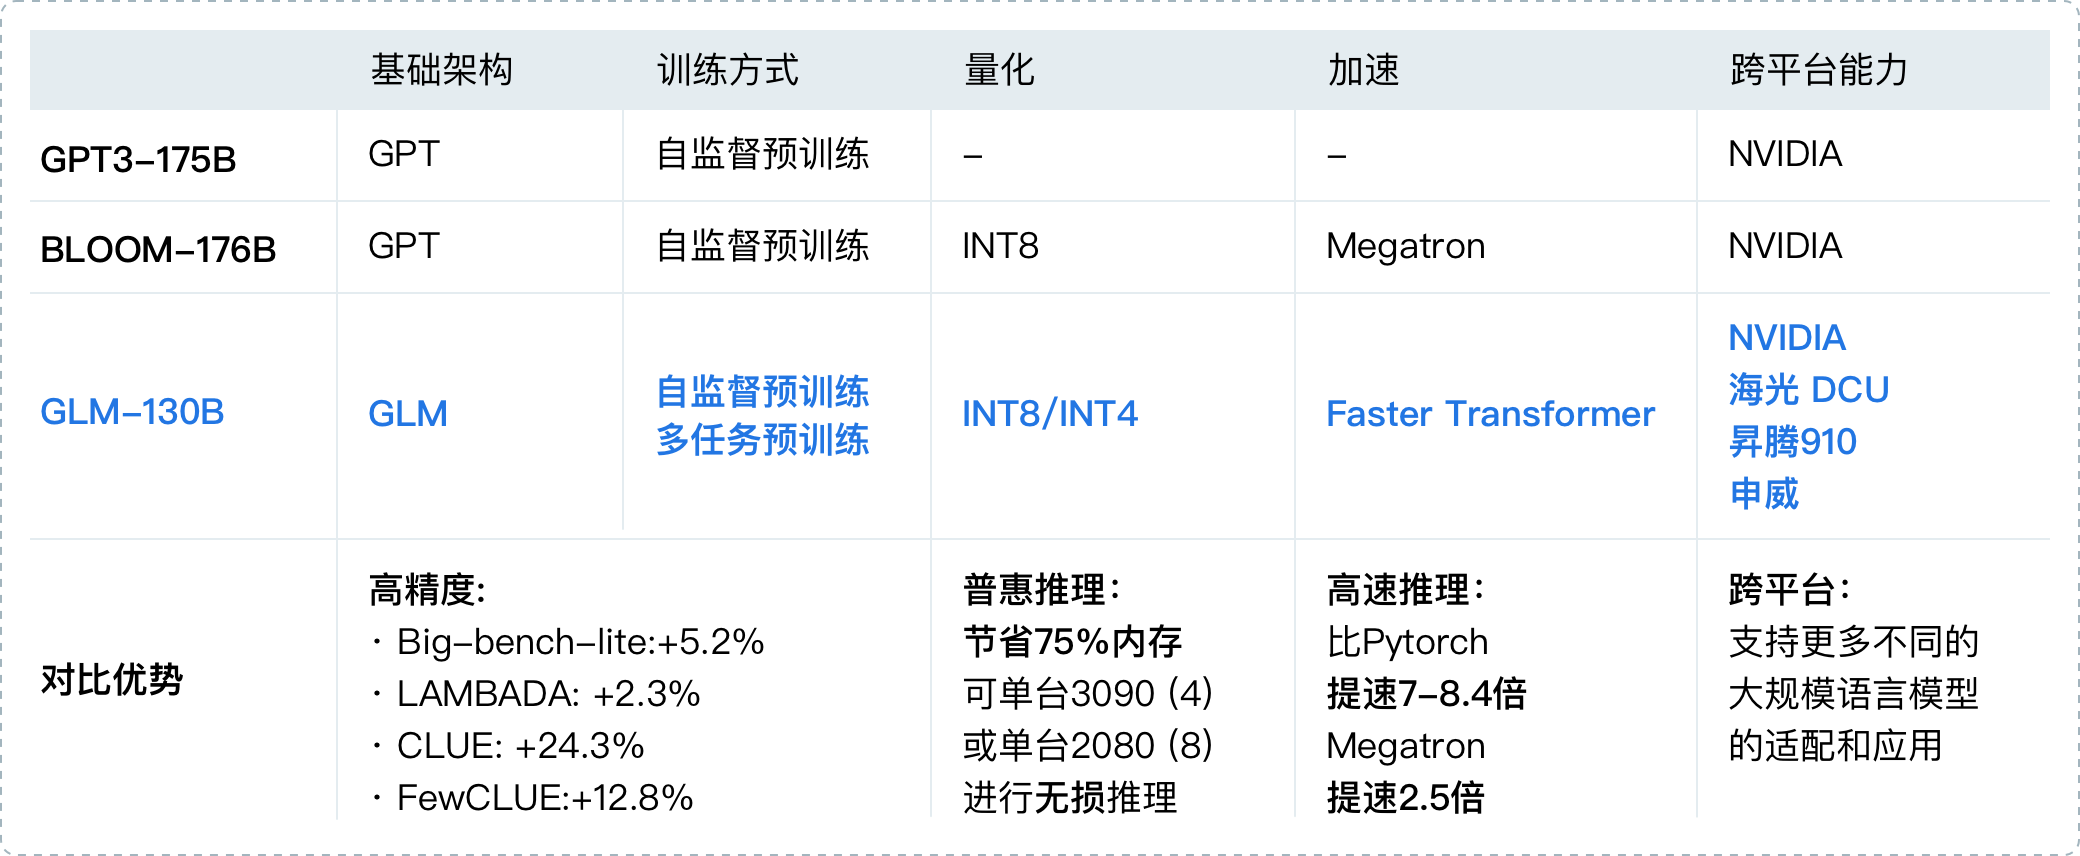
2022年8月,清华背景的智谱AI基于GLM框架,正式推出拥有1300亿参数的中英双语稠密模型 GLM-130B(论文地址、代码地址,论文解读之一,GLM-130B is trained on a cluster of 96 DGX-A100 GPU (8×40G) servers with a 60-day,可以较好的支持2048个token的上下文窗口)
其在一些任务上的表现优于GPT3-175B,是国内与2020年5月的GPT3在综合能力上差不多的模型之一(即便放到23年年初也并不多),这是它的一些重要特点
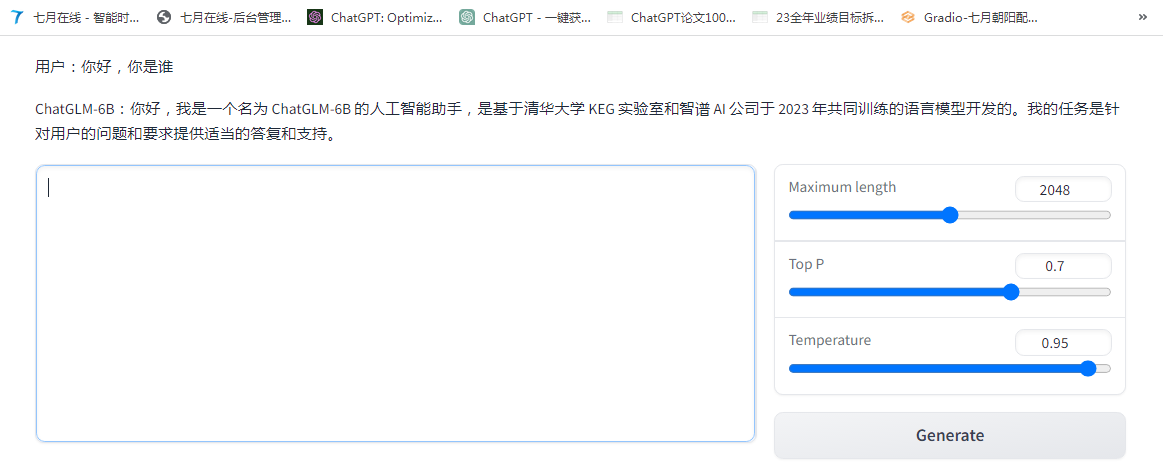
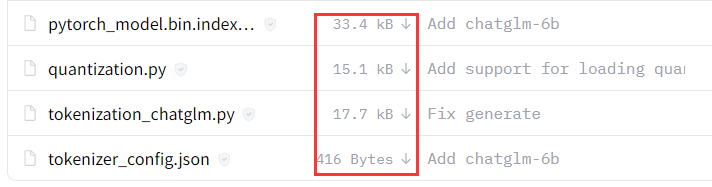
ChatGLM-6B(介绍页面、代码地址),是智谱 AI 开源、支持中英双语的对话语言模型,其
虽尚有很多不足(比如因为6B的大小限制,导致模型的记忆能力、编码、推理能力皆有限),但在6B这个参数量级下不错了,部署也非常简单,我七月在线的同事朝阳花了一两个小时即部署好了(主要时间花在模型下载上,实际的部署操作很快)
以下是具体的部署过程

from transformers import AutoTokenizer, AutoModel
tokenizer = AutoTokenizer.from_pretrained("THUDM/chatglm-6b", trust_remote_code=True)
model = AutoModel.from_pretrained("/data/chatglm-6b", trust_remote_code=True).half().cuda()
model = model.eval()
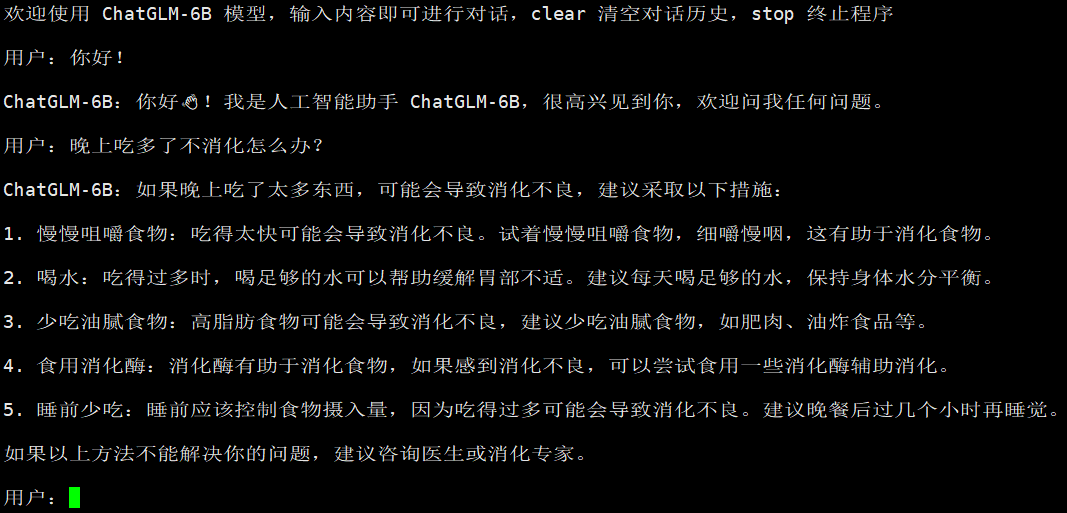
response, history = model.chat(tokenizer, "你好", history=[])
print(response)
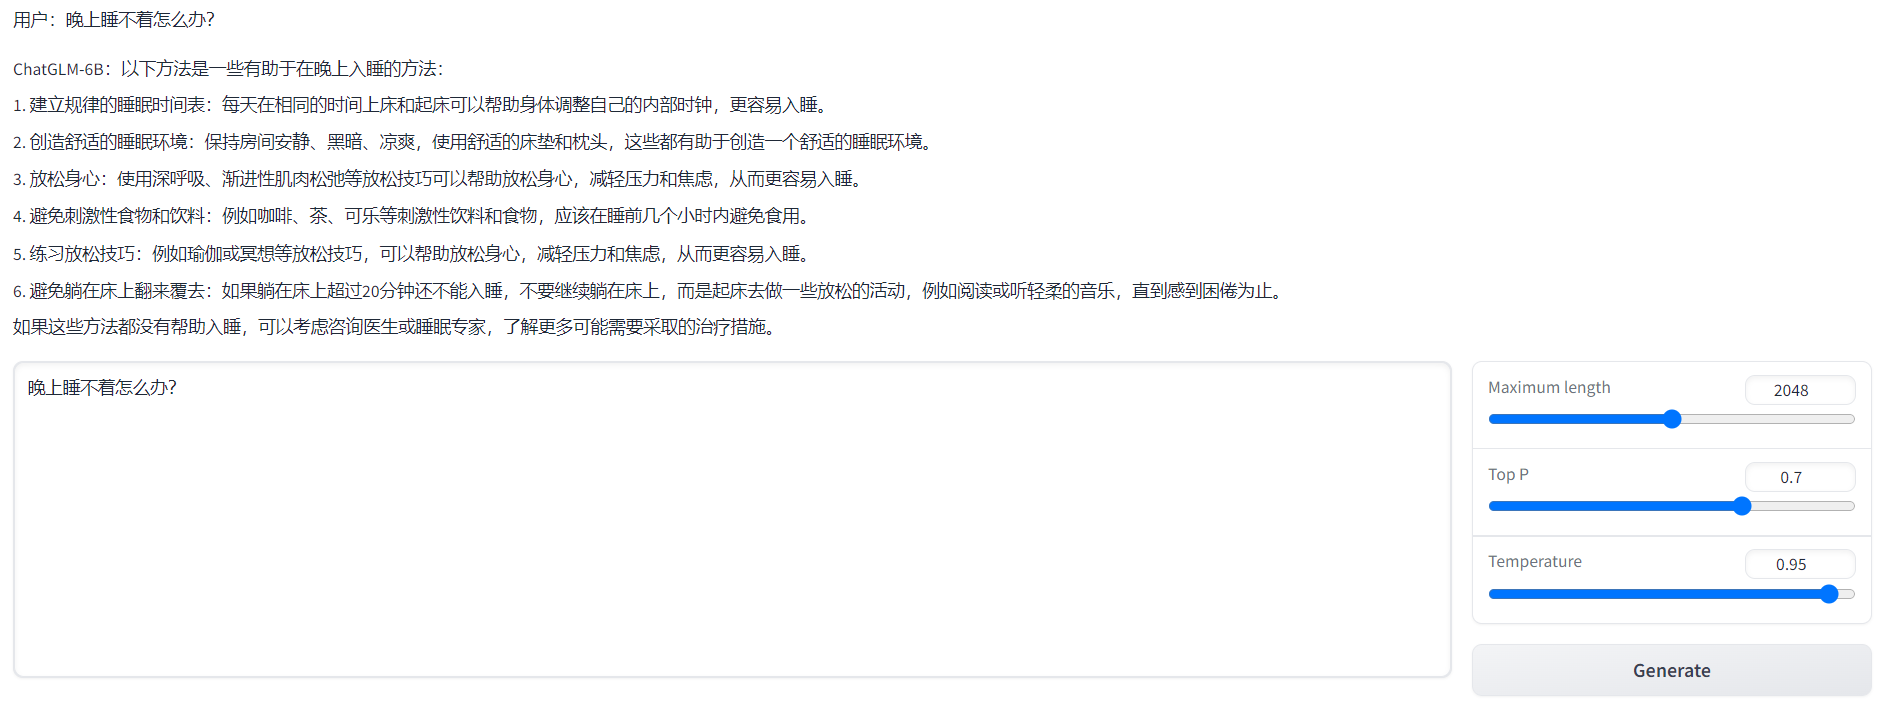
response, history = model.chat(tokenizer, "晚上睡不着应该怎么办", history=history)
print(response)

此外,据介绍,GLM团队正在内测130B参数的ChatGLM,相信从6B到130B,效果应该能提升很多
从上文可知,Stanford Alpaca的52K数据集是通过Self Instruct方式提示GPT3对应的API产生的指令数据,然后通过这批指令数据微调Meta的LLaMA 7B
而GitHub上的这个微调ChatGLM-6B项目(作者:mymusise),则基于Stanford Alpaca的52K数据集通过LoRA(low-rank adaptation)的方式微调ChatGLM-6B
如上一篇文章所说,Huggingface公司推出的PEFT(Parameter-Efficient Fine-Tuning)库便封装了LoRA这个方法,具体而言,通过PEFT-LoRA微调ChatGLM-6B的具体步骤如下
pip install accelerate==0.17.1
pip install tensorboard==2.10
pip install protobuf==3.19.5
pip install transformers==4.27.1
pip install icetk
pip install cpm_kernels==1.0.11
pip install datasets==2.10.1
pip install git+https://github.com/huggingface/peft.git # 最新版本 >=0.3.0.dev0[
{
"instruction": "Give three tips for staying healthy.",
"input": "",
"output": "1.Eat a balanced diet and make sure to include plenty of fruits and vegetables. \n2. Exercise regularly to keep your body active and strong. \n3. Get enough sleep and maintain a consistent sleep schedule."
},
{
"instruction": "What are the three primary colors?",
"input": "",
"output": "The three primary colors are red, blue, and yellow."
},
...
]
{"text": "### Instruction:\nGive three tips for staying healthy.\n\n### Response:\n1.Eat a balanced diet and make sure to include plenty of fruits and vegetables. \n2. Exercise regularly to keep your body active and strong. \n3. Get enough sleep and maintain a consistent sleep schedule.\nEND\n"}
{"text": "### Instruction:\nWhat are the three primary colors?\n\n### Response:\nThe three primary colors are red, blue, and yellow.\nEND\n"}python tokenize_dataset_rows.py \
--jsonl_path data/alpaca_data.jsonl \
--save_path data/alpaca \
--max_seq_length 200 \
--skip_overlength \python finetune.py \
--dataset_path data/alpaca \
--lora_rank 8 \
--per_device_train_batch_size 6 \
--gradient_accumulation_steps 1 \
--max_steps 52000 \
--save_steps 1000 \
--save_total_limit 2 \
--learning_rate 1e-4 \
--fp16 \
--remove_unused_columns false \
--logging_steps 50 \
--output_dir output;export LD_LIBRARY_PATH=/usr/local/cuda-11.3/lib64:$LD_LIBRARY_PATH
export CUDA_HOME=/usr/local/cuda-11.3:$CUDA_HOME
export PATH=/usr/local/cuda-11.3/bin:$PATHpython finetune.py \
--dataset_path data/alpaca \
--lora_rank 8 \
--per_device_train_batch_size 1 \
--gradient_accumulation_steps 1 \
--max_steps 52000 \
--save_steps 1000 \
--save_total_limit 2 \
--learning_rate 1e-4 \
--fp16 \
--remove_unused_columns false \
--logging_steps 50 \
--output_dir output;此外,ChatGLM团队自身也出了一个基于P-Tuning v2的方式微调ChatGLM-6B的项目:ChatGLM-6B 模型基于 P-Tuning v2 的微调
P-Tuning v2(代码地址,论文地址)意义在于:将需要微调的参数量减少到原来的 0.1%,再通过模型量化、Gradient Checkpoint 等方法,最低只需要 7GB 显存即可运行

那具体怎么通过P-Tuning v2微调ChatGLM-6B呢,具体步骤如下:
pip install rouge_chinese nltk jieba datasetsPRE_SEQ_LEN=8
LR=1e-2
CUDA_VISIBLE_DEVICES=0 nohup python -u main.py \
--do_train \
--train_file AdvertiseGen/train.json \
--validation_file AdvertiseGen/dev.json \
--prompt_column content \
--response_column summary \
--overwrite_cache \
--model_name_or_path /data/chatglm-6b \
--output_dir output/adgen-chatglm-6b-pt-$PRE_SEQ_LEN-$LR \
--overwrite_output_dir \
--max_source_length 64 \
--max_target_length 64 \
--per_device_train_batch_size 1 \
--per_device_eval_batch_size 1 \
--gradient_accumulation_steps 16 \
--predict_with_generate \
--max_steps 3000 \
--logging_steps 10 \
--save_steps 1000 \
--learning_rate $LR \
--pre_seq_len $PRE_SEQ_LEN \
>> log.out 2>&1 &


总结:建议使用官方提供的基于P-Tuning v2微调ChatGLM-6B的方式对自己的数据进行微调
可能有读者会有疑问,到底怎么微调ChatGLM-6B呢,接下来我们通过Cursor一步一步生成一份示例代码(且参考此文),如下所示
import torch
from torch.utils.data import TensorDataset, DataLoader
from transformers import AutoTokenizer, AutoModelForCausalLM
from lora import Lora
from torch.utils.tensorboard import SummaryWriter# Download and load the ChatGLM-6B model
model_name = "TsinghuaAI/ChatGLM-6B"
tokenizer = AutoTokenizer.from_pretrained(model_name)
model = AutoModelForCausalLM.from_pretrained(model_name)# Initialize the Lora optimizer
optimizer = Lora(model.parameters(), lr=1e-5, rank=16)# Define your input text
input_text = "Hello, how are you?"
# Tokenize the input text
input_ids = torch.tensor(tokenizer.encode(input_text)).unsqueeze(0)
attention_mask = torch.ones_like(input_ids)
# Define your output text
output_text = "I'm doing well, thank you for asking."
# Tokenize the output text
labels = torch.tensor(tokenizer.encode(output_text)).unsqueeze(0)# Convert your training data to a TensorDataset
train_dataset = TensorDataset(input_ids, attention_mask, labels)
# Create a DataLoader to load
# the data in batches
batch_size = 32
train_loader = DataLoader(train_dataset, batch_size=batch_size, shuffle=True)# Define your validation data
val_input_text = "How are you doing?"
val_output_text = "I'm doing well, thank you for asking."
val_input_ids = torch.tensor(tokenizer.encode(val_input_text)).unsqueeze(0)
val_attention_mask = torch.ones_like(val_input_ids)
val_labels = torch.tensor(tokenizer.encode(val_output_text)).unsqueeze(0)
val_dataset = TensorDataset(val_input_ids, val_attention_mask, val_labels)
val_loader = DataLoader(val_dataset, batch_size=batch_size, shuffle=True)# Define your training and validation losses
train_losses = []
val_losses = []# Initialize the SummaryWriter
writer = SummaryWriter()for epoch in range(10):
total_train_loss = 0
total_val_loss = 0
model.train() for batch in train_loader:
optimizer.zero_grad()
input_ids, attention_mask, labels = batch
outputs = model(input_ids=input_ids, attention_mask=attention_mask, labels=labels)
loss = outputs.loss
loss.backward()
optimizer.step()
# 每次迭代的loss可以帮助我们更好地了解模型的训练过程,以及每个batch的训练效果
total_train_loss += loss.item()
# 每轮的平均loss则可以帮助我们更好地了解模型的整体训练效果
# 以及模型是否出现了过拟合或欠拟合的情况
avg_train_loss = total_train_loss / len(train_loader)
train_losses.append(avg_train_loss) total_val_loss = 0
model.eval()
with torch.no_grad():
for batch in val_loader:
input_ids, attention_mask, labels = batch
outputs = model(input_ids=input_ids, attention_mask=attention_mask, labels=labels)
loss = outputs.loss
total_val_loss += loss.item()
avg_val_loss = total_val_loss / len(val_loader)
val_losses.append(avg_val_loss) print(f"Epoch {epoch+1} train loss: {avg_train_loss:.4f} val loss: {avg_val_loss:.4f}") # Write the training and validation losses to TensorBoard
writer.add_scalar("Training loss", avg_train_loss, epoch)
writer.add_scalar("Validation loss", avg_val_loss, epoch)# Close the SummaryWriter
writer.close()Github上有一个ChatDoctor项目(ChatDoctor: A Medical Chat Model Fine-tuned on LLaMA Model using Medical Domain Knowledge)
核心思想就是基于Meta 的LLaMA进行各种微调,具体而言主要是以下4个步骤

      {
            "instruction": "If you are a doctor, please answer the medical questions based on the patient's description.",
            "input": "Doctor, I have been experiencing sudden and frequent panic attacks. I don't know what to do.",
            "output": "Well, based on what you're telling me, it sounds like you may be suffering from panic disorder. The best course of action is to start with psychotherapy and mental health counseling. Additionally, we should conduct an electrocardiogram to make sure that there are no physical issues causing your panic attacks. We will also need to perform a depression screen and a toxicology screen to rule out any other underlying causes. Finally, I would recommend a comprehensive psychological and psychiatric evaluation and therapy to help manage your symptoms."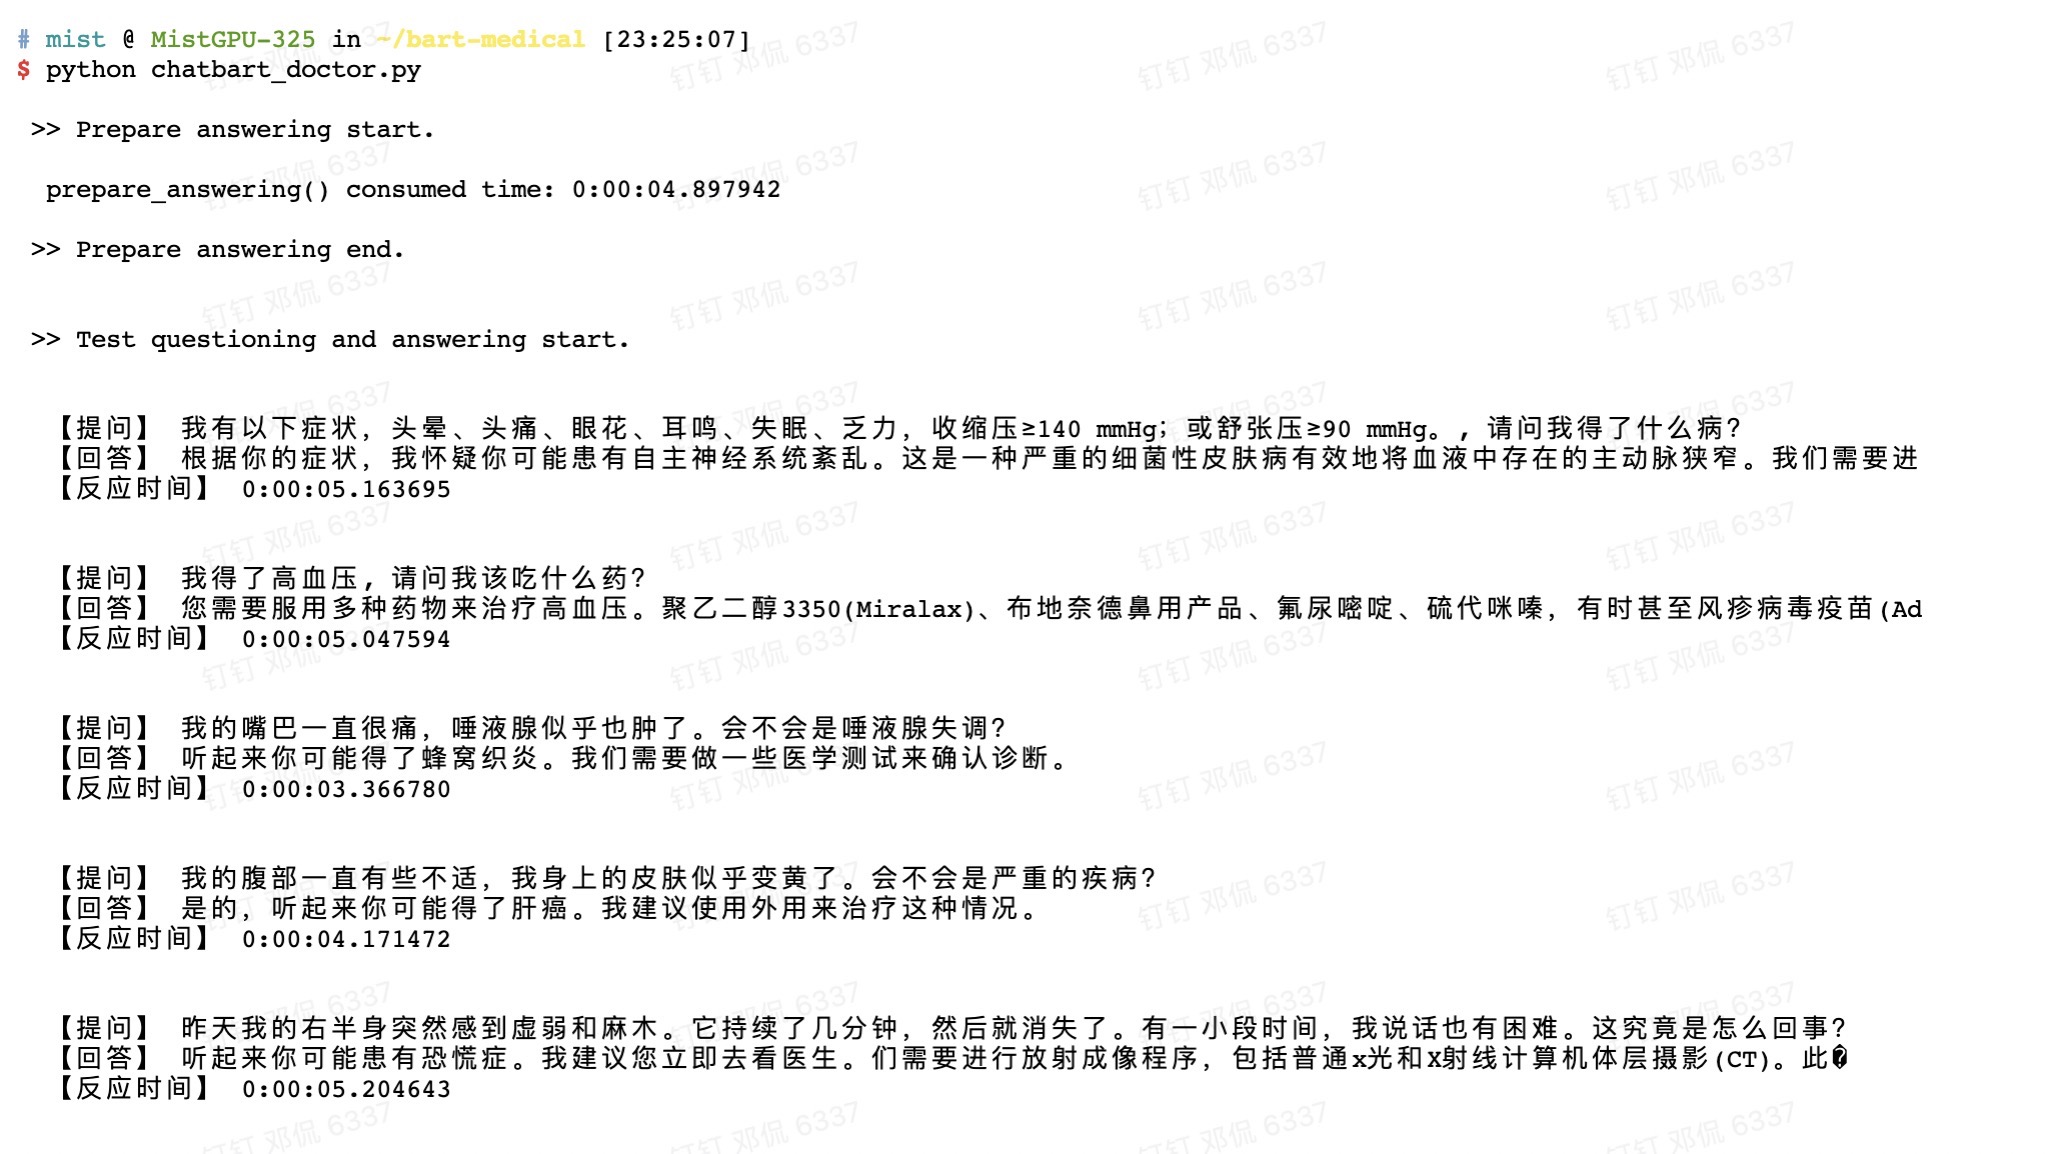
}当然,也有业内研究者基于BART-base,且利用他们自己公司的数据,微调出他们版本的ChatDoctor(截取自邓老师朋友圈)
// 待更..
如何在buildr项目中使用Ruby?我在很多不同的项目中使用过Ruby、JRuby、Java和Clojure。我目前正在使用我的标准Ruby开发一个模拟应用程序,我想尝试使用Clojure后端(我确实喜欢功能代码)以及JRubygui和测试套件。我还可以看到在未来的不同项目中使用Scala作为后端。我想我要为我的项目尝试一下buildr(http://buildr.apache.org/),但我注意到buildr似乎没有设置为在项目中使用JRuby代码本身!这看起来有点傻,因为该工具旨在统一通用的JVM语言并且是在ruby中构建的。除了将输出的jar包含在一个独特的、仅限ruby
我在我的Rails项目中使用Pow和powifygem。现在我尝试升级我的ruby版本(从1.9.3到2.0.0,我使用RVM)当我切换ruby版本、安装所有gem依赖项时,我通过运行railss并访问localhost:3000确保该应用程序正常运行以前,我通过使用pow访问http://my_app.dev来浏览我的应用程序。升级后,由于错误Bundler::RubyVersionMismatch:YourRubyversionis1.9.3,butyourGemfilespecified2.0.0,此url不起作用我尝试过的:重新创建pow应用程序重启pow服务器更新战俘
我已经像这样安装了一个新的Rails项目:$railsnewsite它执行并到达:bundleinstall但是当它似乎尝试安装依赖项时我得到了这个错误Gem::Ext::BuildError:ERROR:Failedtobuildgemnativeextension./System/Library/Frameworks/Ruby.framework/Versions/2.0/usr/bin/rubyextconf.rbcheckingforlibkern/OSAtomic.h...yescreatingMakefilemake"DESTDIR="cleanmake"DESTDIR="
我是Google云的新手,我正在尝试对其进行首次部署。我的第一个部署是RubyonRails项目。我基本上是在关注thisguideinthegoogleclouddocumentation.唯一的区别是我使用的是我自己的项目,而不是他们提供的“helloworld”项目。这是我的app.yaml文件runtime:customvm:trueentrypoint:bundleexecrackup-p8080-Eproductionconfig.ruresources:cpu:0.5memory_gb:1.3disk_size_gb:10当我转到我的项目目录并运行gcloudprevie
假设我有这个范围:("aaaaa".."zzzzz")如何在不事先/每次生成整个项目的情况下从范围中获取第N个项目? 最佳答案 一种快速简便的方法:("aaaaa".."zzzzz").first(42).last#==>"aaabp"如果出于某种原因你不得不一遍又一遍地这样做,或者如果你需要避免为前N个元素构建中间数组,你可以这样写:moduleEnumerabledefskip(n)returnto_enum:skip,nunlessblock_given?each_with_indexdo|item,index|yieldit
英文版英文链接关注公众号在“亚特兰蒂斯的回声”中踏上一段难忘的冒险之旅,深入未知的海洋深处。足智多谋的考古学家AriaSeaborne偶然发现了一件古代神器,揭示了一张通往失落之城亚特兰蒂斯的隐藏地图。在她神秘的导师内森·兰登教授的指导和勇敢的冒险家亚历克斯·默瑟的帮助下,阿丽亚开始了一段危险的旅程,以揭开这座传说中城市的真相。他们的冒险之旅带领他们穿越险恶的大海、神秘的岛屿和充满陷阱和谜语的致命迷宫。随着Aria潜在的魔法能力的觉醒,她被睿智勇敢的QueenNeria的幻象所指引,她让她为即将到来的挑战做好准备。三人组揭开亚特兰蒂斯令人惊叹的隐藏文明,并了解到邪恶的巫师马拉卡勋爵试图利用其古
我可以在Azure网站上部署RubyonRails吗? 最佳答案 还没有。目前仅支持.NET和PHP。 关于ruby-on-rails-RubyonRails可以部署在Azure网站上吗?,我们在StackOverflow上找到一个类似的问题: https://stackoverflow.com/questions/12964010/
前置步骤我们都操作完了,这篇开始介绍jenkins的集成。话不多说,看操作1、登录进入jenkins后会让你选择安装插件,选择第一个默认的就行。安装完成后设置账号密码,重新登录。2、配置JDK和Git都需要执行路径,所以需要先把执行路径找到,先进入服务器的docker容器,2.1JDK的路径root@69eef9ee86cf:/usr/bin#echo$JAVA_HOME/usr/local/openjdk-82.2Git的路径root@69eef9ee86cf:/#whichgit/usr/bin/git3、先配置JDK和Git。点击:ManageJenkins>>GlobalToolCon
深度学习部署:Windows安装pycocotools报错解决方法1.pycocotools库的简介2.pycocotools安装的坑3.解决办法更多Ai资讯:公主号AiCharm本系列是作者在跑一些深度学习实例时,遇到的各种各样的问题及解决办法,希望能够帮助到大家。ERROR:Commanderroredoutwithexitstatus1:'D:\Anaconda3\python.exe'-u-c'importsys,setuptools,tokenize;sys.argv[0]='"'"'C:\\Users\\46653\\AppData\\Local\\Temp\\pip-instal
Ocra无法处理需要“tk”的应用程序require'tk'puts'nope'用奥克拉http://github.com/larsch/ocra不起作用(如链接中的一个问题所述)问题:https://github.com/larsch/ocra/issues/29(Ocra是1.9的"new"rubyscript2exe,本质上它用于将rb脚本部署为可执行文件)唯一的问题似乎是缺少tcl的DLL文件我不认为这是一个问题据我所知,问题是缺少tk的DLL文件如果它们是已知的,则可以在执行ocra时将它们包括在内有没有办法知道tk工作所需的DLL依赖项? 最佳答