使用的是FISCO BCOS 和 WeBASE-Front来搭建区块链,详细教程:
https://blog.csdn.net/yueyue763184/article/details/128924144?spm=1001.2014.3001.5501
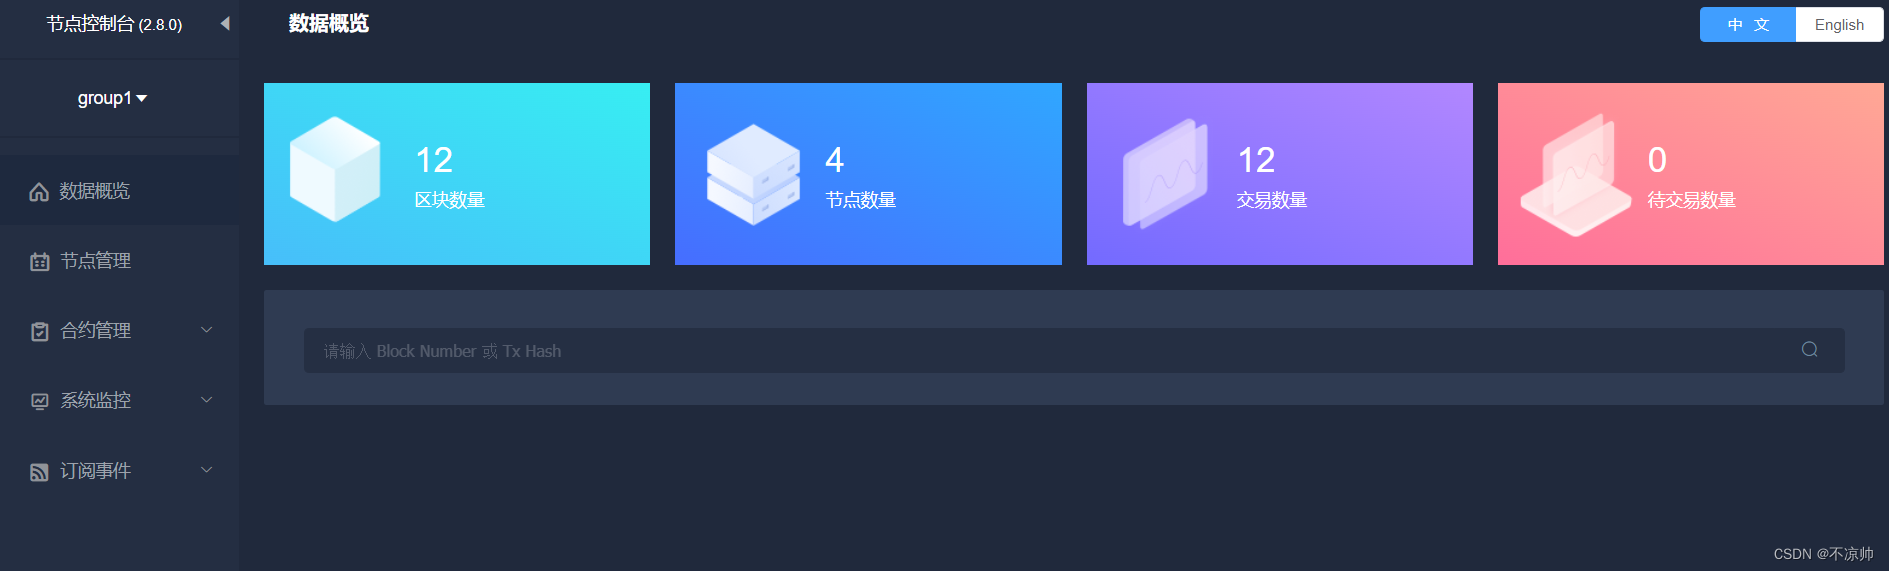
搭建好能达到下图效果即可:
点击“测试用户”,即可“新增用户”。

点击“导出”,选择.pem文件。

在“合约IDE”中准备智能合约,新建合约文件,合约名称是Asset。
pragma solidity ^0.4.25;

contract Asset {
    address public issuer;
    mapping (address => uint) public balances;

    event Sent(address from, address to, uint amount);

    constructor() {
        issuer = msg.sender;
    }

    function issue(address receiver, uint amount) public {
        if (msg.sender != issuer) return;
        balances[receiver] += amount;
    }

    function send(address receiver, uint amount) public {
        if (balances[msg.sender] < amount) return;
        balances[msg.sender] -= amount;
        balances[receiver] += amount;
        emit Sent(msg.sender, receiver, amount);
    }

}
合约IDE会自动保存的,点击“编译”、“部署”后即可得到合约地址contractAddress。

点击“导出java文件”,一般命名与合约名称相同为Asset;
点击“SDK证书下载”;

得到的文件如下:


<!-- web -->
<dependency>
    <groupId>org.springframework.boot</groupId>
    <artifactId>spring-boot-starter-web</artifactId>
</dependency>
<!-- test -->
<dependency>
    <groupId>org.springframework.boot</groupId>
    <artifactId>spring-boot-starter-test</artifactId>
    <scope>test</scope>
</dependency>
<!-- fisco bcos -->
<dependency>
    <groupId>org.fisco-bcos.java-sdk</groupId>
    <artifactId>fisco-bcos-java-sdk</artifactId>
    <version>2.9.1</version>
</dependency>
注意:要将路径和合约地址换成自己的
fisco:
  nodeList: 192.168.119.138:20201
  groupId: 1
  certPath: src\main\resources\sdk
  contractAddress:
    # Asset合约地址(一定要加引号 不然注解@Value会把按照16进制数字进行转换赋值)
    asset: "0xc6053e4f71cdcf14e31cc1031263cee4e1ac7768"
  # 测试用户地址
  account:
    # 测试用户秘钥地址
    accountAddress: src\main\resources\account
    # 测试用户文件地址
    accountFilePath: src\main\resources\account\buliangshuai_key_0x3a456344e952d0275e5e4af4766abb450d3b45ac.pem
说明:
fisco.nodeList:区块链节点的ip和端口;
fisco.groupId:组ID;
fisco.certPath:证书保存目录;
fisco.contractAddress.asset:合约地址;
fisco.contractAddress.account.accountAddress:测试用户地址;
fisco.contractAddress.account.accountFilePath:测试用户的pem文件地址;
在client包中创建2个类,一个是环境配置类ApplicationContext
package com.fisco.bcos.asset.client;

import org.fisco.bcos.sdk.BcosSDK;
import org.fisco.bcos.sdk.client.Client;
import org.fisco.bcos.sdk.config.ConfigOption;
import org.fisco.bcos.sdk.config.exceptions.ConfigException;
import org.fisco.bcos.sdk.config.model.ConfigProperty;
import org.fisco.bcos.sdk.crypto.CryptoSuite;
import org.fisco.bcos.sdk.crypto.keypair.CryptoKeyPair;
import org.springframework.beans.factory.annotation.Value;
import org.springframework.context.annotation.Bean;
import org.springframework.context.annotation.Configuration;

import java.util.Arrays;
import java.util.HashMap;
import java.util.List;
import java.util.Map;

/**
 * @Description: 配置类
 */
@Configuration
public class ApplicationContext {

    @Value("${fisco.nodeList}")
    private String nodeLists;

    @Value("${fisco.groupId}")
    private Integer groupId;

    @Value("${fisco.certPath}")
    private String certPath;

    @Value("${fisco.account.accountFilePath}")
    private String accountFilePath;

    @Bean(name = "configProperty")
    public ConfigProperty defaultConfigProperty() {
        ConfigProperty property = new ConfigProperty();
        // 配置cryptoMaterial
        Map<String, Object> cryptoMaterialMap = new HashMap<>();
        cryptoMaterialMap.put("certPath", certPath);
        property.setCryptoMaterial(cryptoMaterialMap);

        // 配置network
        Map<String, Object> networkMap = new HashMap<>();
        String[] split = nodeLists.split(",");
        List<String> nodeList = Arrays.asList(split);
        networkMap.put("peers", nodeList);
        property.setNetwork(networkMap);

        // 配置account
        Map<String, Object> accountMap = new HashMap<>();
        accountMap.put("keyStoreDir", "account");
        accountMap.put("accountAddress", "");
        accountMap.put("accountFileFormat", "pem");
        accountMap.put("password", "");
        accountMap.put("accountFilePath", accountFilePath);
        property.setAccount(accountMap);

        //配置 threadPool
        Map<String, Object> threadPoolMap = new HashMap<>();
        threadPoolMap.put("channelProcessorThreadSize", "16");
        threadPoolMap.put("receiptProcessorThreadSize", "16");
        threadPoolMap.put("maxBlockingQueueSize", "102400");
        property.setThreadPool(threadPoolMap);
        return property;
    }

    @Bean(name = "configOption")
    public ConfigOption defaultConfigOption(ConfigProperty configProperty) throws ConfigException {
        return new ConfigOption(configProperty);
    }

    @Bean(name = "bcosSDK")
    public BcosSDK bcosSDK(ConfigOption configOption) {
        return new BcosSDK(configOption);
    }

    @Bean(name = "client")
    public Client getClient(BcosSDK bcosSDK) {
        // 为群组初始化client
        Client client = bcosSDK.getClient(groupId);
        return client;
    }

    @Bean
    public CryptoKeyPair getCryptoKeyPair(Client client) {
        // 如果有密钥文件 那么每次读取的就不再是随机的
        CryptoSuite cryptoSuite = client.getCryptoSuite();
        CryptoKeyPair cryptoKeyPair = cryptoSuite.getCryptoKeyPair();
        return cryptoKeyPair;
    }
}
另一个是合约客户端类AssetClient
package com.fisco.bcos.asset.client;

import com.fisco.bcos.asset.contract.Asset;
import org.fisco.bcos.sdk.BcosSDK;
import org.fisco.bcos.sdk.client.Client;
import org.fisco.bcos.sdk.crypto.keypair.CryptoKeyPair;
import org.fisco.bcos.sdk.model.TransactionReceipt;
import org.fisco.bcos.sdk.model.callback.TransactionCallback;
import org.springframework.beans.factory.annotation.Autowired;
import org.springframework.beans.factory.annotation.Value;
import org.springframework.stereotype.Component;

import java.math.BigInteger;

@Component
public class AssetClient {
    @Autowired
    private BcosSDK bcosSDK;
    @Autowired
    private Client client;
    @Autowired
    private CryptoKeyPair cryptoKeyPair;
    @Value("${fisco.contractAddress.asset}")
    private String contractAddress;

    /**
     * 发布资产(条件:当前用户是Asset合约发布者)
     * @param receiver 接收者地址
     * @param amount 资产数量
     */
    public void issueAsset(String receiver, BigInteger amount) {
        Asset asset = Asset.load(contractAddress, client, cryptoKeyPair);
        asset.issue(receiver, amount, new CallbackResponse());
    }

    /**
     * 发送资产(条件:发送者的账号Balance必须大于等于amount)
     * @param receiver 接收者地址
     * @param amount 资产数量
     */
    public void sendAsset(String receiver, BigInteger amount) {
        Asset asset = Asset.load(contractAddress, client, cryptoKeyPair);
        asset.send(receiver, amount, new CallbackResponse());
    }

    private class CallbackResponse extends TransactionCallback {

        @Override
        public void onResponse(TransactionReceipt transactionReceipt) {
            System.out.println("回调结果:");
            System.out.println(transactionReceipt.getContractAddress());
            System.out.println(transactionReceipt.getFrom());
            System.out.println(transactionReceipt.getGasUsed());
            System.out.println(transactionReceipt.getRemainGas());
            System.out.println(transactionReceipt.getStatus());
            System.out.println(transactionReceipt.getMessage());
            System.out.println(transactionReceipt.getStatusMsg());
        }
    }
}
首先编写测试类AssetClientTest
package com.fisco.bcos.asset.client;

import com.fisco.bcos.asset.AssetDemo1Application;
import org.junit.Test;
import org.junit.runner.RunWith;
import org.springframework.beans.factory.annotation.Autowired;
import org.springframework.boot.test.context.SpringBootTest;
import org.springframework.test.context.junit4.SpringJUnit4ClassRunner;

import java.math.BigInteger;

@RunWith(SpringJUnit4ClassRunner.class)
@SpringBootTest(classes = AssetDemo1Application.class)
public class AssetClientTest {
    @Autowired
    private AssetClient assetClient;

    @Test
    public void testIssueAsset() throws InterruptedException {
        String receiver = "0xc6053e4f71cdcf14e31cc1031263cee4e1ac7768";
        BigInteger amount = new BigInteger("10000");
        assetClient.issueAsset(receiver, amount);
        Thread.sleep(5000);
        System.out.println("发布成功!");
    }

    @Test
    public void testSendAsset() throws InterruptedException {
        String receiver = "0xc6053e4f71cdcf14e31cc1031263cee4e1ac7768";
        BigInteger amount = new BigInteger("50000");
        assetClient.sendAsset(receiver, amount);
        Thread.sleep(5000);
        System.out.println("发送成功!");
    }

}
测试的步骤:
1)先后执行testIssueAsset和testSendAsset测试方法,该测试要保证服务器的20200、20201端口是开放的,命令如下:
firewall-cmd --zone=public --add-port=20201/tcp --permanent # 开放端口
firewall-cmd --zone=public --remove-port=20201/tcp --permanent #关闭端口
firewall-cmd --reload # 配置立即生效
firewall-cmd --zone=public --list-ports # 查看防火墙所有开放的端口
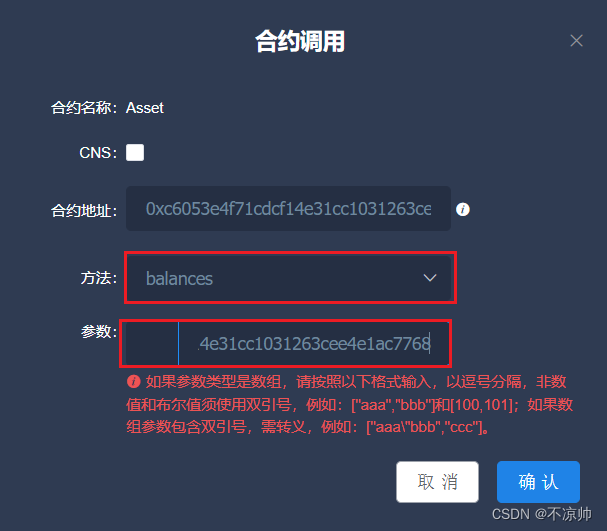
2)执行成功后,在节点控制台的“合约列表”中找到对应的合约,点击“合约调用”,选择balances方法;
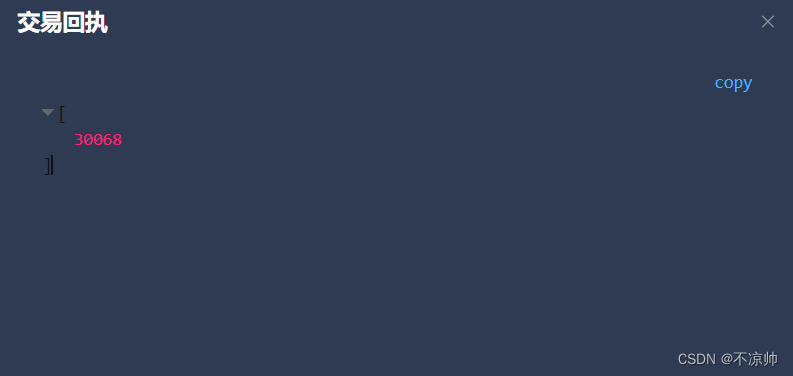
结果如下:
以上就是在Fisco区块链上部署智能合约,并通过Java SDK调用智能合约函数的示例.
我正在尝试编写一个将文件上传到AWS并公开该文件的Ruby脚本。我做了以下事情:s3=Aws::S3::Resource.new(credentials:Aws::Credentials.new(KEY,SECRET),region:'us-west-2')obj=s3.bucket('stg-db').object('key')obj.upload_file(filename)这似乎工作正常,除了该文件不是公开可用的,而且我无法获得它的公共(public)URL。但是当我登录到S3时,我可以正常查看我的文件。为了使其公开可用,我将最后一行更改为obj.upload_file(file
如何在ruby中调用C#dll? 最佳答案 我能想到几种可能性:为您的DLL编写(或找人编写)一个COM包装器,如果它还没有,则使用Ruby的WIN32OLE库来调用它;看看RubyCLR,其中一位作者是JohnLam,他继续在Microsoft从事IronRuby方面的工作。(估计不会再维护了,可能不支持.Net2.0以上的版本);正如其他地方已经提到的,看看使用IronRuby,如果这是您的技术选择。有一个主题是here.请注意,最后一篇文章实际上来自JohnLam(看起来像是2009年3月),他似乎很自在地断言RubyCL
我正在尝试使用boilerpipe来自JRuby。我看过guide从JRuby调用Java,并成功地将它与另一个Java包一起使用,但无法弄清楚为什么同样的东西不能用于boilerpipe。我正在尝试基本上从JRuby中执行与此Java等效的操作:URLurl=newURL("http://www.example.com/some-location/index.html");Stringtext=ArticleExtractor.INSTANCE.getText(url);在JRuby中试过这个:require'java'url=java.net.URL.new("http://www
我需要一些关于TDD概念的帮助。假设我有以下代码defexecute(command)casecommandwhen"c"create_new_characterwhen"i"display_inventoryendenddefcreate_new_character#dostufftocreatenewcharacterenddefdisplay_inventory#dostufftodisplayinventoryend现在我不确定要为什么编写单元测试。如果我为execute方法编写单元测试,那不是几乎涵盖了我对create_new_character和display_invent
目录一.加解密算法数字签名对称加密DES(DataEncryptionStandard)3DES(TripleDES)AES(AdvancedEncryptionStandard)RSA加密法DSA(DigitalSignatureAlgorithm)ECC(EllipticCurvesCryptography)非对称加密签名与加密过程非对称加密的应用对称加密与非对称加密的结合二.数字证书图解一.加解密算法加密简单而言就是通过一种算法将明文信息转换成密文信息,信息的的接收方能够通过密钥对密文信息进行解密获得明文信息的过程。根据加解密的密钥是否相同,算法可以分为对称加密、非对称加密、对称加密和非
在应用开发中,有时候我们需要获取系统的设备信息,用于数据上报和行为分析。那在鸿蒙系统中,我们应该怎么去获取设备的系统信息呢,比如说获取手机的系统版本号、手机的制造商、手机型号等数据。1、获取方式这里分为两种情况,一种是设备信息的获取,一种是系统信息的获取。1.1、获取设备信息获取设备信息,鸿蒙的SDK包为我们提供了DeviceInfo类,通过该类的一些静态方法,可以获取设备信息,DeviceInfo类的包路径为:ohos.system.DeviceInfo.具体的方法如下:ModifierandTypeMethodDescriptionstatic StringgetAbiList()Obt
说在前面这部分我本来是合为一篇来写的,因为目的是一样的,都是通过独立按键来控制LED闪灭本质上是起到开关的作用,即调用函数和中断函数。但是写一篇太累了,我还是决定分为两篇写,这篇是调用函数篇。在本篇中你主要看到这些东西!!!1.调用函数的方法(主要讲语法和格式)2.独立按键如何控制LED亮灭3.程序中的一些细节(软件消抖等)1.调用函数的方法思路还是比较清晰地,就是通过按下按键来控制LED闪灭,即每按下一次,LED取反一次。重要的是,把按键与LED联系在一起。我打算用K1来作为开关,看了一下开发板原理图,K1连接的是单片机的P31口,当按下K1时,P31是与GND相连的,也就是说,当我按下去时
如何找到调用此方法的位置?defto_xml(options={})binding.pryoptions=options.to_hifoptions&&options.respond_to?(:to_h)serializable_hash(options).to_xml(options)end 最佳答案 键入caller。这将返回当前调用堆栈。文档:Kernel#caller.例子[0]%rspecspec10/16|===================================================62=====
Rails相对较新。我正在尝试调用一个API,它应该向我返回一个唯一的URL。我的应用程序中捆绑了HTTParty。我已经创建了一个UniqueNumberController,并且我已经阅读了几个HTTParty指南,直到我想要什么,但也许我只是有点迷路,真的不知道该怎么做。基本上,我需要做的就是调用API,获取它返回的URL,然后将该URL插入到用户的数据库中。谁能给我指出正确的方向或与我分享一些代码? 最佳答案 假设API为JSON格式并返回如下数据:{"url":"http://example.com/unique-url"
我正在写一篇关于在Ruby中几乎一切都是对象的博客文章,我试图通过以下示例来展示这一点:classCoolBeansattr_accessor:beansdefinitialize@bean=[]enddefcount_beans@beans.countendend所以从类中我们可以看出它有4个方法(当然,除非我错了):它可以在创建新实例时初始化一个默认的空bean数组它可以计算它有多少个bean它可以读取它有多少个bean(通过attr_accessor)它可以向空数组写入(或添加)更多bean(也通过attr_accessor)但是,当我询问类本身它有哪些实例方法时,我没有看到默认