2022年11月23日首发于掘金,现在同步到公众号。
11. 前言
大家好,我是若川。推荐点右上方蓝字若川视野把我的公众号设为星标。我倾力持续组织了一年多源码共读,感兴趣的可以加我微信 lxchuan12 参与。另外,想学源码,极力推荐关注我写的专栏《学习源码整体架构系列》,目前是掘金关注人数(4.6k+人)第一的专栏,写有20余篇源码文章。
我们开发业务时经常会使用到组件库,一般来说,很多时候我们不需要关心内部实现。但是如果希望学习和深究里面的原理,这时我们可以分析自己使用的组件库实现。有哪些优雅实现、最佳实践、前沿技术等都可以值得我们借鉴。
相比于原生 JS 等源码。我们或许更应该学习,正在使用的组件库的源码,因为有助于帮助我们写业务和写自己的组件。
如果是 Vue 技术栈,开发移动端的项目,大多会选用 vant 组件库,目前(2022-11-20)star 多达 20.5k,最新版本是 v4.0.0-rc7。我们可以挑选 vant 组件库学习,我会写一个组件库源码系列专栏[1],欢迎大家关注。
这次我们来学习倒计时组件,`countdown`[2]。
学完本文,你将学到:
1. 如何开发一个更优雅的毫秒级渲染的倒计时组件
2. 学会使用 requestAnimationFrame
3. 等等看一个开源项目,我们可以先看 README.md[3] 再看 github/CONTRIBUTING.md[4]
You will need Node.js >= 14[5] and pnpm[6].
# 推荐克隆我的项目
git clone https://github.com/lxchuan12/vant-analysis
cd vant-analysis/vant

# 或者克隆官方仓库
git clone git@github.com:vant-ui/vant.git
cd vant

# 安装依赖,如果没安装 pnpm,可以用 npm i pnpm -g 安装,或者查看官网通过其他方式安装
pnpm i

# 启动服务
pnpm dev
执行 pnpm dev 后,这时我们打开倒计时组件 http://localhost:5173/#/zh-CN/count-down。
在各种电商类或者其他的移动端页面中,倒计时真的是太常见了。我们自己也基本能够快速的写一个倒计时组件。代码实现参考这里,主要是 JavaScript。码上掘金倒计时初步代码@若川[7]
代码中,我直接使用的 setInterval 和每秒钟执行一次。把倒计时的时候减去1s,当倒计时毫秒数不足时用 clearInterval 清除停止定时器。
但如果要实现毫秒级的倒计时这种方法行不通。 另外 setInterval 这种做法,并不是最优的。 那么,vant 倒计时组件中,是如何处理毫秒级和实现倒计时呢。
带着问题我们直接找到 countdown demo 文件:vant/packages/vant/src/count-down/demo/index.vue。为什么是这个文件,我在之前文章跟着 vant4 源码学习如何用 vue3+ts 开发一个 loading 组件,仅88行代码分析了其原理,感兴趣的小伙伴点击查看。这里就不赘述了。
组件源码中的 TS 代码我不会过多解释。没学过 TS 的小伙伴,推荐学这个TypeScript 入门教程[8]。 另外,vant 使用了 @vue/babel-plugin-jsx[9] 插件来支持 JSX、TSX。

// vant/packages/vant/src/count-down/demo/index.vue
<script setup lang="ts">
import VanGrid from '../../grid';
import VanGridItem from '../../grid-item';
import VanCountDown, { type CountDownInstance } from '..';
import { ref } from 'vue';
import { useTranslate } from '../../../docs/site';
import { showToast } from '../../toast';

const t = useTranslate({
  'zh-CN': {
    reset: '重置',
    pause: '暂停',
    start: '开始',
    finished: '倒计时结束',
    millisecond: '毫秒级渲染',
    customStyle: '自定义样式',
    customFormat: '自定义格式',
    manualControl: '手动控制',
    formatWithDay: 'DD 天 HH 时 mm 分 ss 秒',
  },
});

const time = ref(30 * 60 * 60 * 1000);
const countDown = ref<CountDownInstance>();

// 开始
const start = () => {
  countDown.value?.start();
};
// 暂停
const pause = () => {
  countDown.value?.pause();
};
// 重置
const reset = () => {
  countDown.value?.reset();
};
const onFinish = () => showToast(t('finished'));
</script>

<template>

  <!-- 基本使用 -->
  <demo-block :title="t('basicUsage')">
    <van-count-down :time="time" />
  </demo-block>

  <!-- 自定义渲染 -->
  <demo-block :title="t('customFormat')">
    <van-count-down :time="time" :format="t('formatWithDay')" />
  </demo-block>

  <!-- 毫秒级渲染 -->
  <demo-block :title="t('millisecond')">
    <van-count-down millisecond :time="time" format="HH:mm:ss:SS" />
  </demo-block>

  <!-- 自定义样式-->
  <demo-block :title="t('customStyle')">
    <van-count-down :time="time">
      <template #default="currentTime">
        <span class="block">{{ currentTime.hours }}</span>
        <span class="colon">:</span>
        <span class="block">{{ currentTime.minutes }}</span>
        <span class="colon">:</span>
        <span class="block">{{ currentTime.seconds }}</span>
      </template>
    </van-count-down>
  </demo-block>

  <!-- 手动控制 -->
  <demo-block :title="t('manualControl')">
    <van-count-down
      ref="countDown"
      millisecond
      :time="3000"
      :auto-start="false"
      format="ss:SSS"
      @finish="onFinish"
    />
    <van-grid clickable :column-num="3">
      <van-grid-item icon="play-circle-o" :text="t('start')" @click="start" />
      <van-grid-item icon="pause-circle-o" :text="t('pause')" @click="pause" />
      <van-grid-item icon="replay" :text="t('reset')" @click="reset" />
    </van-grid>
  </demo-block>
</template>
从 demo 文件中,我们可以看出 import VanCountDown, { type CountDownInstance } from '..';,引入自 vant/packages/vant/src/count-down/index.ts。我们继续来看入口 index.ts。
主要就是导出一下类型和变量等。
// vant/packages/vant/src/count-down/index.ts
import { withInstall } from '../utils';
import _CountDown from './CountDown';

export const CountDown = withInstall(_CountDown);
// 默认导出
// import xxx from 'vant'
export default CountDown;
export { countDownProps } from './CountDown';
export type { CountDownProps } from './CountDown';
export type {
  CountDownInstance,
  CountDownThemeVars,
  CountDownCurrentTime,
} from './types';

declare module 'vue' {
  export interface GlobalComponents {
    VanCountDown: typeof CountDown;
  }
}
withInstall 函数在之前文章5.1 withInstall 给组件对象添加 install 方法 也有分析,这里就不赘述了。
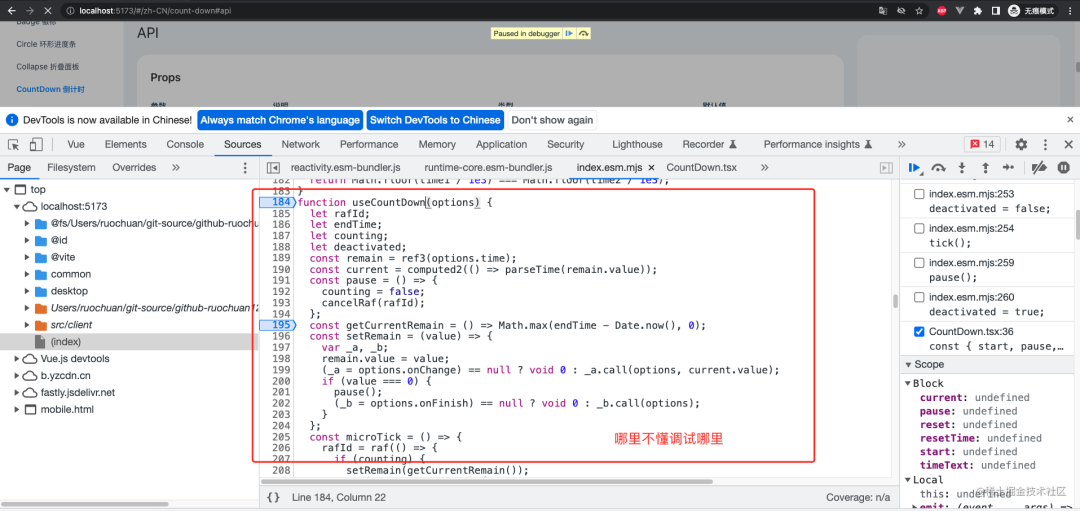
我们可以在这些文件,任意位置加上 debugger 调试源码。
截两张调试图。
调试 Countdown setup。
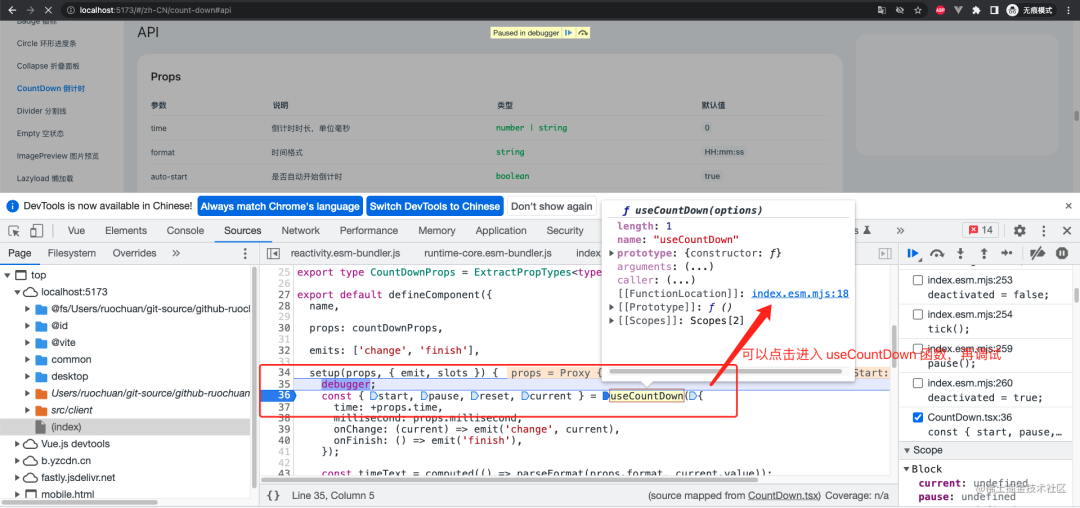
调试 useCountDown。
我们跟着调试,继续分析 Countdown。
// vant/packages/vant/src/count-down/CountDown.tsx
import { watch, computed, defineComponent, type ExtractPropTypes } from 'vue';

// Utils
import {
  truthProp,
  makeStringProp,
  makeNumericProp,
  createNamespace,
} from '../utils';
import { parseFormat } from './utils';

// Composables
import { useCountDown } from '@vant/use';
import { useExpose } from '../composables/use-expose';

const [name, bem] = createNamespace('count-down');

export const countDownProps = {
  time: makeNumericProp(0),
  format: makeStringProp('HH:mm:ss'),
  autoStart: truthProp,
  millisecond: Boolean,
};

export type CountDownProps = ExtractPropTypes<typeof countDownProps>;

export default defineComponent({
  name,

  props: countDownProps,

  emits: ['change', 'finish'],

  setup(props, { emit, slots }) {
    // 代码省略,下文叙述
  },
});这一部分主要使用了useCountDown。
setup(props, { emit, slots }) {
  // useCountDown 组合式 API
  const { start, pause, reset, current } = useCountDown({
    // 传入的时间毫秒数,+ 是字符串转数字
    time: +props.time,
    // 毫秒级渲染
    millisecond: props.millisecond,
    // 回调事件,onChange, onFinish
    onChange: (current) => emit('change', current),
    onFinish: () => emit('finish'),
  });

  // 格式化时间
  const timeText = computed(() => parseFormat(props.format, current.value));

  // 重置,重新开始
  const resetTime = () => {
    reset(+props.time);

    if (props.autoStart) {
      start();
    }
  };

  watch(() => props.time, resetTime, { immediate: true });

  // 导出 start、pause、reset
  useExpose({
    start,
    pause,
    reset: resetTime,
  });

  return () => (
    // 有传入插槽,使用插槽,支持自定义样式,传入解析后的时间对象
    <div role="timer" class={bem()}>
      {slots.default ? slots.default(current.value) : timeText.value}
    </div>
  );
},import { getCurrentInstance } from 'vue';
import { extend } from '../utils';
// expose public api
export function useExpose<T = Record<string, any>>(apis: T) {
const instance = getCurrentInstance();
// 合并到 getCurrentInstance().proxy 上
if (instance) {
extend(instance.proxy as object, apis);
}
}通过 ref 可以获取到 Countdown 实例并调用实例方法,详见组件实例方法[10]。
Vant中的许多组件提供了实例方法,调用实例方法时,我们需要通过ref来注册组件引用信息,引用信息将会注册在父组件的$refs对象上。注册完成后,我们可以通过this.$refs.xxx或者
const xxxRef = ref();
xxxRef.value.xxx();
访问到对应的组件实例,并调用上面的实例方法。
// vant/packages/vant-use/src/useCountDown/index.ts
import {
  ref,
  computed,
  onActivated,
  onDeactivated,
  onBeforeUnmount,
} from 'vue';
import { raf, cancelRaf, inBrowser } from '../utils';

export type CurrentTime = {
  days: number;
  hours: number;
  total: number;
  minutes: number;
  seconds: number;
  milliseconds: number;
};

export type UseCountDownOptions = {
  time: number;
  // 毫秒
  millisecond?: boolean;
  onChange?: (current: CurrentTime) => void;
  onFinish?: () => void;
};

const SECOND = 1000;
const MINUTE = 60 * SECOND;
const HOUR = 60 * MINUTE;
const DAY = 24 * HOUR;

// 解析时间
function parseTime(time: number): CurrentTime {
  const days = Math.floor(time / DAY);
  const hours = Math.floor((time % DAY) / HOUR);
  const minutes = Math.floor((time % HOUR) / MINUTE);
  const seconds = Math.floor((time % MINUTE) / SECOND);
  const milliseconds = Math.floor(time % SECOND);

  return {
    total: time,
    days,
    hours,
    minutes,
    seconds,
    milliseconds,
  };
}以上这大段代码,parseTime 是主要函数,解析时间,生成天数、小时、分钟、秒、毫秒的对象。
真实逻辑这一段可以不用细看。可以调试时再细看。
主要就是利用 Date.now() 会自己走的原理。
初始化开始:结束时间 = 当前时间戳 + 剩余时间
获取:剩余时间 = 结束时间 - 当前时间戳
加上自己定时器逻辑循环
剩余时间就是真实流逝的时间
如果是毫秒级渲染,就直接赋值剩余时间
如果不是,那就判断是同一秒才赋值
设计的十分巧妙,看到这里,我们可能感慨:不得不佩服。
// 简化版 一
const useCountDown = (options) => {
  let endTime;
  let remain = options.time;
  const getCurrentRemain = () => Math.max(endTime - Date.now(), 0);
  const start = () => {
    endTime = Date.now() + remain;
  }
  const setRemain = (value) => {
    remain = value;
  };
  return {
    start,
  }
}
const { start } = useCountDown({time: 3 * 1000});
start();
码上掘金倒计时简化版二
码上掘金倒计时简化版二@若川[11]
// vant/packages/vant-use/src/useCountDown/index.ts
function isSameSecond(time1: number, time2: number): boolean {
  return Math.floor(time1 / 1000) === Math.floor(time2 / 1000);
}

export function useCountDown(options: UseCountDownOptions) {
  let rafId: number;
  let endTime: number;
  let counting: boolean;
  let deactivated: boolean;

  const remain = ref(options.time);
  const current = computed(() => parseTime(remain.value));

  const pause = () => {
    counting = false;
    cancelRaf(rafId);
  };

  const getCurrentRemain = () => Math.max(endTime - Date.now(), 0);

  const setRemain = (value: number) => {
    remain.value = value;
    options.onChange?.(current.value);

    if (value === 0) {
      pause();
      options.onFinish?.();
    }
  };

  const microTick = () => {
    rafId = raf(() => {
      // in case of call reset immediately after finish
      if (counting) {
        setRemain(getCurrentRemain());

        if (remain.value > 0) {
          microTick();
        }
      }
    });
  };

  const macroTick = () => {
    rafId = raf(() => {
      // in case of call reset immediately after finish
      if (counting) {
        const remainRemain = getCurrentRemain();

        if (!isSameSecond(remainRemain, remain.value) || remainRemain === 0) {
          setRemain(remainRemain);
        }

        if (remain.value > 0) {
          macroTick();
        }
      }
    });
  };

  const tick = () => {
    // should not start counting in server
    // see: https://github.com/vant-ui/vant/issues/7807
    if (!inBrowser) {
      return;
    }

    if (options.millisecond) {
      microTick();
    } else {
      macroTick();
    }
  };

  const start = () => {
    if (!counting) {
      endTime = Date.now() + remain.value;
      counting = true;
      tick();
    }
  };

  const reset = (totalTime: number = options.time) => {
    pause();
    remain.value = totalTime;
  };

  // 组件被卸载之前被调用
  onBeforeUnmount(pause);

  // 激活
  onActivated(() => {
    if (deactivated) {
      counting = true;
      deactivated = false;
      tick();
    }
  });

  onDeactivated(() => {
    if (counting) {
      pause();
      deactivated = true;
    }
  });

  // 返回方法和当前时间对象
  return {
    start,
    pause,
    reset,
    current,
  };
}
我们继续来看 raf 和 cancelRaf,是如何实现的。
// 判断是不是浏览器环境,你可能会问,为啥要判断?因为 SSR (服务端渲染)不是浏览器环境。
export const inBrowser = typeof window !== 'undefined';

// Keep forward compatible
// should be removed in next major version
export const supportsPassive = true;

export function raf(fn: FrameRequestCallback): number {
  return inBrowser ? requestAnimationFrame(fn) : -1;
}

export function cancelRaf(id: number) {
  if (inBrowser) {
    cancelAnimationFrame(id);
  }
}

// double raf for animation
export function doubleRaf(fn: FrameRequestCallback): void {
  raf(() => raf(fn));
}
上文代码,主要一个 API,requestAnimationFrame、cancelAnimationFrame。
我们这里简单理解为 window.requestAnimationFrame() 中的回调函数,每 16.67ms 执行一次回调函数即可。
也就是类似 setTimeout、clearTimeout
const timeId = setTimeout( () => {
  // 16.67ms 执行一次
  console.log('16.67ms 执行一次');
}, 16.67);

clearTimeout(timeId);
也可以自行搜索这个 API 查阅更多资料。比如 MDN 上的解释。
mdn window.requestAnimationFrame[12]
window.requestAnimationFrame()告诉浏览器——你希望执行一个动画,并且要求浏览器在下次重绘之前调用指定的回调函数更新动画。该方法需要传入一个回调函数作为参数,该回调函数会在浏览器下一次重绘之前执行
回调函数执行次数通常是每秒 60 次,但在大多数遵循 W3C 建议的浏览器中,回调函数执行次数通常与浏览器屏幕刷新次数相匹配。
备注: 若你想在浏览器下次重绘之前继续更新下一帧动画,那么回调函数自身必须再次调用
window.requestAnimationFrame()。
再来看看,组件中,是如何格式化时间的。这个值得我们参考。我们很多时候可能都是写死天数、小时等文案。不支持自定义格式化。
// vant/packages/vant/src/count-down/utils.ts
import { padZero } from '../utils';
import { CurrentTime } from '@vant/use';

export function parseFormat(format: string, currentTime: CurrentTime): string {
  const { days } = currentTime;
  let { hours, minutes, seconds, milliseconds } = currentTime;

  // 有 DD 参数,补零替换,没有则小时数加上天数
  if (format.includes('DD')) {
    format = format.replace('DD', padZero(days));
  } else {
    hours += days * 24;
  }

  // 有 HH 参数,补零替换,没有则分钟数加上小时数
  if (format.includes('HH')) {
    format = format.replace('HH', padZero(hours));
  } else {
    minutes += hours * 60;
  }

  // 有 mm 参数,补零替换,没有则秒数加上分钟数
  if (format.includes('mm')) {
    format = format.replace('mm', padZero(minutes));
  } else {
    seconds += minutes * 60;
  }

  // 有 mm 参数,补零替换,没有则毫秒数加上秒数
  if (format.includes('ss')) {
    format = format.replace('ss', padZero(seconds));
  } else {
    milliseconds += seconds * 1000;
  }

  // 毫秒数 默认补三位数,按照格式最终给出对应的位数
  if (format.includes('S')) {
    const ms = padZero(milliseconds, 3);

    if (format.includes('SSS')) {
      format = format.replace('SSS', ms);
    } else if (format.includes('SS')) {
      format = format.replace('SS', ms.slice(0, 2));
    } else {
      format = format.replace('S', ms.charAt(0));
    }
  }

  // 最终返回格式化的数据
  return format;
}// vant/packages/vant-compat/node_modules/vant/src/utils/format.ts
// 补零操作
export function padZero(num: Numeric, targetLength = 2): string {
let str = num + '';
while (str.length < targetLength) {
str = '0' + str;
}
return str;
}行文自此,我们就分析完了毫秒级渲染的倒计时组件的实现。
我们来简单总结下。通过 demo 文件调试,入口文件,主文件,useCountDown 组合式 API,插槽等。 分析了自定义格式、毫秒级渲染、自定义样式(利用插槽)等功能的实现。
其中毫秒级渲染,主要就是利用 Date.now() 和 (window.requestAnimationFrame)每 16.67ms 执行一次回调函数。
大致流程如下:
初始化开始:结束时间 = 当前时间戳 + 剩余时间
获取:剩余时间 = 结束时间 - 当前时间戳
加上自己定时器逻辑循环(`window.requestAnimationFrame`)每 16.67ms 执行一次回调函数
剩余时间就是真实流逝的时间
如果是毫秒级渲染,就直接赋值剩余时间
如果不是,那就判断是同一秒才赋值
看完这篇源码文章,再去看 CountDown 组件文档[13],可能就会有豁然开朗的感觉。再看其他组件,可能就可以猜测出大概实现的代码了。
如果是使用 react、Taro 技术栈,感兴趣也可以看看 taroify CountDown 组件的实现 文档[14],源码[15]。
如果看完有收获,欢迎点赞、评论、分享支持。你的支持和肯定,是我写作的动力。
[1]
组件库源码系列专栏: https://juejin.cn/column/7140264842954276871
[2]countdown: https://vant-contrib.gitee.io/vant/v4/#/zh-CN/count-down
README.md: https://github.com/youzan/vant
[4]github/CONTRIBUTING.md: https://github.com/youzan/vant/blob/main/.github/CONTRIBUTING.md
[5]Node.js >= 14: https://nodejs.org
[6]pnpm: https://pnpm.io
[7]码上掘金倒计时初步代码@若川: https://code.juejin.cn/pen/7167966535649230883
[8]TypeScript 入门教程: http://ts.xcatliu.com/
[9]@vue/babel-plugin-jsx: https://www.npmjs.com/package/@vue/babel-plugin-jsx
[10]组件实例方法: https://vant-contrib.gitee.io/vant/v4/#/zh-CN/advanced-usage#zu-jian-shi-li-fang-fa
[11]码上掘金倒计时简化版二@若川: https://code.juejin.cn/pen/7168892330752081928
[12]mdn window.requestAnimationFrame: https://developer.mozilla.org/zh-CN/docs/Web/API/Window/requestAnimationFrame
[13]CountDown 组件文档: https://vant-contrib.gitee.io/vant/#/zh-CN/count-down
[14]文档: https://taroify.gitee.io/taroify.com/components/countdown
[15]源码: https://github.com/mallfoundry/taroify/tree/main/packages/core/src/countdown

················· 若川简介 ·················
你好,我是若川,毕业于江西高校。现在是一名前端开发“工程师”。写有《学习源码整体架构系列》20余篇,在知乎、掘金收获超百万阅读。
从2014年起,每年都会写一篇年度总结,已经坚持写了8年,点击查看年度总结。
同时,持续组织了一年多源码共读活动,帮助5000+前端人学会看源码。公众号愿景:帮助5年内前端人走向前列。

扫码加我微信 lxchuan12、拉你进源码共读群
今日话题
目前建有江西|湖南|湖北 籍 前端群,想进群的可以加我微信 lxchuan12 进群。分享、收藏、点赞、在看我的文章就是对我最大的支持~
项目介绍随着我国经济迅速发展,人们对手机的需求越来越大,各种手机软件也都在被广泛应用,但是对于手机进行数据信息管理,对于手机的各种软件也是备受用户的喜爱小学生兴趣延时班预约小程序的设计与开发被用户普遍使用,为方便用户能够可以随时进行小学生兴趣延时班预约小程序的设计与开发的数据信息管理,特开发了小程序的设计与开发的管理系统。小学生兴趣延时班预约小程序的设计与开发的开发利用现有的成熟技术参考,以源代码为模板,分析功能调整与小学生兴趣延时班预约小程序的设计与开发的实际需求相结合,讨论了小学生兴趣延时班预约小程序的设计与开发的使用。开发环境开发说明:前端使用微信微信小程序开发工具:后端使用ssm:VU
在Ruby中,以毫秒为单位获取自纪元(1970)以来的当前系统时间的正确方法是什么?我试过了Time.now.to_i,好像不是我想要的结果。我需要结果显示毫秒并且使用long类型,而不是float或double。 最佳答案 (Time.now.to_f*1000).to_iTime.now.to_f显示包含十进制数字的时间。要获得毫秒数,只需将时间乘以1000。 关于ruby-以毫秒为单位获取当前系统时间,我们在StackOverflow上找到一个类似的问题:
我正在寻找一个用ruby演示计时器的在线示例,并发现了下面的代码。它按预期工作,但这个简单的程序使用30Mo内存(如Windows任务管理器中所示)和太多CPU有意义吗?非常感谢deftime_blockstart_time=Time.nowThread.new{yield}Time.now-start_timeenddefrepeat_every(seconds)whiletruedotime_spent=time_block{yield}#Tohandle-vesleepinteravalsleep(seconds-time_spent)iftime_spent
@scores_raw.eachdo|score_raw|#belowiscodeiftimewasbeingsentinmillisecondshh=((score_raw.score.to_i)/100)/3600mm=(hh-hh.to_i)*60ss=(mm-mm.to_i)*60crumbs=[hh,mm,ss]sum=crumbs.first.to_i*3600+crumbs[1].to_i*60+crumbs.last.to_i@scoressum,:hms=>hh.round.to_s+":"+mm.round.to_s+":"+ss.round.to_s}@score
目录0专栏介绍1平面2R机器人概述2运动学建模2.1正运动学模型2.2逆运动学模型2.3机器人运动学仿真3动力学建模3.1计算动能3.2势能计算与动力学方程3.3动力学仿真0专栏介绍?附C++/Python/Matlab全套代码?课程设计、毕业设计、创新竞赛必备!详细介绍全局规划(图搜索、采样法、智能算法等);局部规划(DWA、APF等);曲线优化(贝塞尔曲线、B样条曲线等)。?详情:图解自动驾驶中的运动规划(MotionPlanning),附几十种规划算法1平面2R机器人概述如图1所示为本文的研究本体——平面2R机器人。对参数进行如下定义:机器人广义坐标
网站的日志分析,是seo优化不可忽视的一门功课,但网站越大,每天产生的日志就越大,大站一天都可以产生几个G的网站日志,如果光靠肉眼去分析,那可能看到猴年马月都看不完,因此借助网站日志分析工具去分析网站日志,那将会使网站日志分析工作变得更简单。下面推荐两款网站日志分析软件。第一款:逆火网站日志分析器逆火网站日志分析器是一款功能全面的网站服务器日志分析软件。通过分析网站的日志文件,不仅能够精准的知道网站的访问量、网站的访问来源,网站的广告点击,访客的地区统计,搜索引擎关键字查询等,还能够一次性分析多个网站的日志文件,让你轻松管理网站。逆火网站日志分析器下载地址:https://pan.baidu.
参考文章搭建文章gitte源码在线体验可以注册两个号来测试演示图:一.整体介绍 介绍SignalR一种通讯模型Hub(中心模型,或者叫集线器模型),调用这个模型写好的方法,去发送消息。 内容有: ①:Hub模型的方法介绍 ②:服务器端代码介绍 ③:前端vue3安装并调用后端方法 ④:聊天室样例整体流程:1、进入网站->调用连接SignalR的方法2、与好友发送消息->调用SignalR的自定义方法 前端通过,signalR内置方法.invoke() 去请求接口3、监听接受方法(渲染消息)通过new signalR.HubConnectionBuilder().on
一、机器人介绍 此处是基于MATLABRVC工具箱,对ABB-IRB-1200型号的微型机械臂进行正逆向运动学分析,并利Simulink工具实现对机械臂进行具有动力学参数的末端轨迹规划仿真,最后根据机械模型设计Simulink-Adams联合仿真。 图1.ABBIRB 1200尺寸参数示意图ABBIRB 1200提供的两种型号广泛适用于各作业,且两者间零部件通用,两种型号的工作范围分别为700 mm 和 900 mm,大有效负载分别为 7 kg 和5 kg。 IRB 1200 能够在狭小空间内能发挥其工作范围与性能优势,具有全新的设计、小型化的体积、高效的性能、易于集成、便捷的接
目录一.大致如下常见问题:(1)找不到程序所依赖的Qt库version`Qt_5'notfound(requiredby(2)CouldnotLoadtheQtplatformplugin"xcb"in""eventhoughitwasfound(3)打包到在不同的linux系统下,或者打包到高版本的相同系统下,运行程序时,直接提示段错误即segmentationfault,或者Illegalinstruction(coredumped)非法指令(4)ldd应用程序或者库,查看运行所依赖的库时,直接报段错误二.问题逐个分析,得出解决方法:(1)找不到程序所依赖的Qt库version`Qt_5'
我想使用ruby-prof和JMeter分析Rails应用程序。我对分析特定Controller/操作/或模型方法的建议方法不感兴趣,我想分析完整堆栈,从上到下。所以我运行这样的东西:RAILS_ENV=productionruby-prof-fprof.outscript/server>/dev/null然后我在上面运行我的JMeter测试计划。然而,问题是使用CTRL+C或SIGKILL中断它也会在ruby-prof可以写入任何输出之前杀死它。如何在不中断ruby-prof的情况下停止mongrel服务器? 最佳答案