最近打火机与公主裙电视剧追疯了!!!谁还没有李峋爱心代码!!快来领!!沉浸式追剧大学生今天午觉没睡怒干爱心代码现有三分资源如下:
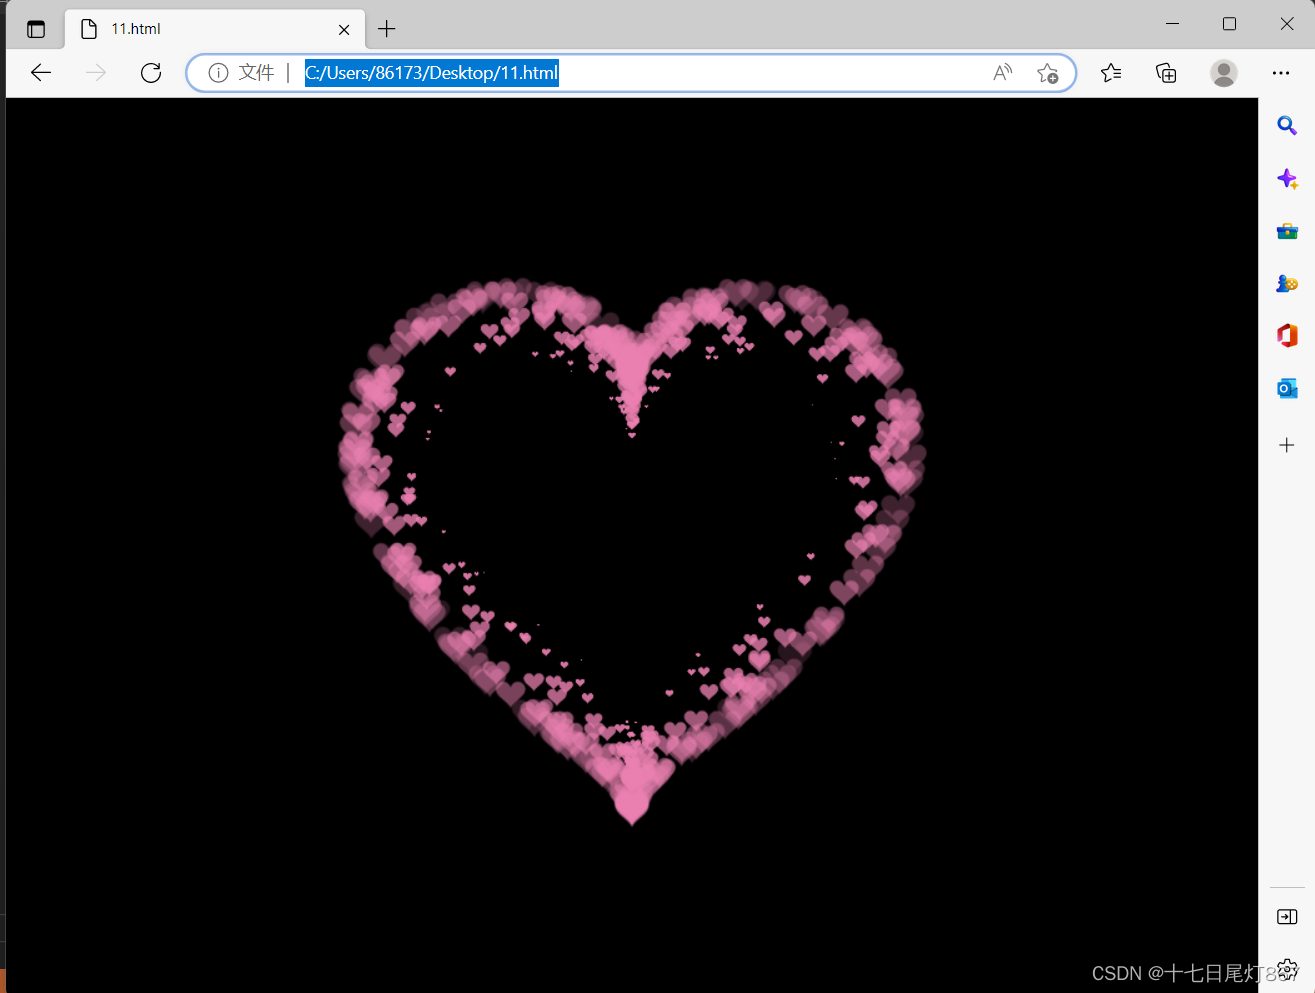
效果:
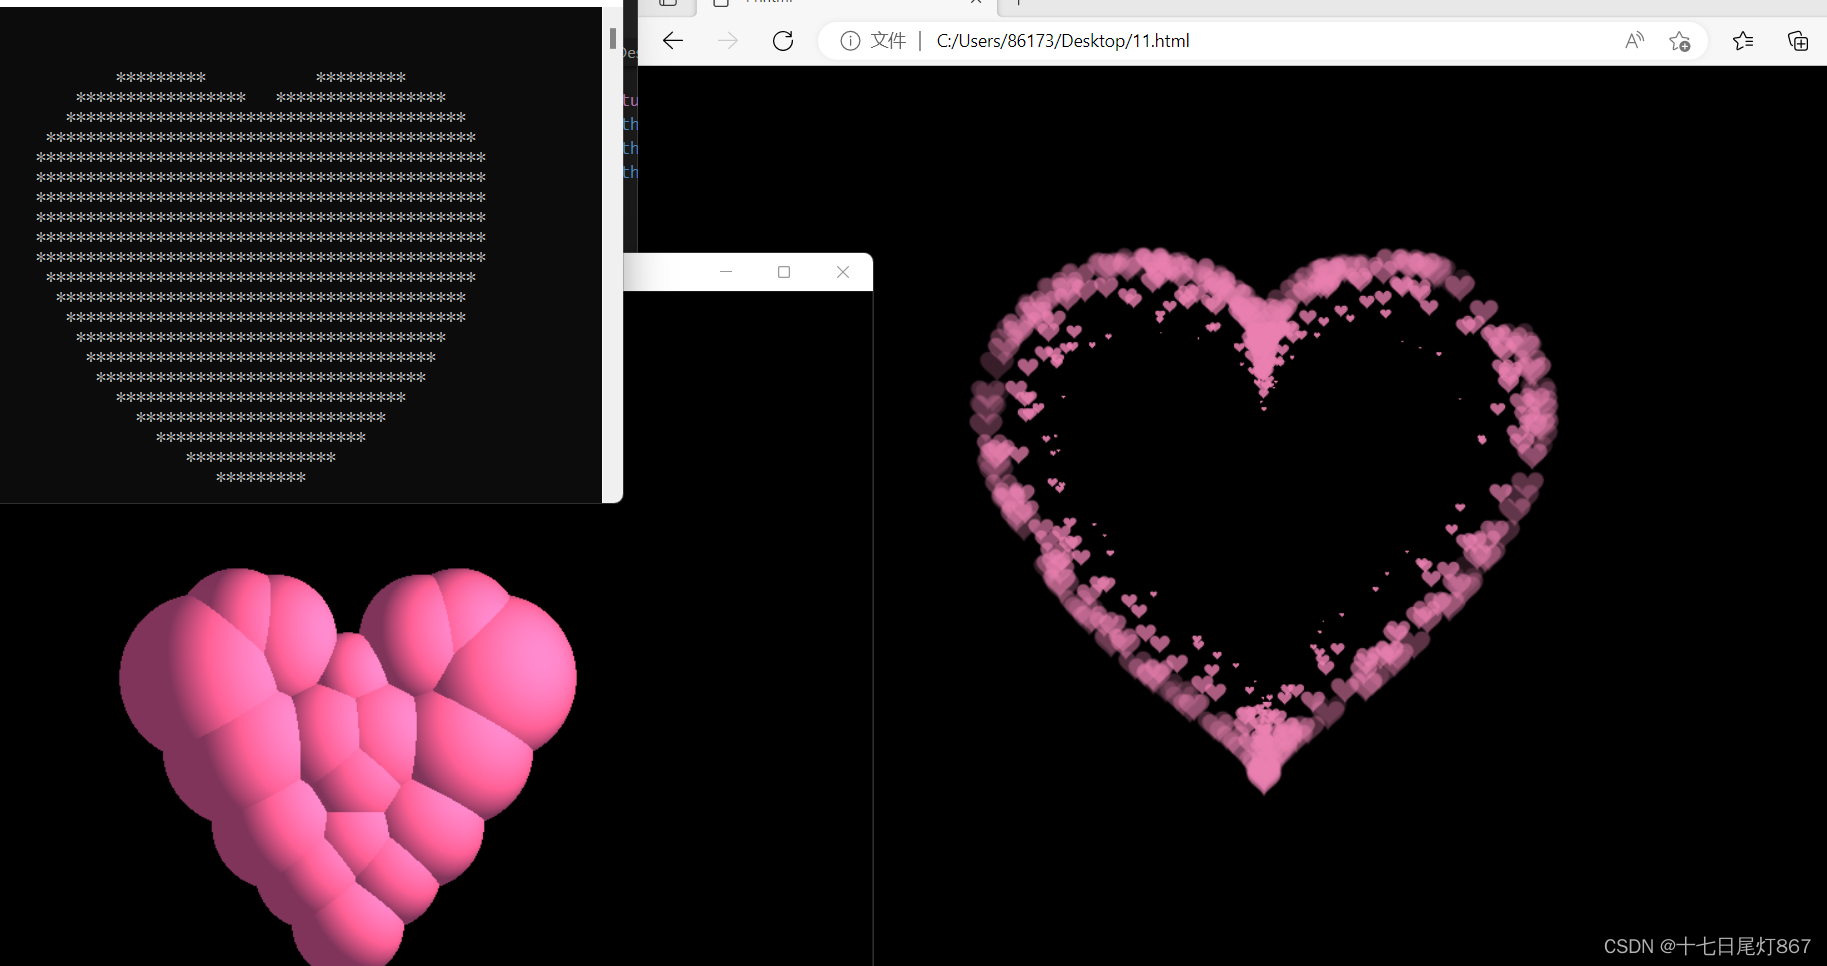
1)、公主两个for循环二维C++控制台输出爱心;
2)、原创C++语言利用openGL库实现三维动态旋转粉色爱心;
以上两者可以在一个代码文件中同时实现,所以写在了一起,全部代码包括注释实现如下所示:
注:前提是安装了OpenGL库!
#include "stdlib.h"
#include "glut.h"
#include <time.h>
#include<iostream>
#define STEP 1.0f
#pragma comment(lib,"glut32.lib")
using namespace std;
//#define _USE_MATH_DEFINES //用到math里面的宏常量
#include <math.h>
GLfloat w = 840;
GLfloat h = 800;
double rotate_x = 0.0;//选转
double rotate_y = 0.0;
double rotate_z = 0.0;


 // 对颜色的宏定义
# define  Hotpink  255.0/255.0, 105.0/255.0,  180.0/255.0
# define sunshine 255.0/255.0, 210.0/255.0, 166.0/255.0
#define BMP_Header_Length 54  //图像数据在内存块中的偏移量


// 旋转初始的角度
GLfloat angle = 0.0f;
// 设置旋转轴:两个三维的点确定的旋转轴
GLfloat axis[][3] = {
	0.0f, 0.5f, 0.5f,
	1.0f, 0.5f, 0.5f
};


GLfloat tra[3] = { -300, 0, -470 };


//材质参数
GLfloat matiral_specular[4] = { 0.00, 0.00, 0.00, 1.00 };  //材质参数:镜面反射,所得到的光的强度(颜色)
GLfloat matiral_emission[4] = { 0.00, 0.00, 0.00, 1.00 };  //材质本身就微微的向外发射光线
const GLfloat matiral_shininess = 11.00;


void setMetiral(GLfloat matiral_diffuse_ambient[4])
{
	//设置颜色
	glMaterialfv(GL_FRONT_AND_BACK, GL_AMBIENT_AND_DIFFUSE, matiral_diffuse_ambient); //设置相同值更逼真
	//设置参数
	glMaterialfv(GL_FRONT_AND_BACK, GL_SPECULAR, matiral_specular);  //镜面反射,所得到的光的强度(颜色)
	glMaterialfv(GL_FRONT_AND_BACK, GL_EMISSION, matiral_emission);  //材质本身就微微的向外发射光线,以至于眼睛感觉到它有这样的颜色
	glMaterialf(GL_FRONT_AND_BACK, matiral_shininess, 0);   //“镜面指数”(0~128) 该值越小,材质越粗糙,点光源发射的光线照射到上面,也可以产生较大的亮点。该值越大,表示材质越类似于镜面,光源照射到上面后,产生较小的亮点。

}


void display(void)
{
	glClear(GL_COLOR_BUFFER_BIT | GL_DEPTH_BUFFER_BIT);
	glMatrixMode(GL_MODELVIEW);
	glLoadIdentity();          //增加M矩阵
	glRotatef(rotate_x, 1.0, 0.0, 0.0);//绕x轴旋转
	glRotatef(rotate_y, 0.0, 1.0, 0.0);
	glRotatef(rotate_z, 0.0, 0.0, 1.0);

	glTranslatef(tra[0], tra[1], tra[2]);//平移


	// 设置绕给定的轴旋转
	glTranslatef(300, 0, 0);
	glRotatef(angle, axis[1][1] - axis[0][1], axis[0][0] - axis[1][0], axis[1][2] - axis[0][2]);
	glTranslatef(-300, 0, 0);


	**************************************爱心*************
	glColor3f(Hotpink);
	glTranslatef(300, 200, 0);//1
	glutSolidSphere(70.0, 200, 200);//(半径/球面数)
    glTranslatef(-300, -200, 0);

	glColor3f(Hotpink);
	glTranslatef(540, 200, 0);//2
	glutSolidSphere(130.0, 200, 200);//(半径/球面数)
	glTranslatef(-540, -200, 0);

	glColor3f(Hotpink);
	glTranslatef(60, 200, 0);//3
	glutSolidSphere(130.0, 200, 200);//(半径/球面数)
	glTranslatef(-60, -200, 0);

	glColor3f(Hotpink);
	glTranslatef(180, 260, 0);//4
	glutSolidSphere(100.0, 200, 200);//(半径/球面数)
	glTranslatef(-180, -260, 0);

	glColor3f(Hotpink);
	glTranslatef(420, 260, 0);//5
	glutSolidSphere(100.0, 200, 200);//(半径/球面数)
	glTranslatef(-420, -260, 0);

	glColor3f(Hotpink);
	glTranslatef(300, -180, 0);//6
	glutSolidSphere(90.0, 200, 200);//(半径/球面数)
	glTranslatef(-300, 180, 0);

	glColor3f(Hotpink);
	glTranslatef(420, -28, 0);//7
	glutSolidSphere(100.0, 200, 200);//(半径/球面数)
	glTranslatef(-420, 28, 0);

	glColor3f(Hotpink);
	glTranslatef(180, -28, 0);//8
	glutSolidSphere(100.0, 200, 200);//(半径/球面数)
	glTranslatef(-180, 28, 0);

	glColor3f(Hotpink);
	glTranslatef(480, 90, 0);//9
	glutSolidSphere(120.0, 200, 200);//(半径/球面数)
	glTranslatef(-480, -90, 0);

	glColor3f(Hotpink);
	glTranslatef(120, 90, 0);//10
	glutSolidSphere(120.0, 200, 200);//(半径/球面数)
	glTranslatef(-120, -90, 0);

	glColor3f(Hotpink);
	glTranslatef(120, 270, 0);//11
	glutSolidSphere(100.0, 200, 200);//(半径/球面数)
	glTranslatef(-120, -270, 0);

	glColor3f(Hotpink);
	glTranslatef(480, 270, 0);//12
	glutSolidSphere(100.0, 200, 200);//(半径/球面数)
	glTranslatef(-480, -270, 0);

	glColor3f(Hotpink);
	glTranslatef(240, -100, 0);//13
	glutSolidSphere(90.0, 200, 200);//(半径/球面数)
	glTranslatef(-240, 100, 0);

	glColor3f(Hotpink);
	glTranslatef(360, -100, 0);//14
	glutSolidSphere(90.0, 200, 200);//(半径/球面数)
	glTranslatef(-360, 100, 0);

	glColor3f(Hotpink);
	glTranslatef(300, -50, 0);//15
	glutSolidSphere(90.0, 200, 200);//(半径/球面数)
	glTranslatef(-300, 50, 0);

	glColor3f(Hotpink);
	glTranslatef(300, 50, 0);//16
	glutSolidSphere(100.0, 200, 200);//(半径/球面数)
	glTranslatef(-300, -50, 0);

	glColor3f(Hotpink);
	glTranslatef(260, 100, 0);//17
	glutSolidSphere(100.0, 200, 200);//(半径/球面数)
	glTranslatef(-260, -100, 0);

	glColor3f(Hotpink);
	glTranslatef(340, 100, 0);//18
	glutSolidSphere(100.0, 200, 200);//(半径/球面数)
	glTranslatef(-340, -100, 0);

	//glColor3f(Hotpink);
	//glTranslatef(300, 40, -50);//19
	//glutSolidSphere(200.0, 200, 200);//(半径/球面数)
	//glTranslatef(-300, -40, 50);
	//***************************************************


	glFlush();  // 刷新
	glutSwapBuffers();//双缓冲
}


// 窗口大小变化回调函数
void reshape(int w, int h) {
	glViewport(0, 0, w, h);//定义视口大小
	glMatrixMode(GL_PROJECTION);//为投影变换指定当前矩阵
	glLoadIdentity();//设置当前矩阵为单位矩阵
	gluPerspective(90.0, (GLfloat)w / (GLfloat)h, 0.1, 100000.0);//设置透视投影矩阵,指定了要观察的视景体在世界坐标系中的具体大小
	//(视角,横纵比,近处裁面,远处裁面)
	glMatrixMode(GL_MODELVIEW);
	glLoadIdentity();
}

// 动画所需的定时器回调函数

void timer_function(GLint value)
{
	// 旋转角度增加
	angle += STEP;
	// 若角度大于360转完一圈则清零
	if (angle > 360.0) angle -= 360.0;
	glutPostRedisplay();
	glutTimerFunc(33, timer_function, value);
}


void init(void)
{

	GLfloat sun_direction[] = { 700.0, 400.0, 100.0, 1.0 };
	GLfloat sun_intensity[] = { sunshine, 1.0 };
	GLfloat ambient_intensity[] = { 0.5, 0.5, 0.5, 1.0 };//周围环境的强度

    glEnable(GL_LIGHTING);              // Set up ambient light.环境光
	glLightModelfv(GL_LIGHT_MODEL_AMBIENT, ambient_intensity);//全局光照


	glEnable(GL_LIGHT0);                // Set up sunlight.漫反射
	glLightfv(GL_LIGHT0, GL_POSITION, sun_direction);
	glLightfv(GL_LIGHT0, GL_DIFFUSE, sun_intensity);

	glEnable(GL_COLOR_MATERIAL);  //如果在光照下希望模型的颜色可以起作用,需要启动颜色材料模式:
	glColorMaterial(GL_FRONT, GL_AMBIENT_AND_DIFFUSE);//表示模型的正面接受环境光和散射光

	glLineWidth(5);
	glClearColor(0.0, 0.0, 0.0, 0.0);      //定义背景颜色-->  black


	//允许二维映射
	glEnable(GL_MAP2_VERTEX_3);
	//二维映射:x、y方向U和V的参数[0, 1],且中间插值数量为各20个
	glMapGrid2f(20, 0.0, 1.0, 20, 0.0, 1.0);

	//启用反走样
	glEnable(GL_BLEND);
	glEnable(GL_LINE_SMOOTH);
	glHint(GL_LINE_SMOOTH_HINT, GL_FASTEST);  // (指定反走样线段的采样质量,选择速度最快选项)
	glBlendFunc(GL_SRC_ALPHA, GL_ONE_MINUS_SRC_ALPHA);


	glEnable(GL_BLEND); // 打开颜色混合
	glDisable(GL_DEPTH_TEST); // 关闭深度测试
	glBlendFunc(GL_SRC_ALPHA, GL_ONE); // 基于源像素α通道值的半透明混合函数,可以透过窗户看房内
	glEnable(GL_DEPTH_TEST); //打开深度测试

	glMatrixMode(GL_PROJECTION);     // 貌似和视角有关的定义 places the camera at (0,0,0) and faces it along(0,0,-1).
	glOrtho(-w, w, -h, h, -w, w); // 创建一个正交平行的视景体。 一般用于物体不会因为离屏幕的远近而产生大小的变换的情况
}


void specialkeys(int key, int x, int y){   //键盘相应函数


	//旋转
	if (key == GLUT_KEY_RIGHT)
		rotate_y -= 1;
	else if (key == GLUT_KEY_LEFT)
		rotate_y += 1;
	else if (key == GLUT_KEY_DOWN)
		rotate_x -= 1;
	else if (key == GLUT_KEY_UP)
		rotate_x += 1;

	glutPostRedisplay();
}


int main(int argc, char** argv)    //  main函数
{

   float x, y, a;
		for (y = 1.5; y > -1.5; y -= 0.1)
		{
			for (x = -1.5; x < 1.5; x += 0.05)
			{
				a = x * x + y * y - 1;
				putchar(a * a * a - x * x * y * y * y <= 0.0 ? '*' : ' ');
			}
			putchar('\n');
		}

	glutInit(&argc, argv);
	glutInitDisplayMode(GLUT_SINGLE | GLUT_RGB);
	glutInitWindowSize(w, h);
	glutInitWindowPosition(100, 100);
	glutCreateWindow("The LOVE");
	init();
	glBlendFunc(GL_SRC_ALPHA, GL_ONE_MINUS_SRC_ALPHA);//源颜色的α作为源因子/1-α作为目标因子
	glEnable(GL_DEPTH_TEST);    //启动深度缓存

	glutSpecialFunc(specialkeys);  //调用键盘控制函数
	glutDisplayFunc(display);
	//glutReshapeFunc(reshape);
	glutTimerFunc(500, timer_function, 1);

	glutIdleFunc(display);//设置空闲时调用的函数

	glutMainLoop();
	//system("pause");
	return 0;
}
实现效果:

3)、李峋爱心html+css+js;
说明:本代码是参考其他博主,方便大家学习借鉴,全部代码也粘贴如下:
(自己新建一个文本文件,以下全部代码粘贴进去,然后将文本文件的格式重命名由.txt改成.html然后直接打开就可以啦)
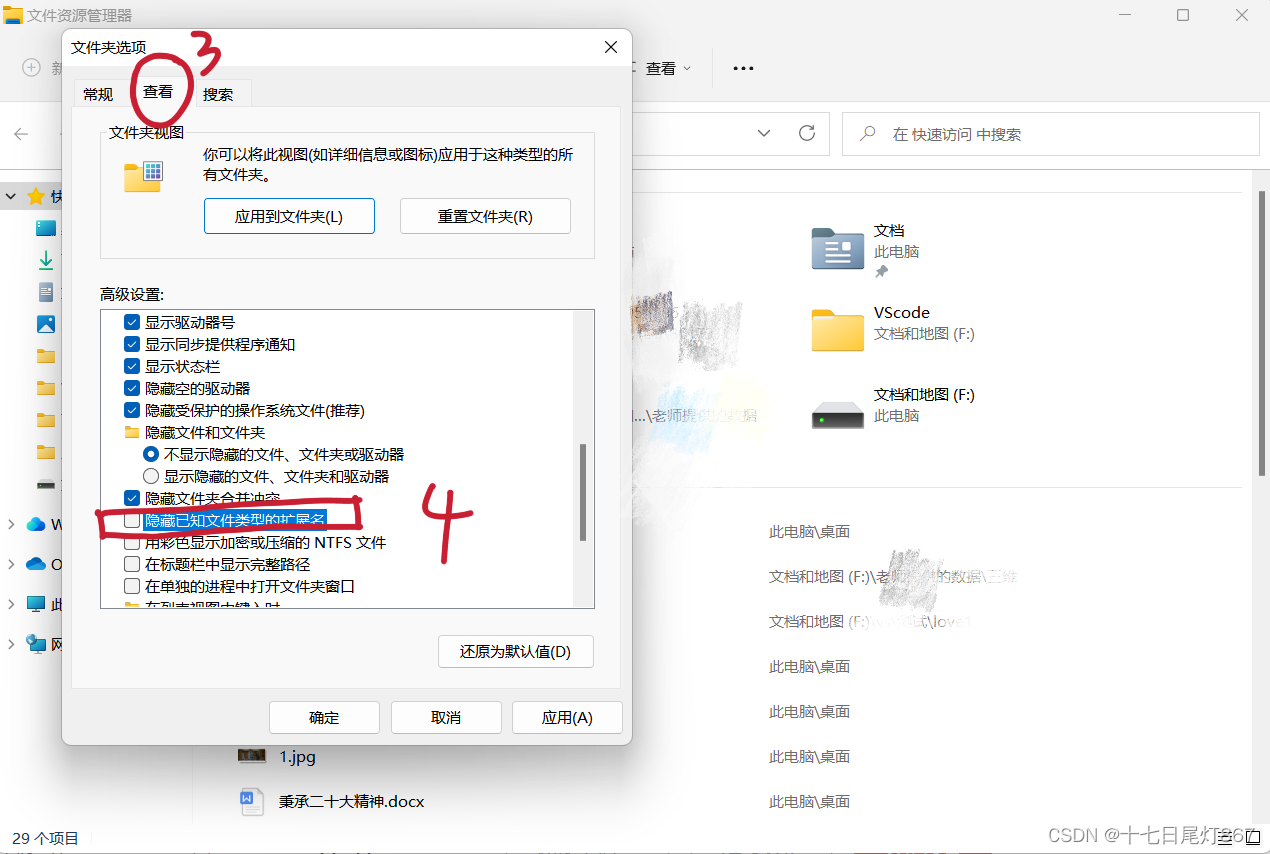
另注:有一部分没有基础的小笨蛋们还会遇到这样的问题(因为我发给我的小伙伴们遇到了QAQ),大家新建文本文件后,一部分人的电脑没有改动前不显示文件格式,即不是名字+.txt的形式,首先需要显示文件格式,才能改文件格式。
显示文件格式如下:
①打开我的电脑,在下图位置1点击三个点 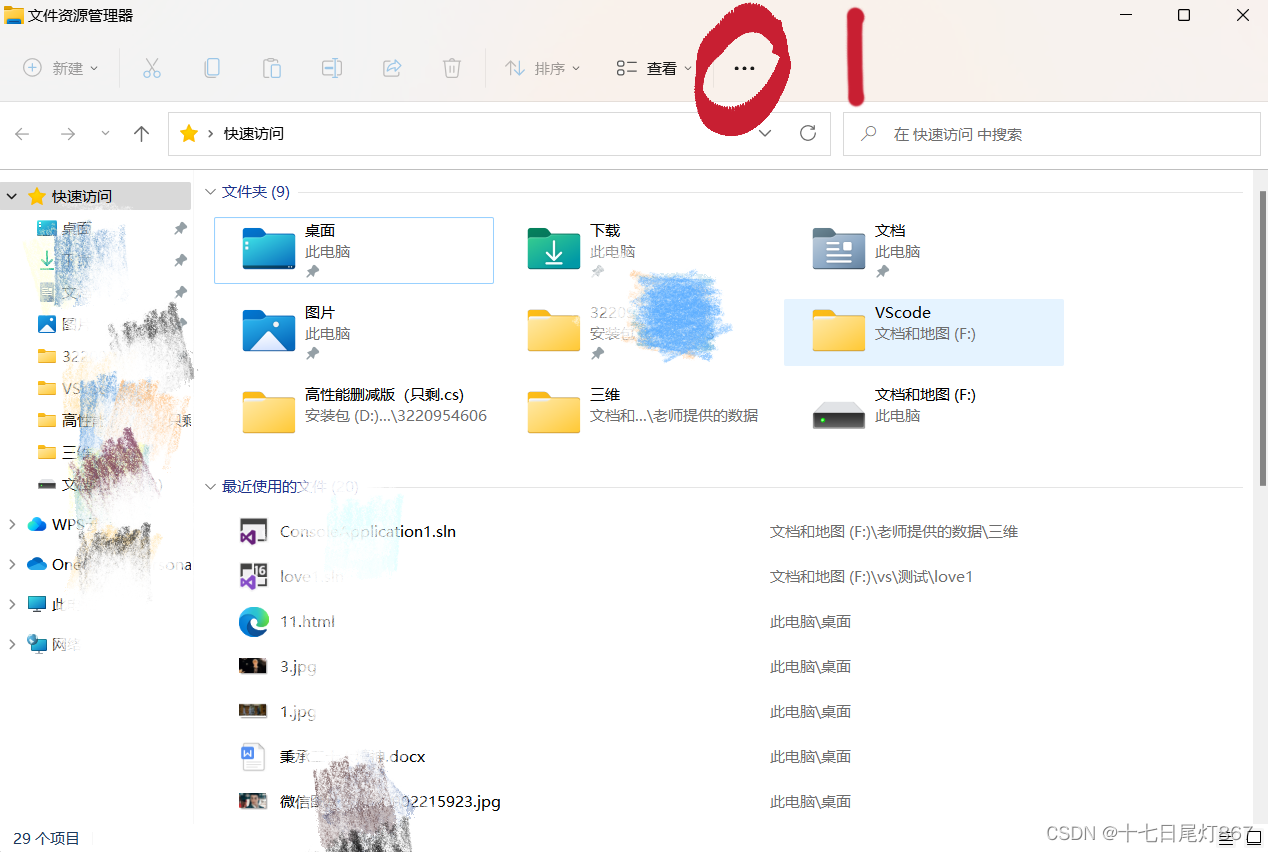
②在位置2点击选项
③打开文件夹选项后,点击位置3查看,之后滑动高级设置滚动栏,找出位置4隐藏已知文件类型的扩展名,将它前面的勾取消即可。然后点击应用,点击确定就完成了!
显示出文件类型之后,将文件后缀.txt改成.htm(重命名改)就可以啦!
全部代码如下:
<!DOCTYPE html>
<html>
  <head>
    <title></title>
    <script src="js/jquery.min.js"></script>
  </head>
  <style>
    * {
      padding: 0;
      margin: 0;
    }
    html,
    body {
      height: 100%;
      padding: 0;
      margin: 0;
      background: #000;
    }

    .aa {
      position: fixed;
      left: 50%;
      bottom: 10px;
      color: #ccc;
    }

    .container {
      width: 100%;
      height: 100%;
    }
    canvas {
      z-index: 99;
      position: absolute;
      width: 100%;
      height: 100%;
    }
  </style>
  <body>
    <!-- 樱花 -->
    <div id="jsi-cherry-container" class="container">
      <audio autoplay="autopaly">
        <source src="renxi.mp3" type="audio/mp3" />
      </audio>
      <img class="img" src="./123.png" alt="" />
      <!-- 爱心 -->
      <canvas id="pinkboard" class="container"> </canvas>
    </div>

  </body>
</html>
<script>
    /*
     * Settings
     */
    var settings = {
      particles: {
        length: 500, // maximum amount of particles
        duration: 2, // particle duration in sec
        velocity: 100, // particle velocity in pixels/sec
        effect: -0.75, // play with this for a nice effect
        size: 30, // particle size in pixels
      },
    };

    (function () {
      var b = 0;
      var c = ["ms", "moz", "webkit", "o"];
      for (var a = 0; a < c.length && !window.requestAnimationFrame; ++a) {
        window.requestAnimationFrame = window[c[a] + "RequestAnimationFrame"];
        window.cancelAnimationFrame =
          window[c[a] + "CancelAnimationFrame"] ||
          window[c[a] + "CancelRequestAnimationFrame"];
      }
      if (!window.requestAnimationFrame) {
        window.requestAnimationFrame = function (h, e) {
          var d = new Date().getTime();
          var f = Math.max(0, 16 - (d - b));
          var g = window.setTimeout(function () {
            h(d + f);
          }, f);
          b = d + f;
          return g;
        };
      }
      if (!window.cancelAnimationFrame) {
        window.cancelAnimationFrame = function (d) {
          clearTimeout(d);
        };
      }
    })();

    /*
     * Point class
     */
    var Point = (function () {
      function Point(x, y) {
        this.x = typeof x !== "undefined" ? x : 0;
        this.y = typeof y !== "undefined" ? y : 0;
      }
      Point.prototype.clone = function () {
        return new Point(this.x, this.y);
      };
      Point.prototype.length = function (length) {
        if (typeof length == "undefined")
          return Math.sqrt(this.x * this.x + this.y * this.y);
        this.normalize();
        this.x *= length;
        this.y *= length;
        return this;
      };
      Point.prototype.normalize = function () {
        var length = this.length();
        this.x /= length;
        this.y /= length;
        return this;
      };
      return Point;
    })();

    /*
     * Particle class
     */
    var Particle = (function () {
      function Particle() {
        this.position = new Point();
        this.velocity = new Point();
        this.acceleration = new Point();
        this.age = 0;
      }
      Particle.prototype.initialize = function (x, y, dx, dy) {
        this.position.x = x;
        this.position.y = y;
        this.velocity.x = dx;
        this.velocity.y = dy;
        this.acceleration.x = dx * settings.particles.effect;
        this.acceleration.y = dy * settings.particles.effect;
        this.age = 0;
      };
      Particle.prototype.update = function (deltaTime) {
        this.position.x += this.velocity.x * deltaTime;
        this.position.y += this.velocity.y * deltaTime;
        this.velocity.x += this.acceleration.x * deltaTime;
        this.velocity.y += this.acceleration.y * deltaTime;
        this.age += deltaTime;
      };
      Particle.prototype.draw = function (context, image) {
        function ease(t) {
          return --t * t * t + 1;
        }
        var size = image.width * ease(this.age / settings.particles.duration);
        context.globalAlpha = 1 - this.age / settings.particles.duration;
        context.drawImage(
          image,
          this.position.x - size / 2,
          this.position.y - size / 2,
          size,
          size
        );
      };
      return Particle;
    })();

    /*
     * ParticlePool class
     */
    var ParticlePool = (function () {
      var particles,
        firstActive = 0,
        firstFree = 0,
        duration = settings.particles.duration;

      function ParticlePool(length) {
        // create and populate particle pool
        particles = new Array(length);
        for (var i = 0; i < particles.length; i++)
          particles[i] = new Particle();
      }
      ParticlePool.prototype.add = function (x, y, dx, dy) {
        particles[firstFree].initialize(x, y, dx, dy);

        // handle circular queue
        firstFree++;
        if (firstFree == particles.length) firstFree = 0;
        if (firstActive == firstFree) firstActive++;
        if (firstActive == particles.length) firstActive = 0;
      };
      ParticlePool.prototype.update = function (deltaTime) {
        var i;

        // update active particles
        if (firstActive < firstFree) {
          for (i = firstActive; i < firstFree; i++)
            particles[i].update(deltaTime);
        }
        if (firstFree < firstActive) {
          for (i = firstActive; i < particles.length; i++)
            particles[i].update(deltaTime);
          for (i = 0; i < firstFree; i++) particles[i].update(deltaTime);
        }

        // remove inactive particles
        while (
          particles[firstActive].age >= duration &&
          firstActive != firstFree
        ) {
          firstActive++;
          if (firstActive == particles.length) firstActive = 0;
        }
      };
      ParticlePool.prototype.draw = function (context, image) {
        // draw active particles
        if (firstActive < firstFree) {
          for (i = firstActive; i < firstFree; i++)
            particles[i].draw(context, image);
        }
        if (firstFree < firstActive) {
          for (i = firstActive; i < particles.length; i++)
            particles[i].draw(context, image);
          for (i = 0; i < firstFree; i++) particles[i].draw(context, image);
        }
      };
      return ParticlePool;
    })();

    /*
     * Putting it all together
     */
    (function (canvas) {
      var context = canvas.getContext("2d"),
        particles = new ParticlePool(settings.particles.length),
        particleRate =
          settings.particles.length / settings.particles.duration, // particles/sec
        time;

      // get point on heart with -PI <= t <= PI
      function pointOnHeart(t) {
        return new Point(
          160 * Math.pow(Math.sin(t), 3),
          130 * Math.cos(t) -
            50 * Math.cos(2 * t) -
            20 * Math.cos(3 * t) -
            10 * Math.cos(4 * t) +
            25
        );
      }

      // creating the particle image using a dummy canvas
      var image = (function () {
        var canvas = document.createElement("canvas"),
          context = canvas.getContext("2d");
        canvas.width = settings.particles.size;
        canvas.height = settings.particles.size;
        // helper function to create the path
        function to(t) {
          var point = pointOnHeart(t);
          point.x =
            settings.particles.size / 2 +
            (point.x * settings.particles.size) / 350;
          point.y =
            settings.particles.size / 2 -
            (point.y * settings.particles.size) / 350;
          return point;
        }
        // create the path
        context.beginPath();
        var t = -Math.PI;
        var point = to(t);
        context.moveTo(point.x, point.y);
        while (t < Math.PI) {
          t += 0.01; // baby steps!
          point = to(t);
          context.lineTo(point.x, point.y);
        }
        context.closePath();
        // create the fill
        context.fillStyle = "#ea80b0";
        context.fill();
        // create the image
        var image = new Image();
        image.src = canvas.toDataURL();
        return image;
      })();

      // render that thing!
      function render() {
        // next animation frame
        requestAnimationFrame(render);

        // update time
        var newTime = new Date().getTime() / 1000,
          deltaTime = newTime - (time || newTime);
        time = newTime;

        // clear canvas
        context.clearRect(0, 0, canvas.width, canvas.height);

        // create new particles
        var amount = particleRate * deltaTime;
        for (var i = 0; i < amount; i++) {
          var pos = pointOnHeart(Math.PI - 2 * Math.PI * Math.random());
          var dir = pos.clone().length(settings.particles.velocity);
          particles.add(
            canvas.width / 2 + pos.x,
            canvas.height / 2 - pos.y,
            dir.x,
            -dir.y
          );
        }

        // update and draw particles
        particles.update(deltaTime);
        particles.draw(context, image);
      }

      // handle (re-)sizing of the canvas
      function onResize() {
        canvas.width = canvas.clientWidth;
        canvas.height = canvas.clientHeight;
      }
      window.onresize = onResize;

      // delay rendering bootstrap
      setTimeout(function () {
        onResize();
        render();
      }, 10);
    })(document.getElementById("pinkboard"));
  </script>

  <script>
    var RENDERER = {
      INIT_CHERRY_BLOSSOM_COUNT: 30,
      MAX_ADDING_INTERVAL: 10,

      init: function () {
        this.setParameters();
        this.reconstructMethods();
        this.createCherries();
        this.render();
        if (
          navigator.userAgent.match(
            /(phone|pod|iPhone|iPod|ios|Android|Mobile|BlackBerry|IEMobile|MQQBrowser|JUC|Fennec|wOSBrowser|BrowserNG|WebOS|Symbian|Windows Phone)/i
          )
        ) {
          // var box = document.querySelectorAll(".box")[0];
          // console.log(box, "移动端");
          // box.style.marginTop = "65%";
        }
      },
      setParameters: function () {
        this.$container = $("#jsi-cherry-container");
        this.width = this.$container.width();
        this.height = this.$container.height();
        this.context = $("<canvas />")
          .attr({ width: this.width, height: this.height })
          .appendTo(this.$container)
          .get(0)
        var rate = this.FOCUS_POSITION / (this.z + this.FOCUS_POSITION),
          x = this.renderer.width / 2 + this.x * rate,
          y = this.renderer.height / 2 - this.y * rate;
        return { rate: rate, x: x, y: y };
      },
      re
          }
        } else {
          this.phi += Math.PI / (axis.y == this.thresholdY ? 200 : 500);
          this.phi %= Math.PI;
        }
        if (this.y <= -this.renderer.height * this.SURFACE_RATE) {
          this.x += 2;
          this.y = -this.renderer.height * this.SURFACE_RATE;
        } else {
          this.x += this.vx;
          this.y += this.vy;
        }
        return (
          this.z > -this.FOCUS_POSITION &&
          this.z < this.FAR_LIMIT &&
          this.x < this.renderer.width * 1.5
        );
      },
    };
    $(function () {
      RENDERER.init();
    });
  </script>
实现效果如下:
自己兴趣所做,有问题可以评论提出虚心请教!感谢喜欢!
加字比如:
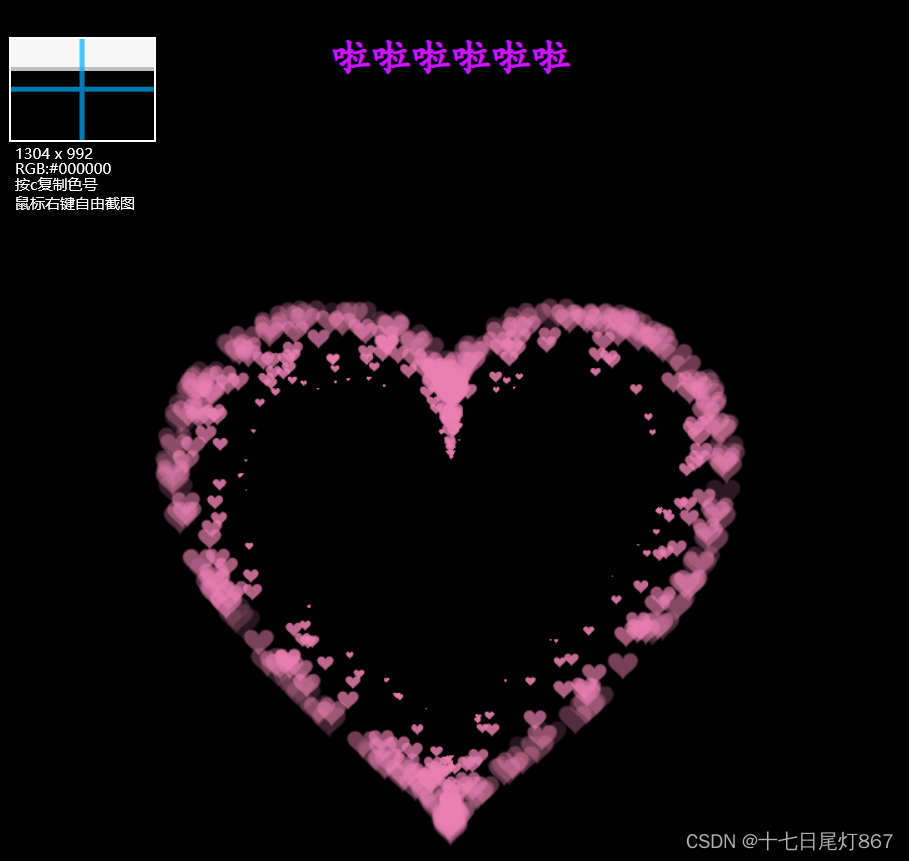
有想加特定字的再和我联系啦啦啦啦
我想将html转换为纯文本。不过,我不想只删除标签,我想智能地保留尽可能多的格式。为插入换行符标签,检测段落并格式化它们等。输入非常简单,通常是格式良好的html(不是整个文档,只是一堆内容,通常没有anchor或图像)。我可以将几个正则表达式放在一起,让我达到80%,但我认为可能有一些现有的解决方案更智能。 最佳答案 首先,不要尝试为此使用正则表达式。很有可能你会想出一个脆弱/脆弱的解决方案,它会随着HTML的变化而崩溃,或者很难管理和维护。您可以使用Nokogiri快速解析HTML并提取文本:require'nokogiri'h
如何在buildr项目中使用Ruby?我在很多不同的项目中使用过Ruby、JRuby、Java和Clojure。我目前正在使用我的标准Ruby开发一个模拟应用程序,我想尝试使用Clojure后端(我确实喜欢功能代码)以及JRubygui和测试套件。我还可以看到在未来的不同项目中使用Scala作为后端。我想我要为我的项目尝试一下buildr(http://buildr.apache.org/),但我注意到buildr似乎没有设置为在项目中使用JRuby代码本身!这看起来有点傻,因为该工具旨在统一通用的JVM语言并且是在ruby中构建的。除了将输出的jar包含在一个独特的、仅限ruby
在rails源中:https://github.com/rails/rails/blob/master/activesupport/lib/active_support/lazy_load_hooks.rb可以看到以下内容@load_hooks=Hash.new{|h,k|h[k]=[]}在IRB中,它只是初始化一个空哈希。和做有什么区别@load_hooks=Hash.new 最佳答案 查看rubydocumentationforHashnew→new_hashclicktotogglesourcenew(obj)→new_has
在我的Controller中,我通过以下方式在我的index方法中支持HTML和JSON:respond_todo|format|format.htmlformat.json{renderjson:@user}end在浏览器中拉起它时,它会自然地以HTML呈现。但是,当我对/user资源进行内容类型为application/json的curl调用时(因为它是索引方法),我仍然将HTML作为响应。如何获取JSON作为响应?我还需要说明什么? 最佳答案 您应该将.json附加到请求的url,提供的格式在routes.rb的路径中定义。这
所以我在关注Railscast,我注意到在html.erb文件中,ruby代码有一个微弱的背景高亮效果,以区别于其他代码HTML文档。我知道Ryan使用TextMate。我正在使用SublimeText3。我怎样才能达到同样的效果?谢谢! 最佳答案 为SublimeText安装ERB包。假设您安装了SublimeText包管理器*,只需点击cmd+shift+P即可获得命令菜单,然后键入installpackage并选择PackageControl:InstallPackage获取包管理器菜单。在该菜单中,键入ERB并在看到包时选择
这可能是个愚蠢的问题。但是,我是一个新手......你怎么能在交互式rubyshell中有多行代码?好像你只能有一条长线。按回车键运行代码。无论如何我可以在不运行代码的情况下跳到下一行吗?再次抱歉,如果这是一个愚蠢的问题。谢谢。 最佳答案 这是一个例子:2.1.2:053>a=1=>12.1.2:054>b=2=>22.1.2:055>a+b=>32.1.2:056>ifa>b#Thecode‘if..."startsthedefinitionoftheconditionalstatement.2.1.2:057?>puts"f
我的主要目标是能够完全理解我正在使用的库/gem。我尝试在Github上从头到尾阅读源代码,但这真的很难。我认为更有趣、更温和的踏脚石就是在使用时阅读每个库/gem方法的源代码。例如,我想知道RubyonRails中的redirect_to方法是如何工作的:如何查找redirect_to方法的源代码?我知道在pry中我可以执行类似show-methodmethod的操作,但我如何才能对Rails框架中的方法执行此操作?您对我如何更好地理解Gem及其API有什么建议吗?仅仅阅读源代码似乎真的很难,尤其是对于框架。谢谢! 最佳答案 Ru
我的假设是moduleAmoduleBendend和moduleA::Bend是一样的。我能够从thisblog找到解决方案,thisSOthread和andthisSOthread.为什么以及什么时候应该更喜欢紧凑语法A::B而不是另一个,因为它显然有一个缺点?我有一种直觉,它可能与性能有关,因为在更多命名空间中查找常量需要更多计算。但是我无法通过对普通类进行基准测试来验证这一点。 最佳答案 这两种写作方法经常被混淆。首先要说的是,据我所知,没有可衡量的性能差异。(在下面的书面示例中不断查找)最明显的区别,可能也是最著名的,是你的
几个月前,我读了一篇关于rubygem的博客文章,它可以通过阅读代码本身来确定编程语言。对于我的生活,我不记得博客或gem的名称。谷歌搜索“ruby编程语言猜测”及其变体也无济于事。有人碰巧知道相关gem的名称吗? 最佳答案 是这个吗:http://github.com/chrislo/sourceclassifier/tree/master 关于ruby-寻找通过阅读代码确定编程语言的rubygem?,我们在StackOverflow上找到一个类似的问题:
我正在使用Rails构建一个简单的聊天应用程序。当用户输入url时,我希望将其输出为html链接(即“url”)。我想知道在Ruby中是否有任何库或众所周知的方法可以做到这一点。如果没有,我有一些不错的正则表达式示例代码可以使用... 最佳答案 查看auto_linkRails提供的辅助方法。这会将所有URL和电子邮件地址变成可点击的链接(htmlanchor标记)。这是文档中的代码示例。auto_link("Gotohttp://www.rubyonrails.organdsayhellotodavid@loudthinking.