目录
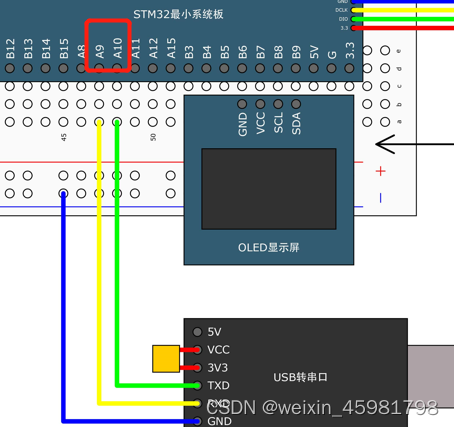

要交叉连接,所以RX接TX
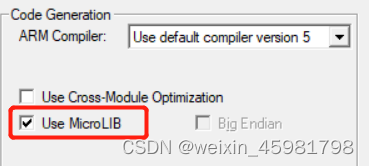
使用printf之前,先打开工程选项
再serial.c中,添加#include <stdio.h>,再在文件中重写fputc函数
int fputc(int ch, FILE *f)
{
	Serial_SendByte(ch);
	return ch;
}
fputc是printf函数的底层,printf在打印的时候,就是不断调用fputc函数一个个打印的,现在把fputc函数重定向到了串口,则printf自然就输出到串口
在serial.h文件中要包含头文件
#include <stdio.h>
这种方法printf只能有一个,若重定向到串口1了,则串口2不能使用
若多个串口都想用printf,则使用sprintf,sprintf可以把格式化字符输出到一个字符串中
#include "stm32f10x.h"                  // Device header
#include <stdio.h>
#include <stdarg.h>

void Serial_Init(void)
{
	RCC_APB2PeriphClockCmd(RCC_APB2Periph_USART1, ENABLE);
	RCC_APB2PeriphClockCmd(RCC_APB2Periph_GPIOA, ENABLE);


	GPIO_InitTypeDef GPIO_InitStructure;
	//TX引脚是USART外设控制的输出引脚,所以要选复用推挽输出
	//RX引脚是USART外设数据输入脚,所以要选择输入模式
	//一根线只能有一个输出,可以有多个输入,故输入脚,外设和GPIO都可以用
	//一般RX配置是浮空输入或者上拉输入,因为串口波形空闲状态是高电平,故不选择下拉输入
	GPIO_InitStructure.GPIO_Mode = GPIO_Mode_AF_PP;//复用推挽输出,数据只需要数据发送
	GPIO_InitStructure.GPIO_Pin = GPIO_Pin_9;
	GPIO_InitStructure.GPIO_Speed = GPIO_Speed_50MHz;
	GPIO_Init(GPIOA, &GPIO_InitStructure);

	USART_InitTypeDef USART_InitStructure;
	USART_InitStructure.USART_BaudRate = 9600;//9600波特率
	USART_InitStructure.USART_HardwareFlowControl = USART_HardwareFlowControl_None;//硬件流控制
	USART_InitStructure.USART_Mode = USART_Mode_Tx;
	USART_InitStructure.USART_Parity = USART_Parity_No;//无校验
	USART_InitStructure.USART_StopBits = USART_StopBits_1;//1位停止位
	USART_InitStructure.USART_WordLength = USART_WordLength_8b;//8位字长
	USART_Init(USART1, &USART_InitStructure);

	USART_Cmd(USART1, ENABLE);
}

void Serial_SendByte(uint8_t Byte)
{
	USART_SendData(USART1, Byte);//发送数据
	while (USART_GetFlagStatus(USART1, USART_FLAG_TXE) == RESET);
}

void Serial_SendArray(uint8_t *Array, uint16_t Length)
{
	uint16_t i;
	for (i = 0; i < Length; i ++)
	{
		Serial_SendByte(Array[i]);
	}
}

void Serial_SendString(char *String)
{
	uint8_t i;
	for (i = 0; String[i] != '\0'; i ++)
	{
		Serial_SendByte(String[i]);
	}
}

uint32_t Serial_Pow(uint32_t X, uint32_t Y)
{
	uint32_t Result = 1;
	while (Y --)
	{
		Result *= X;
	}
	return Result;
}

//传输12345,相当于12345/10000%10=1,12345/1000%10=2
void Serial_SendNumber(uint32_t Number, uint8_t Length)
{
	uint8_t i;
	for (i = 0; i < Length; i ++)
	{
		Serial_SendByte(Number / Serial_Pow(10, Length - i - 1) % 10 + '0');
	}
}

int fputc(int ch, FILE *f)
{
	Serial_SendByte(ch);//改发送给串口
	return ch;
}

//用来接收后面的可变参数列表
void Serial_Printf(char *format, ...)
{
	char String[100];
	va_list arg;
	va_start(arg, format);
	vsprintf(String, format, arg);
	va_end(arg);
	Serial_SendString(String);
}
#include "stm32f10x.h"                  // Device header
#include "Delay.h"
#include "OLED.h"
#include "Serial.h"

int main(void)
{
	OLED_Init();

	Serial_Init();

	Serial_SendByte(0x41);//发送字节

	uint8_t MyArray[] = {0x42, 0x43, 0x44, 0x45};
	Serial_SendArray(MyArray, 4);//发送数组

	Serial_SendString("\r\nNum1=");//发送字符串

	Serial_SendNumber(111, 3);//发送n位数字

	printf("\r\nNum2=%d", 222);

	char String[100];
	sprintf(String, "\r\nNum3=%d", 333);
	Serial_SendString(String);

	Serial_Printf("\r\nNum4=%d", 444);
	Serial_Printf("\r\n");

	while (1)
	{

	}
}
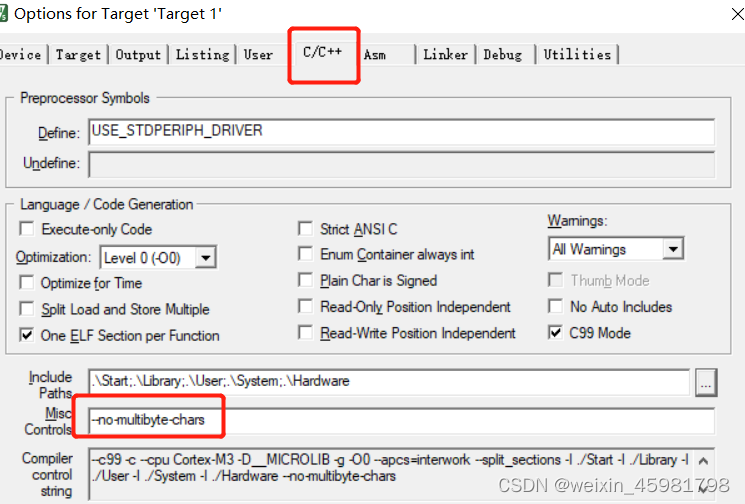
--no-multibyte-chars
Serial_Printf("你好,世界");便可以在显示屏中显示汉字
查询流程:在主函数里不断判断那RXNE标志位,如果置1,说明接收到数据了
再调用ReceiveData读取DR寄存器的值即可
	while(1)
	{
		if (USART_GetFlagStatus(USART1,USART_FLAG_RXNE) == RET )
		{
            //DR完成读操作后会自动清零,故需要手动清0
			RxData = USART_ReceiveData(USART1);
			OLED_ShowHexNum(1 , 1 , RxData , 2);
		}
	}
在串口调试助手中,发送AF,就会在单片机的显示屏上显示AF
     uint8_t Serial_RxData;
     uint8_t Serial_RxFlag;

    在初始化的函数中:
	//写入中断的代码
	USART_ITConfig(USART1, USART_IT_RXNE, ENABLE);//开启RXNE标志位到中断的输出

	//以下是配置NVIC
	NVIC_PriorityGroupConfig(NVIC_PriorityGroup_2);//先分组

	NVIC_InitTypeDef NVIC_InitStructure;
	NVIC_InitStructure.NVIC_IRQChannel = USART1_IRQn;
	NVIC_InitStructure.NVIC_IRQChannelCmd = ENABLE;
	NVIC_InitStructure.NVIC_IRQChannelPreemptionPriority = 1;
	NVIC_InitStructure.NVIC_IRQChannelSubPriority = 1;
	NVIC_Init(&NVIC_InitStructure);

	USART_Cmd(USART1, ENABLE);//使能


uint8_t Serial_GetRxFlag(void)//读后自动清除的功能
{
	if (Serial_RxFlag == 1)
	{
		Serial_RxFlag = 0;
		return 1;
	}
	return 0;
}


uint8_t Serial_GetRxData(void)
{
	return Serial_RxData;
}

void USART1_IRQHandler(void)
{
	if (USART_GetITStatus(USART1, USART_IT_RXNE) == SET)//判断标志位
	{
		//在中断中对数据进行转存
		Serial_RxData = USART_ReceiveData(USART1);//先读取模块的变量里
		Serial_RxFlag = 1;
		//如果读取DR,就自动清除,如果没有读取DR,就要手动清除
		USART_ClearITPendingBit(USART1, USART_IT_RXNE);//清除标志位
	}
} while (1)
{
if (Serial_GetRxFlag() == 1)
{
RxData = Serial_GetRxData();
Serial_SendByte(RxData);//把接收到的数据回传给电脑
OLED_ShowHexNum(1, 8, RxData, 2);//显示在显示屏上
}
}
当RXNE=1时,也就是电脑串口小助手有数据传递给开发板时,进入中断
获取电脑上的数据,并手动清零,将获取到的数据用函数封装起来
在主函数中调用函数,将获取到的值显示在电脑上和显示屏中
#include "stm32f10x.h" // Device header
#include <stdio.h>
#include <stdarg.h>
uint8_t Serial_RxData;
uint8_t Serial_RxFlag;
void Serial_Init(void)
{
RCC_APB2PeriphClockCmd(RCC_APB2Periph_USART1, ENABLE);
RCC_APB2PeriphClockCmd(RCC_APB2Periph_GPIOA, ENABLE);
GPIO_InitTypeDef GPIO_InitStructure;
GPIO_InitStructure.GPIO_Mode = GPIO_Mode_AF_PP;//复用推挽输出
GPIO_InitStructure.GPIO_Pin = GPIO_Pin_9;
GPIO_InitStructure.GPIO_Speed = GPIO_Speed_50MHz;
GPIO_Init(GPIOA, &GPIO_InitStructure);
GPIO_InitStructure.GPIO_Mode = GPIO_Mode_IPU;//上拉输入模式
GPIO_InitStructure.GPIO_Pin = GPIO_Pin_10;
GPIO_InitStructure.GPIO_Speed = GPIO_Speed_50MHz;
GPIO_Init(GPIOA, &GPIO_InitStructure);
USART_InitTypeDef USART_InitStructure;
USART_InitStructure.USART_BaudRate = 9600;
USART_InitStructure.USART_HardwareFlowControl = USART_HardwareFlowControl_None;
USART_InitStructure.USART_Mode = USART_Mode_Tx | USART_Mode_Rx;//接收+发送
USART_InitStructure.USART_Parity = USART_Parity_No;
USART_InitStructure.USART_StopBits = USART_StopBits_1;
USART_InitStructure.USART_WordLength = USART_WordLength_8b;
USART_Init(USART1, &USART_InitStructure);
//写入中断的代码
USART_ITConfig(USART1, USART_IT_RXNE, ENABLE);//开启RXNE标志位到中断的输出
//以下是配置NVIC
NVIC_PriorityGroupConfig(NVIC_PriorityGroup_2);//先分组
NVIC_InitTypeDef NVIC_InitStructure;
NVIC_InitStructure.NVIC_IRQChannel = USART1_IRQn;
NVIC_InitStructure.NVIC_IRQChannelCmd = ENABLE;
NVIC_InitStructure.NVIC_IRQChannelPreemptionPriority = 1;
NVIC_InitStructure.NVIC_IRQChannelSubPriority = 1;
NVIC_Init(&NVIC_InitStructure);
USART_Cmd(USART1, ENABLE);//使能
}
void Serial_SendByte(uint8_t Byte)
{
USART_SendData(USART1, Byte);
while (USART_GetFlagStatus(USART1, USART_FLAG_TXE) == RESET);
}
void Serial_SendArray(uint8_t *Array, uint16_t Length)
{
uint16_t i;
for (i = 0; i < Length; i ++)
{
Serial_SendByte(Array[i]);
}
}
void Serial_SendString(char *String)
{
uint8_t i;
for (i = 0; String[i] != '\0'; i ++)
{
Serial_SendByte(String[i]);
}
}
uint32_t Serial_Pow(uint32_t X, uint32_t Y)
{
uint32_t Result = 1;
while (Y --)
{
Result *= X;
}
return Result;
}
void Serial_SendNumber(uint32_t Number, uint8_t Length)
{
uint8_t i;
for (i = 0; i < Length; i ++)
{
Serial_SendByte(Number / Serial_Pow(10, Length - i - 1) % 10 + '0');
}
}
int fputc(int ch, FILE *f)
{
Serial_SendByte(ch);
return ch;
}
void Serial_Printf(char *format, ...)
{
char String[100];
va_list arg;
va_start(arg, format);
vsprintf(String, format, arg);
va_end(arg);
Serial_SendString(String);
}
uint8_t Serial_GetRxFlag(void)//读后自动清除的功能
{
if (Serial_RxFlag == 1)
{
Serial_RxFlag = 0;
return 1;
}
return 0;
}
uint8_t Serial_GetRxData(void)
{
return Serial_RxData;
}
void USART1_IRQHandler(void)
{
if (USART_GetITStatus(USART1, USART_IT_RXNE) == SET)//判断标志位
{
//在中断中对数据进行转存
Serial_RxData = USART_ReceiveData(USART1);//先读取模块的变量里
Serial_RxFlag = 1;
//如果读取DR,就自动清除,如果没有读取DR,就要手动清除
USART_ClearITPendingBit(USART1, USART_IT_RXNE);//清除标志位
}
}
#include "stm32f10x.h" // Device header
#include "Delay.h"
#include "OLED.h"
#include "Serial.h"
uint8_t RxData;
int main(void)
{
OLED_Init();
OLED_ShowString(1, 1, "RxData:");
Serial_Init();
	while (1)
	{
		if (Serial_GetRxFlag() == 1)
		{
			RxData = Serial_GetRxData();
			Serial_SendByte(RxData);//把接收到的数据回传给电脑
			OLED_ShowHexNum(1, 8, RxData, 2);//显示在显示屏上
		}
	}
}
我正在使用i18n从头开始构建一个多语言网络应用程序,虽然我自己可以处理一大堆yml文件,但我说的语言(非常)有限,最终我想寻求外部帮助帮助。我想知道这里是否有人在使用UI插件/gem(与django上的django-rosetta不同)来处理多个翻译器,其中一些翻译器不愿意或无法处理存储库中的100多个文件,处理语言数据。谢谢&问候,安德拉斯(如果您已经在rubyonrails-talk上遇到了这个问题,我们深表歉意) 最佳答案 有一个rails3branchofthetolkgem在github上。您可以通过在Gemfi
我正在尝试测试是否存在表单。我是Rails新手。我的new.html.erb_spec.rb文件的内容是:require'spec_helper'describe"messages/new.html.erb"doit"shouldrendertheform"dorender'/messages/new.html.erb'reponse.shouldhave_form_putting_to(@message)with_submit_buttonendendView本身,new.html.erb,有代码:当我运行rspec时,它失败了:1)messages/new.html.erbshou
我在从html页面生成PDF时遇到问题。我正在使用PDFkit。在安装它的过程中,我注意到我需要wkhtmltopdf。所以我也安装了它。我做了PDFkit的文档所说的一切......现在我在尝试加载PDF时遇到了这个错误。这里是错误:commandfailed:"/usr/local/bin/wkhtmltopdf""--margin-right""0.75in""--page-size""Letter""--margin-top""0.75in""--margin-bottom""0.75in""--encoding""UTF-8""--margin-left""0.75in""-
我在我的项目目录中完成了compasscreate.和compassinitrails。几个问题:我已将我的.sass文件放在public/stylesheets中。这是放置它们的正确位置吗?当我运行compasswatch时,它不会自动编译这些.sass文件。我必须手动指定文件:compasswatchpublic/stylesheets/myfile.sass等。如何让它自动运行?文件ie.css、print.css和screen.css已放在stylesheets/compiled。如何在编译后不让它们重新出现的情况下删除它们?我自己编译的.sass文件编译成compiled/t
我看到这个错误:translationmissing:da.datetime.distance_in_words.about_x_hours我的语言环境文件:http://pastie.org/2944890我的看法:我已将其添加到我的application.rb中:config.i18n.load_path+=Dir[Rails.root.join('my','locales','*.{rb,yml}').to_s]config.i18n.default_locale=:da如果我删除I18配置,帮助程序会处理英语。更新:我在config/enviorments/devolpment
我有一个对象has_many应呈现为xml的子对象。这不是问题。我的问题是我创建了一个Hash包含此数据,就像解析器需要它一样。但是rails自动将整个文件包含在.........我需要摆脱type="array"和我该如何处理?我没有在文档中找到任何内容。 最佳答案 我遇到了同样的问题;这是我的XML:我在用这个:entries.to_xml将散列数据转换为XML,但这会将条目的数据包装到中所以我修改了:entries.to_xml(root:"Contacts")但这仍然将转换后的XML包装在“联系人”中,将我的XML代码修改为
为了将Cucumber用于命令行脚本,我按照提供的说明安装了arubagem。它在我的Gemfile中,我可以验证是否安装了正确的版本并且我已经包含了require'aruba/cucumber'在'features/env.rb'中为了确保它能正常工作,我写了以下场景:@announceScenario:Testingcucumber/arubaGivenablankslateThentheoutputfrom"ls-la"shouldcontain"drw"假设事情应该失败。它确实失败了,但失败的原因是错误的:@announceScenario:Testingcucumber/ar
我在我的项目中添加了一个系统来重置用户密码并通过电子邮件将密码发送给他,以防他忘记密码。昨天它运行良好(当我实现它时)。当我今天尝试启动服务器时,出现以下错误。=>BootingWEBrick=>Rails3.2.1applicationstartingindevelopmentonhttp://0.0.0.0:3000=>Callwith-dtodetach=>Ctrl-CtoshutdownserverExiting/Users/vinayshenoy/.rvm/gems/ruby-1.9.3-p0/gems/actionmailer-3.2.1/lib/action_mailer
我的瘦服务器配置了nginx,我的ROR应用程序正在它们上运行。在我发布代码更新时运行thinrestart会给我的应用程序带来一些停机时间。我试图弄清楚如何优雅地重启正在运行的Thin实例,但找不到好的解决方案。有没有人能做到这一点? 最佳答案 #Restartjustthethinserverdescribedbythatconfigsudothin-C/etc/thin/mysite.ymlrestartNginx将继续运行并代理请求。如果您将Nginx设置为使用多个上游服务器,例如server{listen80;server
在MRIRuby中我可以这样做:deftransferinternal_server=self.init_serverpid=forkdointernal_server.runend#Maketheserverprocessrunindependently.Process.detach(pid)internal_client=self.init_client#Dootherstuffwithconnectingtointernal_server...internal_client.post('somedata')ensure#KillserverProcess.kill('KILL',