文章目录
系列文章:
Elasticsearch-05-Elasticsearch-sql组件史上最全详解
Elasticsearch-03-JavaApi以及springboot中操作-RestHighLevelClient
Elasticsearch-02-es的restapi使用
Elasticsearch-01-es概念及安装
ElasticSearch是一个基于Lucene的搜索服务器。它提供了一个分布式多用户能力的全文搜索引擎,基于RESTful web接口。Elasticsearch是用Java开发的,并作为Apache许可条款下的开放源码发布,是当前流行的企业级搜索引擎。 -----百度百科
而ElasticSearch-head就是一款能连接ElasticSearch搜索引擎,并提供可视化的操作页面对ElasticSearch搜索引擎进行各种设置和数据检索功能的管理插件,如在head插件页面编写RESTful接口风格的请求,就可以对ElasticSearch中的数据进行增删改查、创建或者删除索引等操作。类似于使用navicat工具连接MySQL这种关系型数据库,对数据库做操作。
简而言之:ElasticSearch-head就是一个针对es可视化操作的插件。
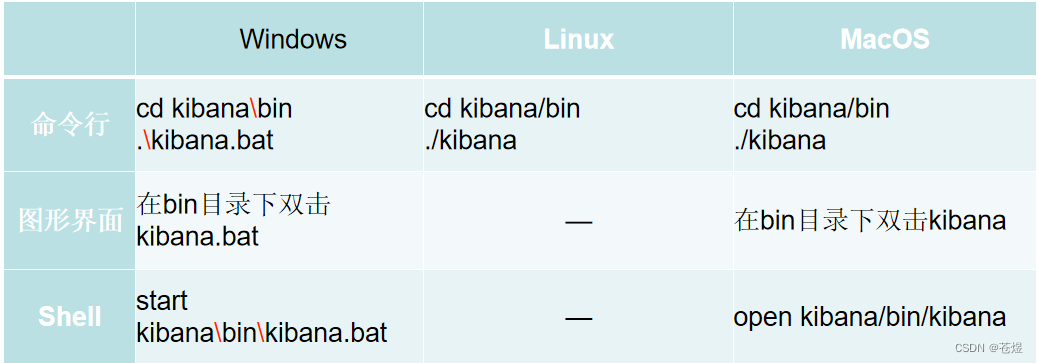
(1) 下载node:
① 下载地址:https://nodejs.org/en/download/
② 检查是否安装成功:Win+R CMD输入“node -v”命令检查,如果输出了版本号,则node安装成功。
(2) 安装grunt:
① CMD中执行“npm install -g grunt-cli”命令等待安装完成
② 输入:grunt -version命令检查是否安装成功
(1) 下载地址:https://github.com/mobz/elasticsearch-head
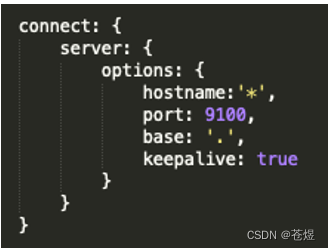
(2) 下载完成后,解压,打开elasticsearch-head-master文件夹,
修改Gruntfile.js文件,添加hostname:‘*’, 如图:
(3) 输入 cd elasticsearch-head
npm install
(4) 输入 npm run start 启动服务
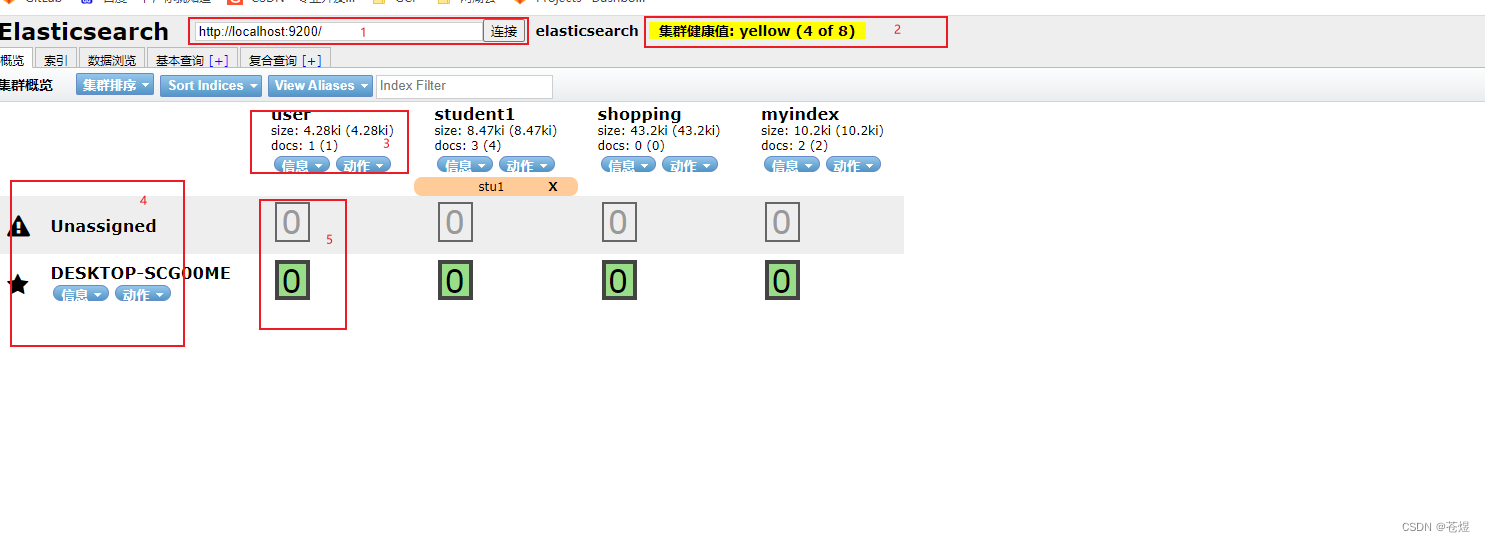
(5) 验证:http://localhost:9100/ 安装成功
(6) 如果无法发现ES节点,尝试在ES配置文件中设置允许跨域
http.cors.enabled: true
http.cors.allow-origin: “*”
安装完后,默认head插件的web端口为9100,ElasticSearch服务的端口为9200,使用浏览器访问head地址,如http://IP地址:9100/,
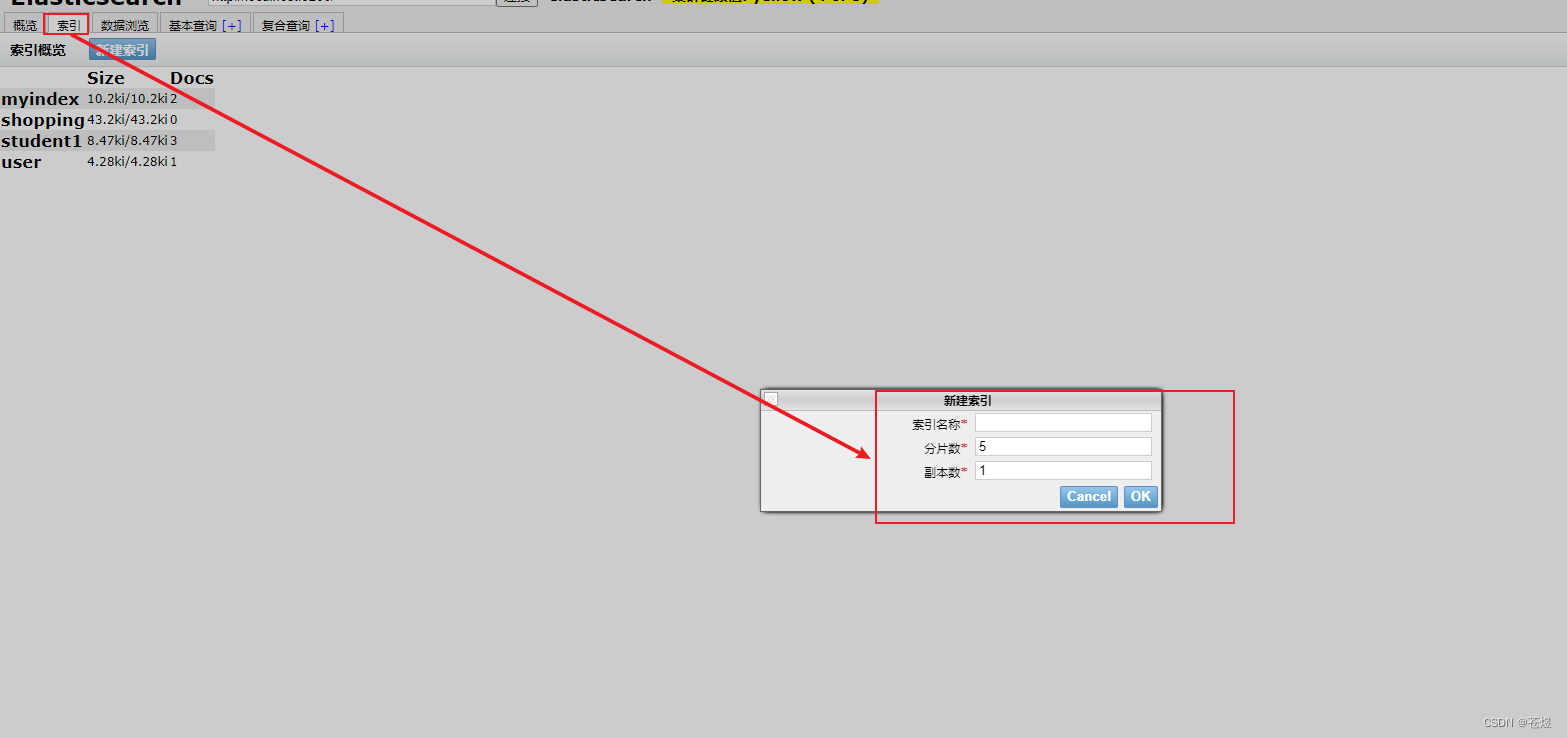
1:快速创建索引
2:聚合查询

注:这里的操作已经和restapi操作一模一样了,在此可以参看我的这篇文章Elasticsearch-02-es的restapi使用
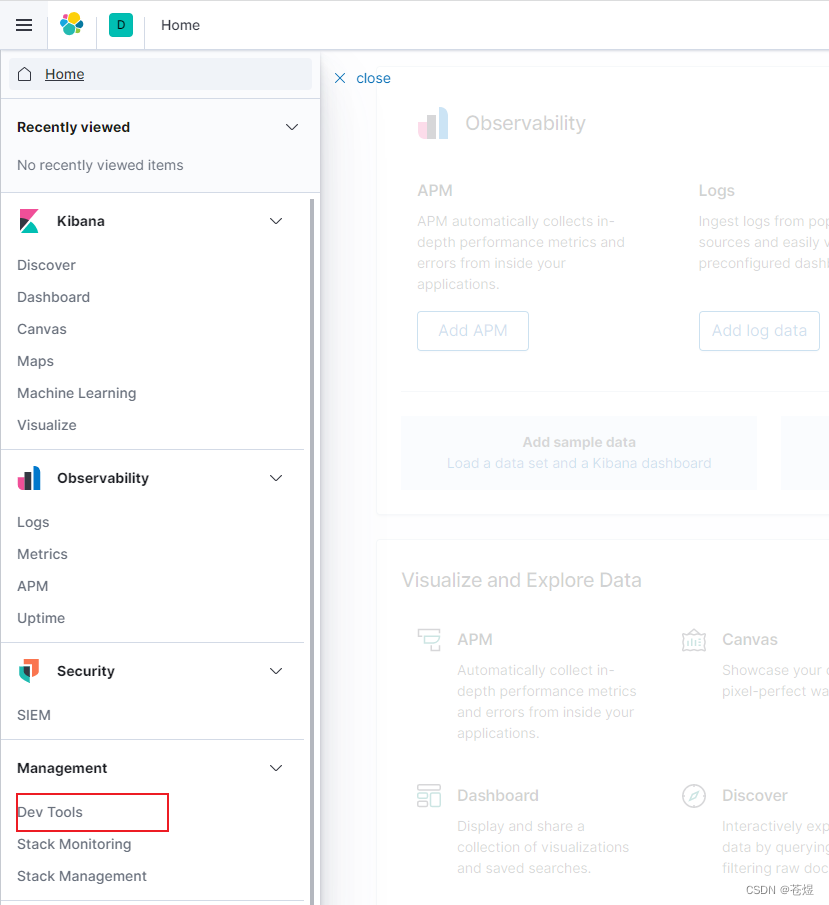
Kibana是一个针对Elasticsearch的开源分析及可视化平台,使用Kibana可以查询、查看并与存储在ES索引的数据进行交互操作,使用Kibana能执行高级的数据分析,并能以图表、表格和地图的形式查看数据。
下载地址:https://www.elastic.co/cn/downloads/kibana
1:解压
2:更改config/kibana.yml
# Kibana is served by a back end server. This setting specifies the port to use.
# 服务端口号
server.port: 5601

# Specifies the address to which the Kibana server will bind. IP addresses and host names are both valid values.
# The default is 'localhost', which usually means remote machines will not be able to connect.
# To allow connections from remote users, set this parameter to a non-loopback address.
# 允许访问的IP,如果允许任何IP访问此处输入0.0.0.0
server.host: "localhost"

# Enables you to specify a path to mount Kibana at if you are running behind a proxy.
# Use the `server.rewriteBasePath` setting to tell Kibana if it should remove the basePath
# from requests it receives, and to prevent a deprecation warning at startup.
# This setting cannot end in a slash.
#server.basePath: ""

# Specifies whether Kibana should rewrite requests that are prefixed with
# `server.basePath` or require that they are rewritten by your reverse proxy.
# This setting was effectively always `false` before Kibana 6.3 and will
# default to `true` starting in Kibana 7.0.
#server.rewriteBasePath: false

# The maximum payload size in bytes for incoming server requests.
#server.maxPayloadBytes: 1048576

# The Kibana server's name.  This is used for display purposes.
# 服务名称
server.name: "kibana"

# The URLs of the Elasticsearch instances to use for all your queries.
# ES服务地址
elasticsearch.hosts: ["http://localhost:9200"]

# When this setting's value is true Kibana uses the hostname specified in the server.host
# setting. When the value of this setting is false, Kibana uses the hostname of the host
# that connects to this Kibana instance.
#elasticsearch.preserveHost: true

# Kibana uses an index in Elasticsearch to store saved searches, visualizations and
# dashboards. Kibana creates a new index if the index doesn't already exist.
# 创建的索引
#kibana.index: ".kibana"

# The default application to load.
#kibana.defaultAppId: "home"

# If your Elasticsearch is protected with basic authentication, these settings provide
# the username and password that the Kibana server uses to perform maintenance on the Kibana
# index at startup. Your Kibana users still need to authenticate with Elasticsearch, which
# is proxied through the Kibana server.
# 登录ES使用的用户名和密码
#elasticsearch.username: "kibana"
#elasticsearch.password: "pass"

# Enables SSL and paths to the PEM-format SSL certificate and SSL key files, respectively.
# These settings enable SSL for outgoing requests from the Kibana server to the browser.
#server.ssl.enabled: false
#server.ssl.certificate: /path/to/your/server.crt
#server.ssl.key: /path/to/your/server.key

# Optional settings that provide the paths to the PEM-format SSL certificate and key files.
# These files are used to verify the identity of Kibana to Elasticsearch and are required when
# xpack.security.http.ssl.client_authentication in Elasticsearch is set to required.
#elasticsearch.ssl.certificate: /path/to/your/client.crt
#elasticsearch.ssl.key: /path/to/your/client.key

# Optional setting that enables you to specify a path to the PEM file for the certificate
# authority for your Elasticsearch instance.
#elasticsearch.ssl.certificateAuthorities: [ "/path/to/your/CA.pem" ]

# To disregard the validity of SSL certificates, change this setting's value to 'none'.
#elasticsearch.ssl.verificationMode: full

# Time in milliseconds to wait for Elasticsearch to respond to pings. Defaults to the value of
# the elasticsearch.requestTimeout setting.
#elasticsearch.pingTimeout: 1500

# Time in milliseconds to wait for responses from the back end or Elasticsearch. This value
# must be a positive integer.
#elasticsearch.requestTimeout: 30000

# List of Kibana client-side headers to send to Elasticsearch. To send *no* client-side
# headers, set this value to [] (an empty list).
#elasticsearch.requestHeadersWhitelist: [ authorization ]

# Header names and values that are sent to Elasticsearch. Any custom headers cannot be overwritten
# by client-side headers, regardless of the elasticsearch.requestHeadersWhitelist configuration.
#elasticsearch.customHeaders: {}

# Time in milliseconds for Elasticsearch to wait for responses from shards. Set to 0 to disable.
#elasticsearch.shardTimeout: 30000

# Time in milliseconds to wait for Elasticsearch at Kibana startup before retrying.
#elasticsearch.startupTimeout: 5000

# Logs queries sent to Elasticsearch. Requires logging.verbose set to true.
#elasticsearch.logQueries: false

# Specifies the path where Kibana creates the process ID file.
#pid.file: /var/run/kibana.pid

# Enables you specify a file where Kibana stores log output.
#logging.dest: stdout

# Set the value of this setting to true to suppress all logging output.
#logging.silent: false

# Set the value of this setting to true to suppress all logging output other than error messages.
#logging.quiet: false

# Set the value of this setting to true to log all events, including system usage information
# and all requests.
#logging.verbose: false

# Set the interval in milliseconds to sample system and process performance
# metrics. Minimum is 100ms. Defaults to 5000.
#ops.interval: 5000

# Specifies locale to be used for all localizable strings, dates and number formats.
# Supported languages are the following: English - en , by default , Chinese - zh-CN .
# 设置kibana为中文
i18n.locale: "zh-CN"
1:chown -R es:es kibana-7.6.1
2:su es
注:启动时间较长,请耐心等待
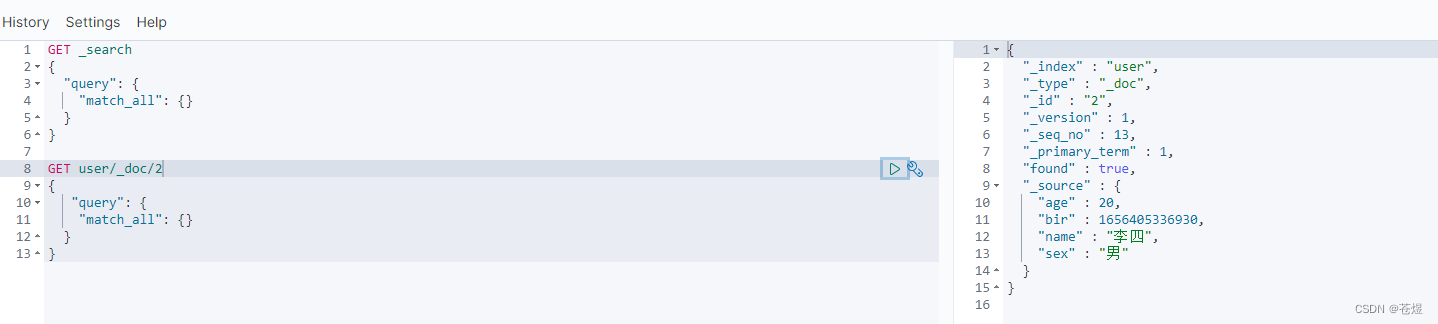
这里的操作和restapi是一样的,好处是有自动提示,具体更多操作可以参考我的另一篇文章:
Elasticsearch-02-es的restapi使用
需求:要创建虚拟机,就需要给他提供一个虚拟的磁盘,我们就在/opt目录下创建一个10G大小的raw格式的虚拟磁盘CentOS-7-x86_64.raw命令格式:qemu-imgcreate-f磁盘格式磁盘名称磁盘大小qemu-imgcreate-f磁盘格式-o?1.创建磁盘qemu-imgcreate-fraw/opt/CentOS-7-x86_64.raw10G执行效果#ls/opt/CentOS-7-x86_64.raw2.安装虚拟机使用virt-install命令,基于我们提供的系统镜像和虚拟磁盘来创建一个虚拟机,另外在创建虚拟机之前,提前打开vnc客户端,在创建虚拟机的时候,通过vnc
我试图在Ubuntu14.04中使用Curl安装RVM。我运行了以下命令:\curl-sSLhttps://get.rvm.io|bash-sstable出现如下错误:curl:(7)Failedtoconnecttoget.rvm.ioport80:Networkisunreachable非常感谢解决此问题的任何帮助。谢谢 最佳答案 在执行curl之前尝试这个:echoipv4>>~/.curlrc 关于ruby-在Ubuntu14.04中使用Curl安装RVM时出错,我们在Stack
不知何故,我似乎无法获得包含我的聚合的响应...使用curl它按预期工作:HBZUMB01$curl-XPOST"http://localhost:9200/contents/_search"-d'{"size":0,"aggs":{"sport_count":{"value_count":{"field":"dwid"}}}}'我收到回复:{"took":4,"timed_out":false,"_shards":{"total":5,"successful":5,"failed":0},"hits":{"total":90,"max_score":0.0,"hits":[]},"a
安装Rails时,一切都很好,但后来,我写道:rails-v和输出:/home/toshiba/.rvm/rubies/ruby-2.2.1/lib/ruby/site_ruby/2.2.0/rubygems/core_ext/kernel_require.rb:54:in`require':cannotloadsuchfile--rails/cli(LoadError)from/home/toshiba/.rvm/rubies/ruby-2.2.1/lib/ruby/site_ruby/2.2.0/rubygems/core_ext/kernel_require.rb:54:in`r
1.回顾.TransportServicepublicclassTransportServiceextendsAbstractLifecycleComponentTransportService:方法:1publicfinalTextendsTransportResponse>voidsendRequest(finalTransport.Connectionconnection,finalStringaction,finalTransportRequestrequest,finalTransportRequestOptionsoptions,TransportResponseHandlerT>
一、什么是MQTT协议MessageQueuingTelemetryTransport:消息队列遥测传输协议。是一种基于客户端-服务端的发布/订阅模式。与HTTP一样,基于TCP/IP协议之上的通讯协议,提供有序、无损、双向连接,由IBM(蓝色巨人)发布。原理:(1)MQTT协议身份和消息格式有三种身份:发布者(Publish)、代理(Broker)(服务器)、订阅者(Subscribe)。其中,消息的发布者和订阅者都是客户端,消息代理是服务器,消息发布者可以同时是订阅者。MQTT传输的消息分为:主题(Topic)和负载(payload)两部分Topic,可以理解为消息的类型,订阅者订阅(Su
TCL脚本语言简介•TCL(ToolCommandLanguage)是一种解释执行的脚本语言(ScriptingLanguage),它提供了通用的编程能力:支持变量、过程和控制结构;同时TCL还拥有一个功能强大的固有的核心命令集。TCL经常被用于快速原型开发,脚本编程,GUI和测试等方面。•实际上包含了两个部分:一个语言和一个库。首先,Tcl是一种简单的脚本语言,主要使用于发布命令给一些互交程序如文本编辑器、调试器和shell。由于TCL的解释器是用C\C++语言的过程库实现的,因此在某种意义上我们又可以把TCL看作C库,这个库中有丰富的用于扩展TCL命令的C\C++过程和函数,所以,Tcl是
提供3种Ubuntu系统安装微信的方法,在Ubuntu20.04上验证都ok。1.WineHQ7.0安装微信:ubuntu20.04安装最新版微信--可以支持微信最新版,但是适配的不是特别好;比如WeChartOCR.exe报错。2.原生微信安装:linux系统下的微信安装(ubuntu20.04)--微信适配的最好,反应最快,但是微信版本只到2.1.1,版本太老,很多功能都没有。3.深度deepin-wine6安装微信:ubuntu20.04+系统deepin-wine6安装新版微信--综合比较好,当前个人使用此种方法1个月,微信版本3.4;没什么大问题,尚可。一、WineHQ7.0安装微信
这个问题在这里已经有了答案:Unabletoinstallgem-Failedtobuildgemnativeextension-cannotloadsuchfile--mkmf(LoadError)(17个答案)关闭9年前。嘿,我正在尝试在一台新的ubuntu机器上安装rails。我安装了ruby和rvm,但出现“无法构建gemnative扩展”错误。这是什么意思?$sudogeminstallrails-v3.2.9(没有sudo表示我没有权限)然后它会输出很多“获取”命令,最终会出现这个错误:Buildingnativeextensions.Thiscouldtakeawhi
我有一个Rails应用程序,现在设置了ElasticSearch和Tiregem以在模型上进行搜索,我想知道我应该如何设置我的应用程序以对模型中的某些索引进行模糊字符串匹配。我将我的模型设置为索引标题、描述等内容,但我想对其中一些进行模糊字符串匹配,但我不确定在何处进行此操作。如果您想发表评论,我将在下面包含我的代码!谢谢!在Controller中:defsearch@resource=Resource.search(params[:q],:page=>(params[:page]||1),:per_page=>15,load:true)end在模型中:classResource'Us